Model Showcase
Do you have a project you have been working on and would like to showcase it here? Email Us
Click on any of the images below to open a full size copy. You can also use the + sign on the left to open a menu to jump to a specific entry. Thank you to all those that submitted models into our model showcase. Enjoy!
Chuck Diljak
HO Scale
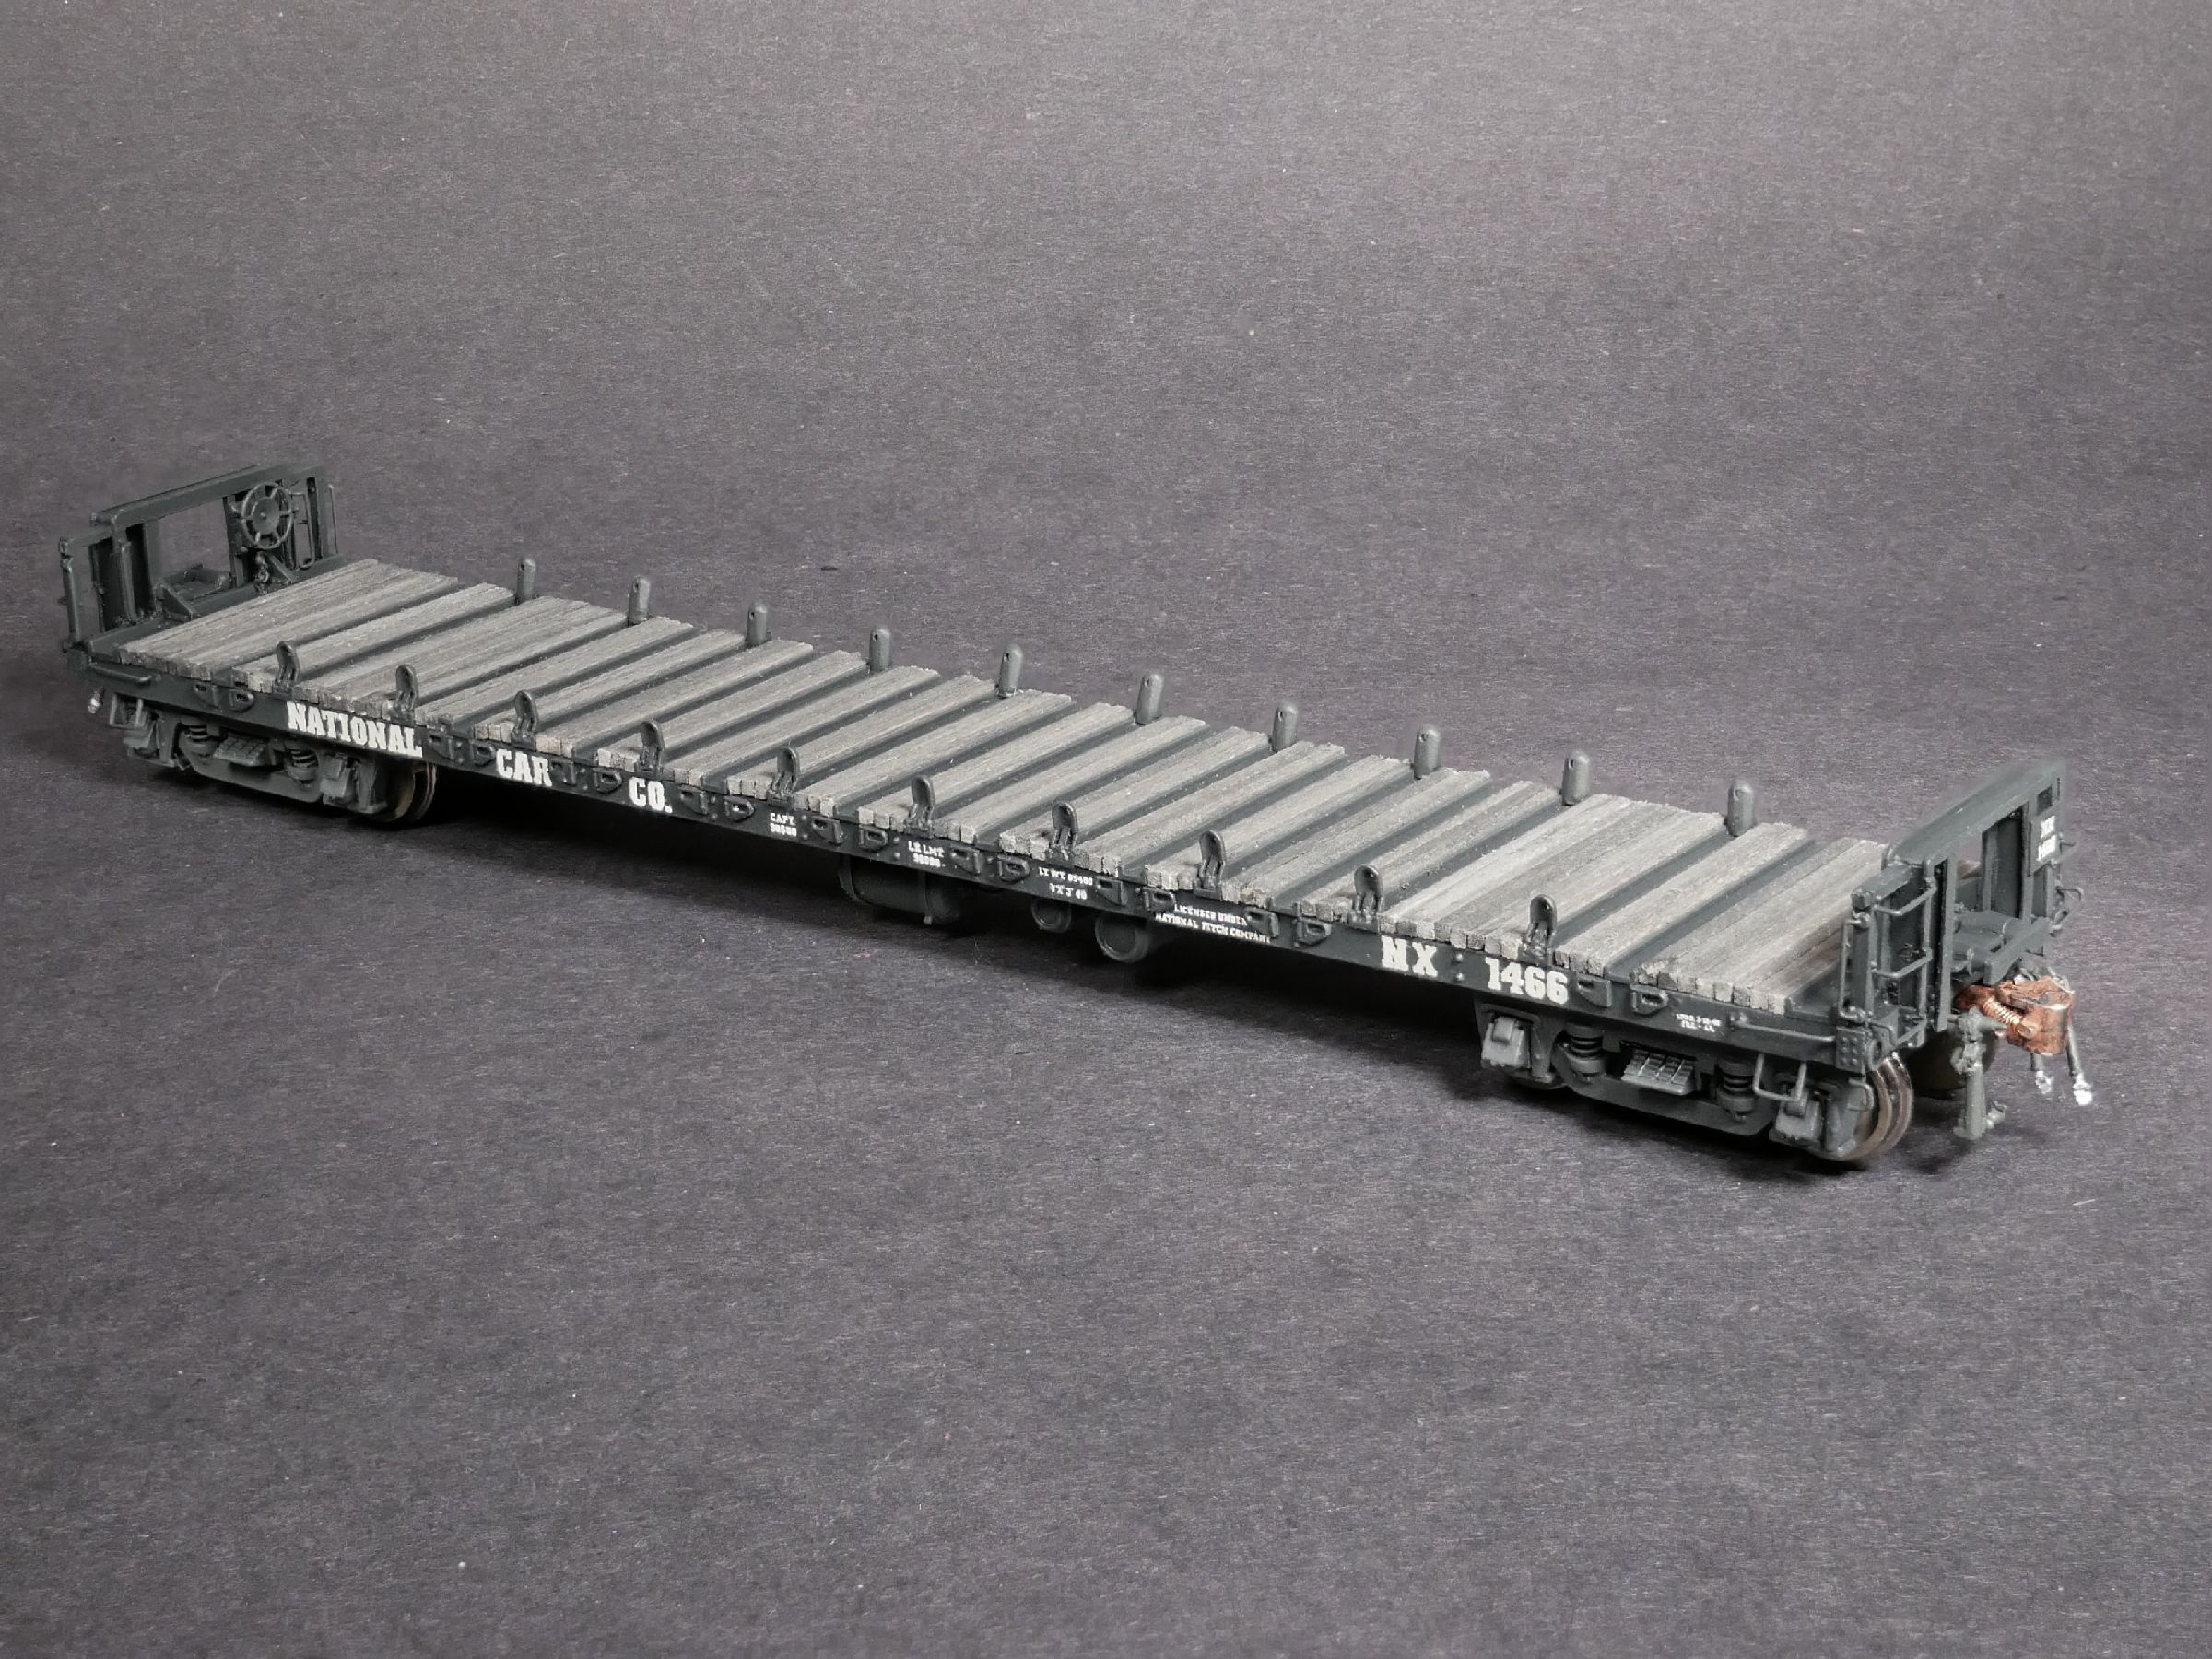
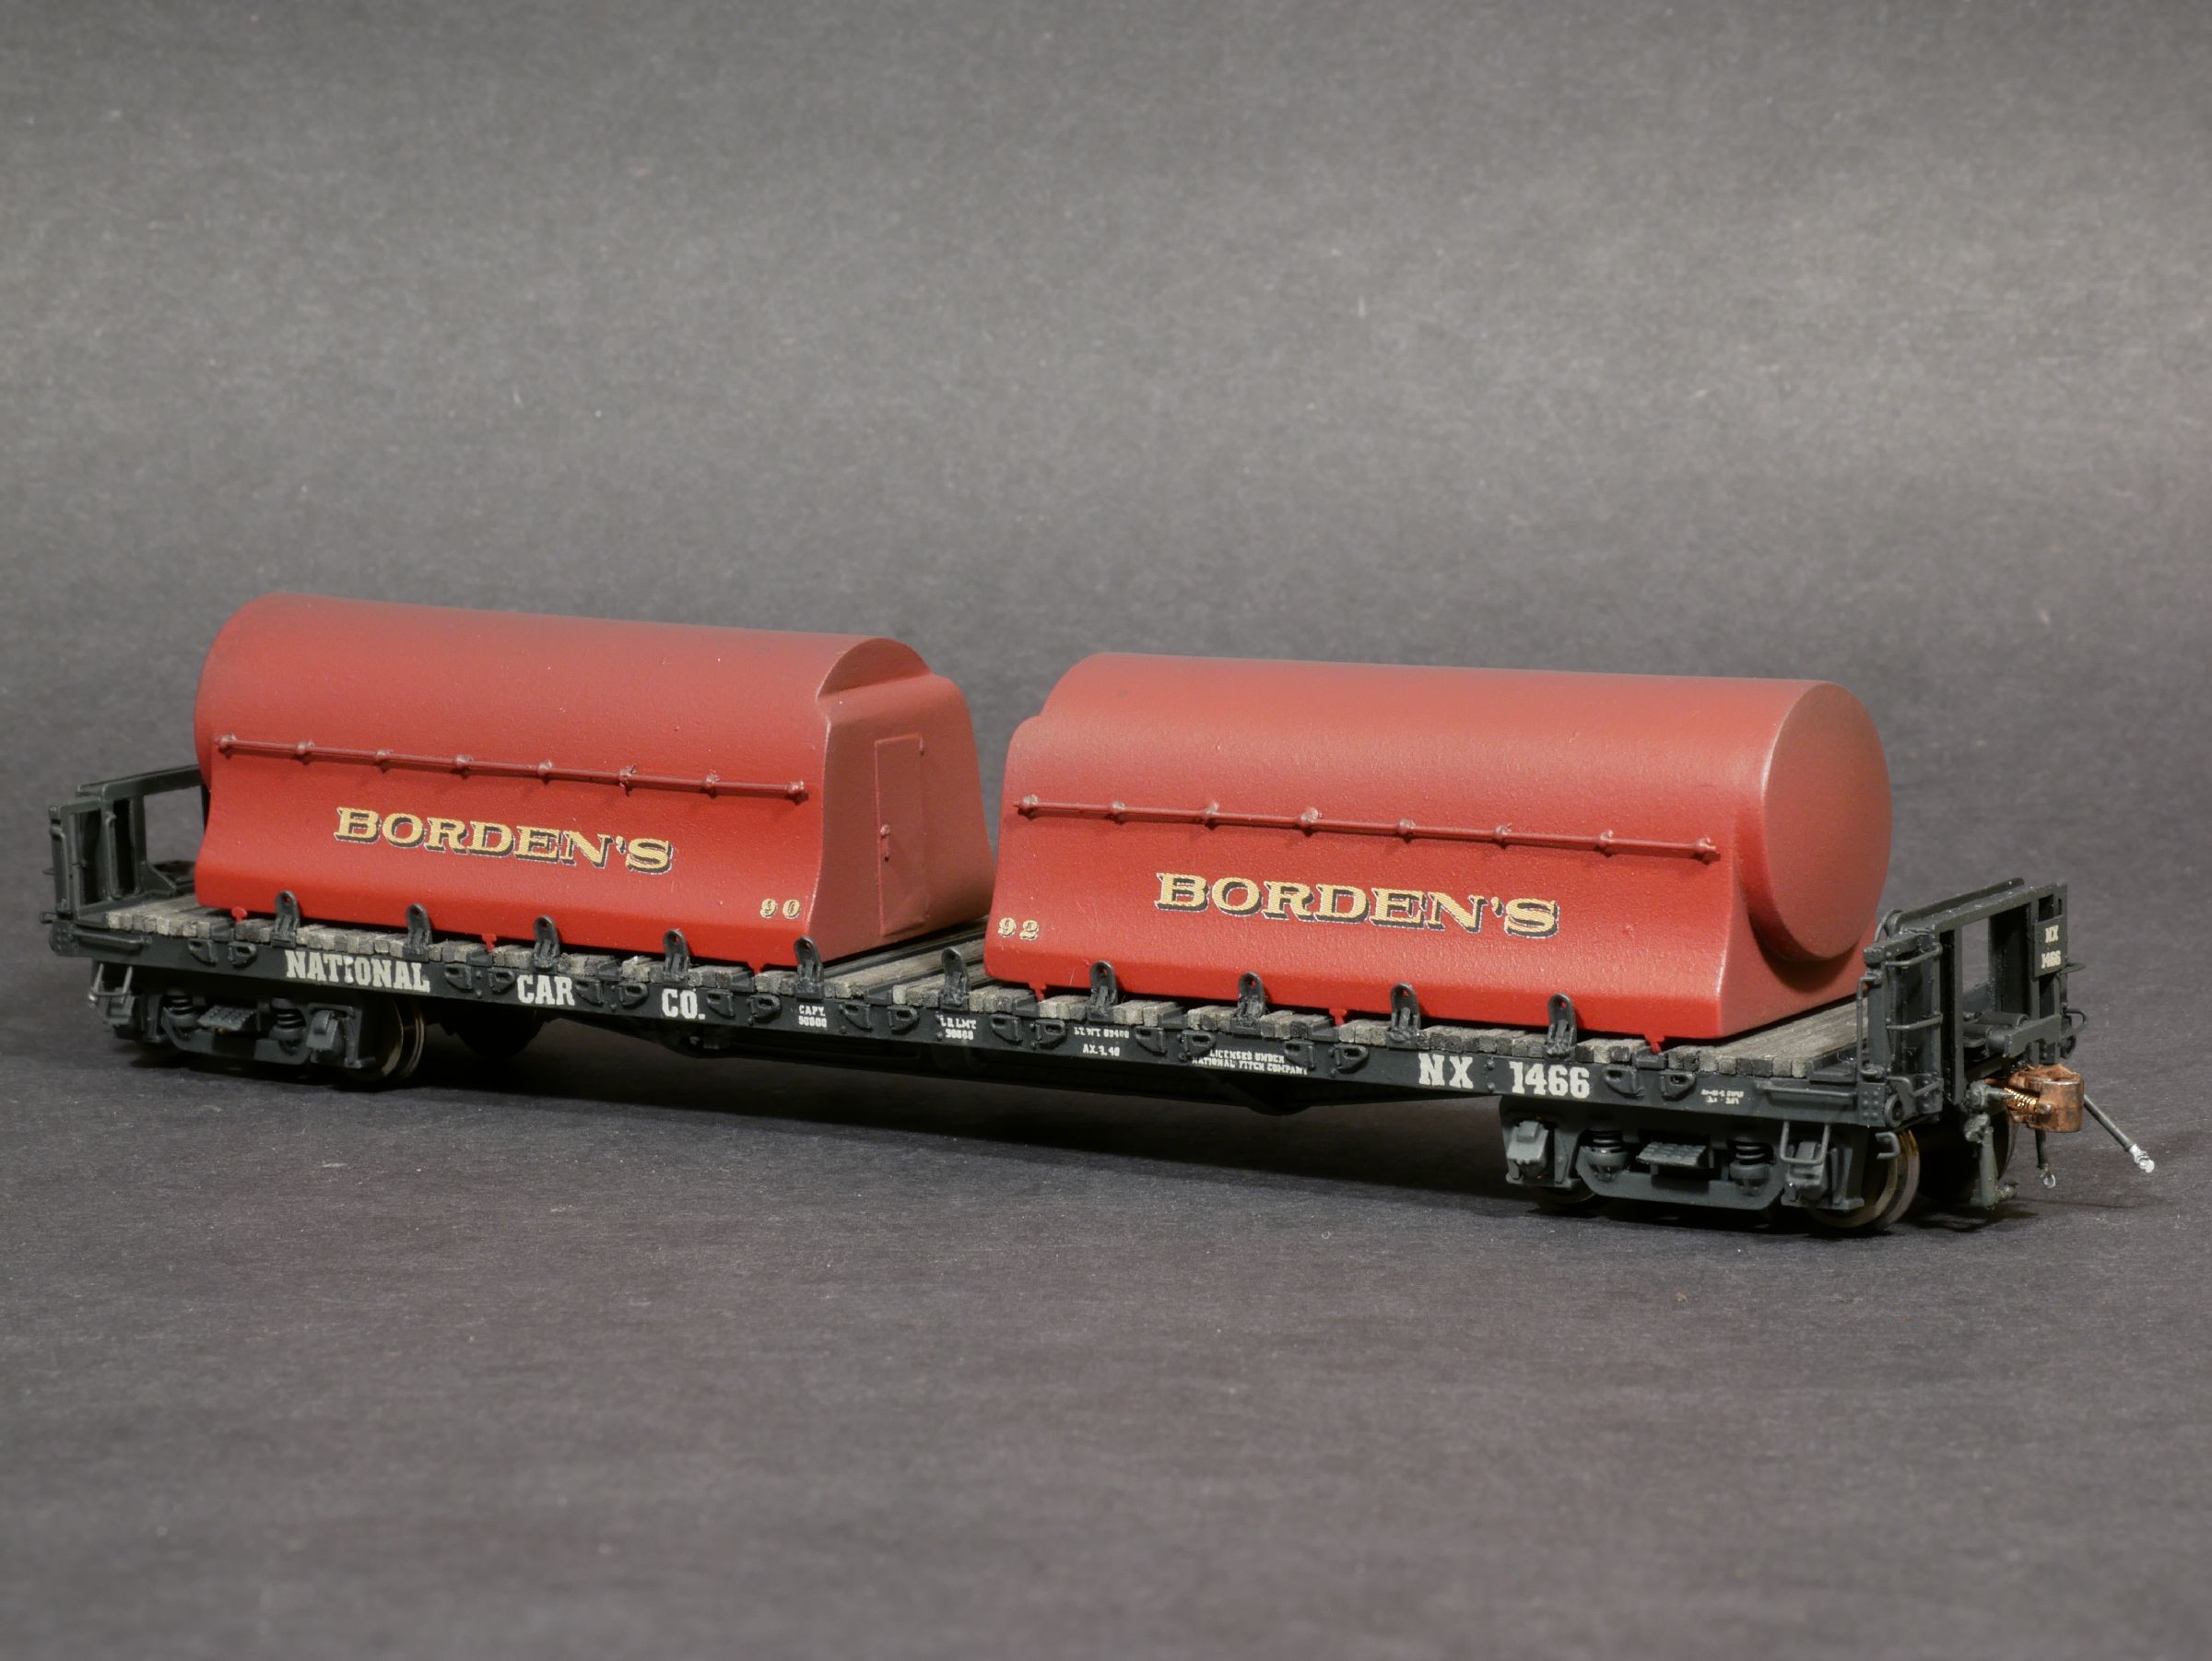
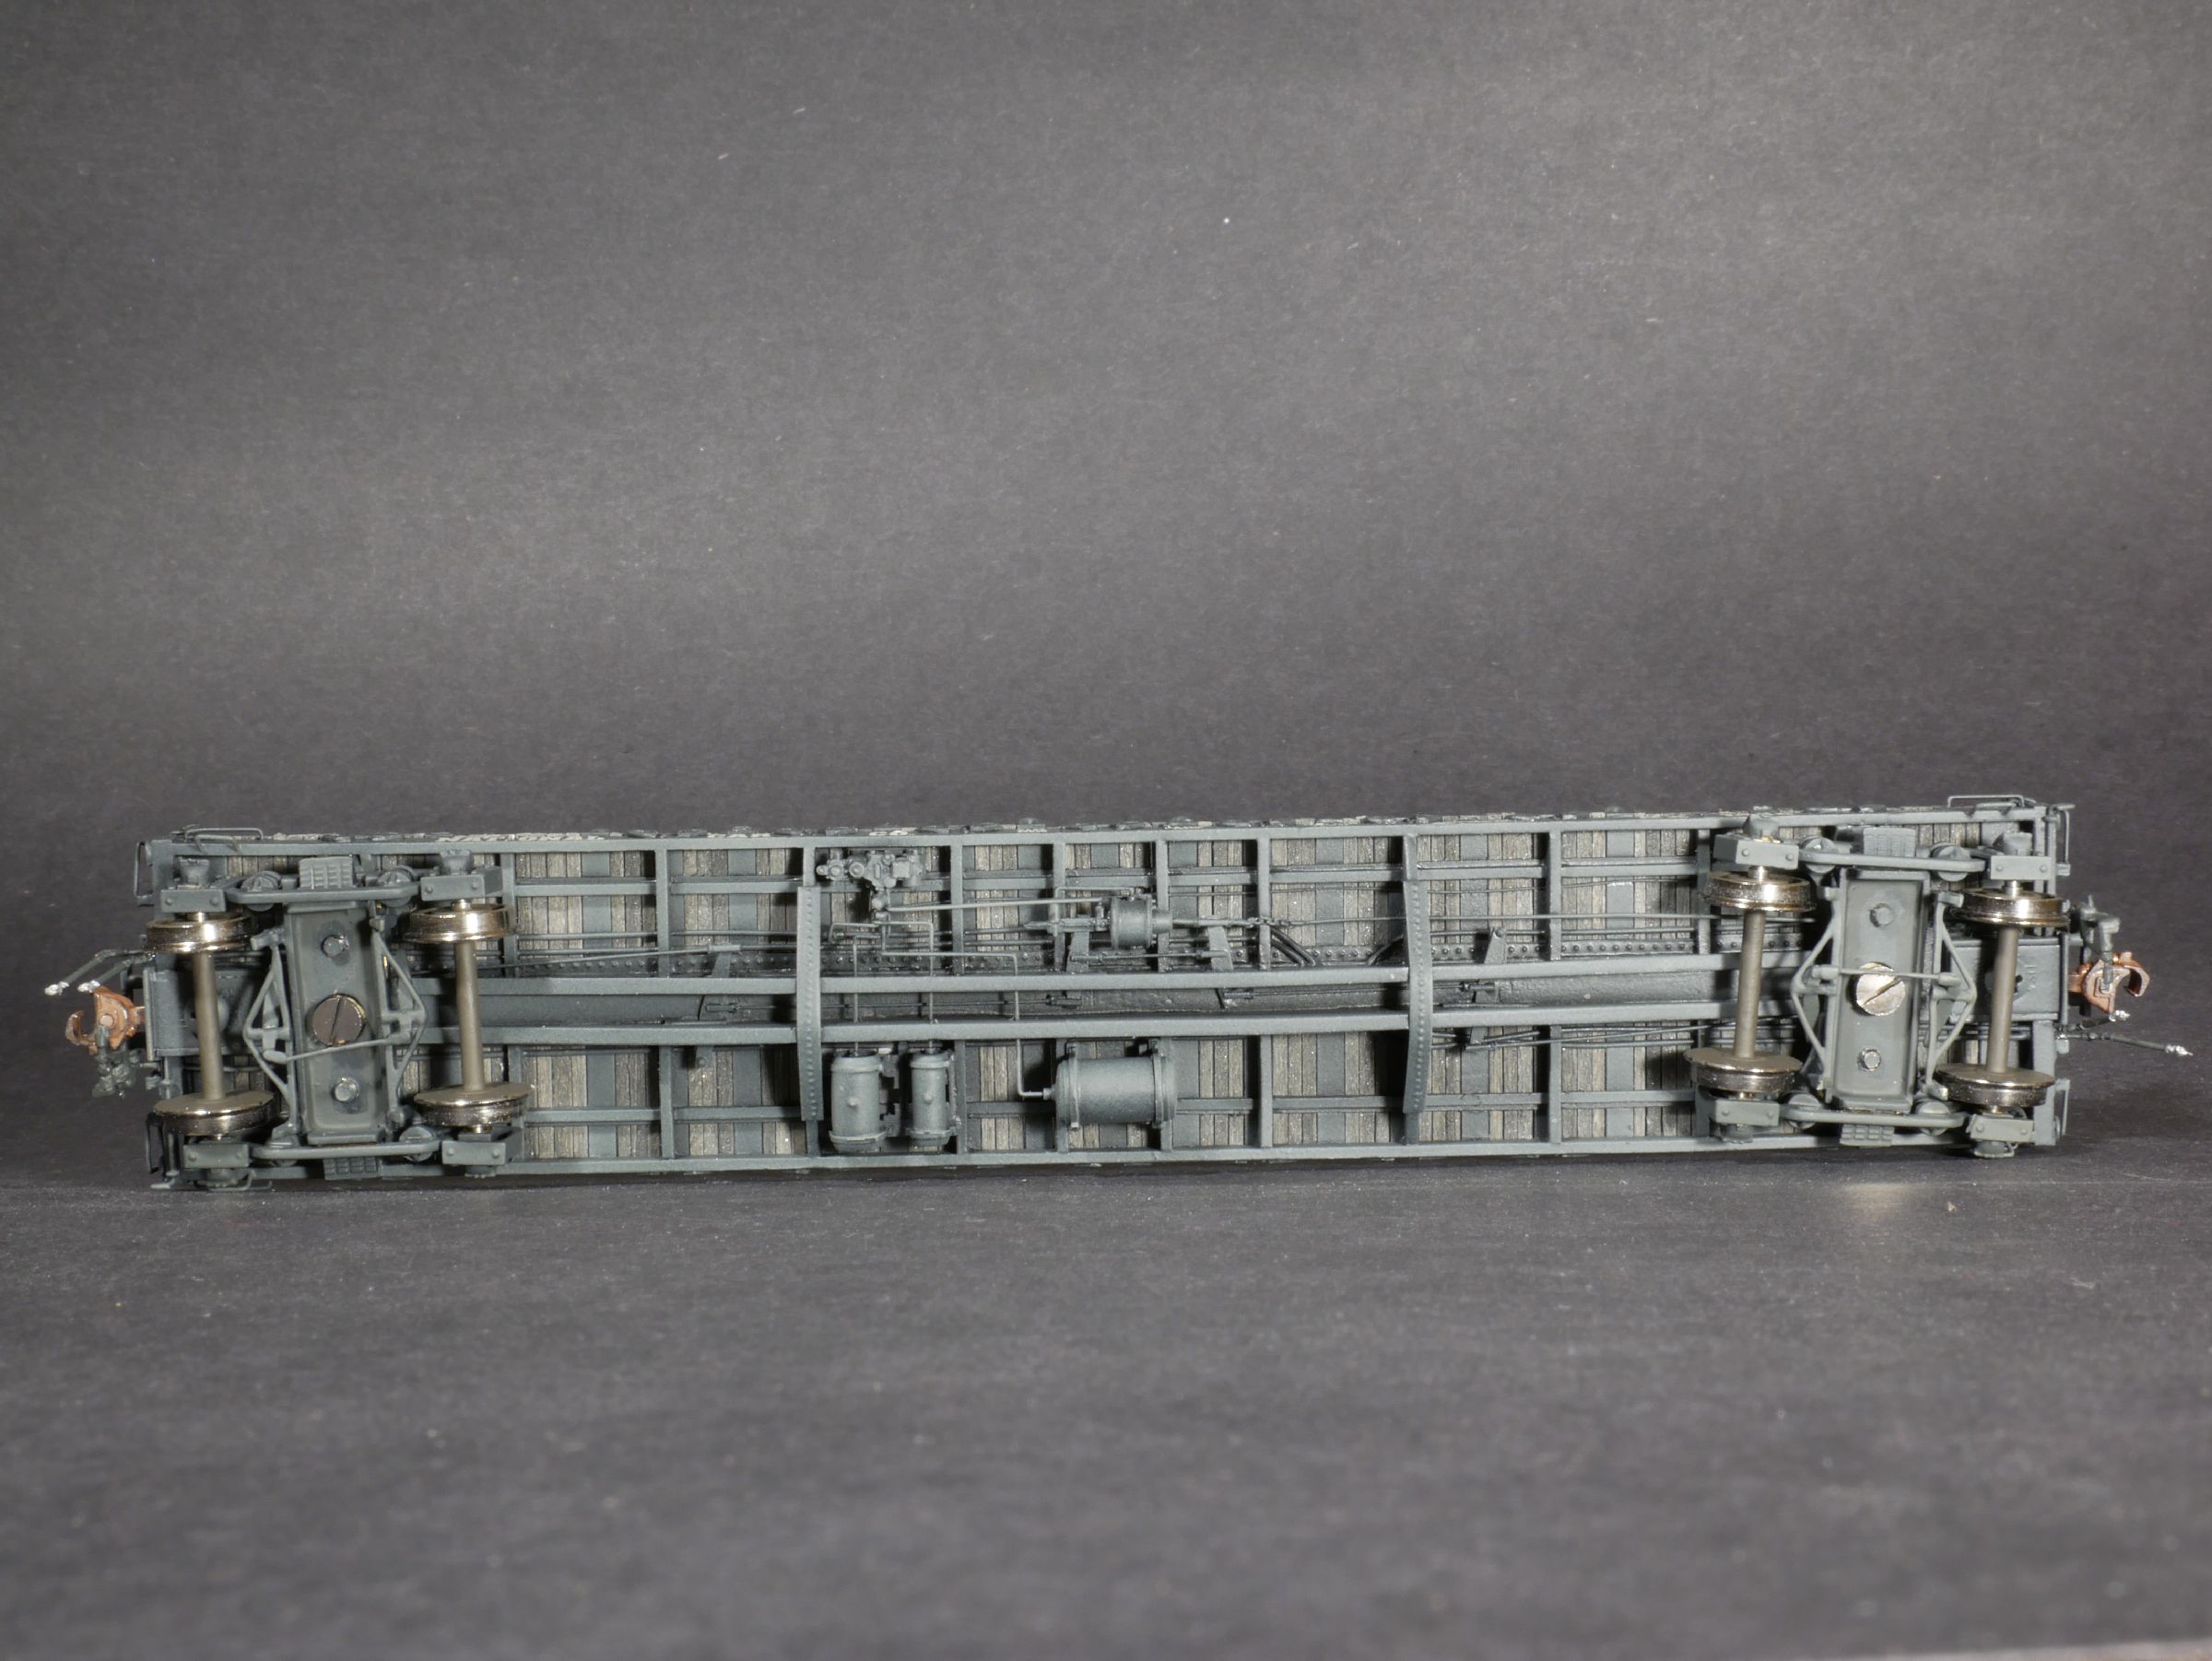
Milk Containers on Flat Car
Funaro & Camerlengo kit as starting point.
Chuck created the artwork for the tanks and end reporting marks before printing decals
The deck is scratch built with strip wood and styrene channel
Grab irons, stirrup steps, and uncoupling levers are bent by hand.
Brake components are Cal Scale parts.
Piping is bent by hand
Trucks are brass 6’10” Commonwealth
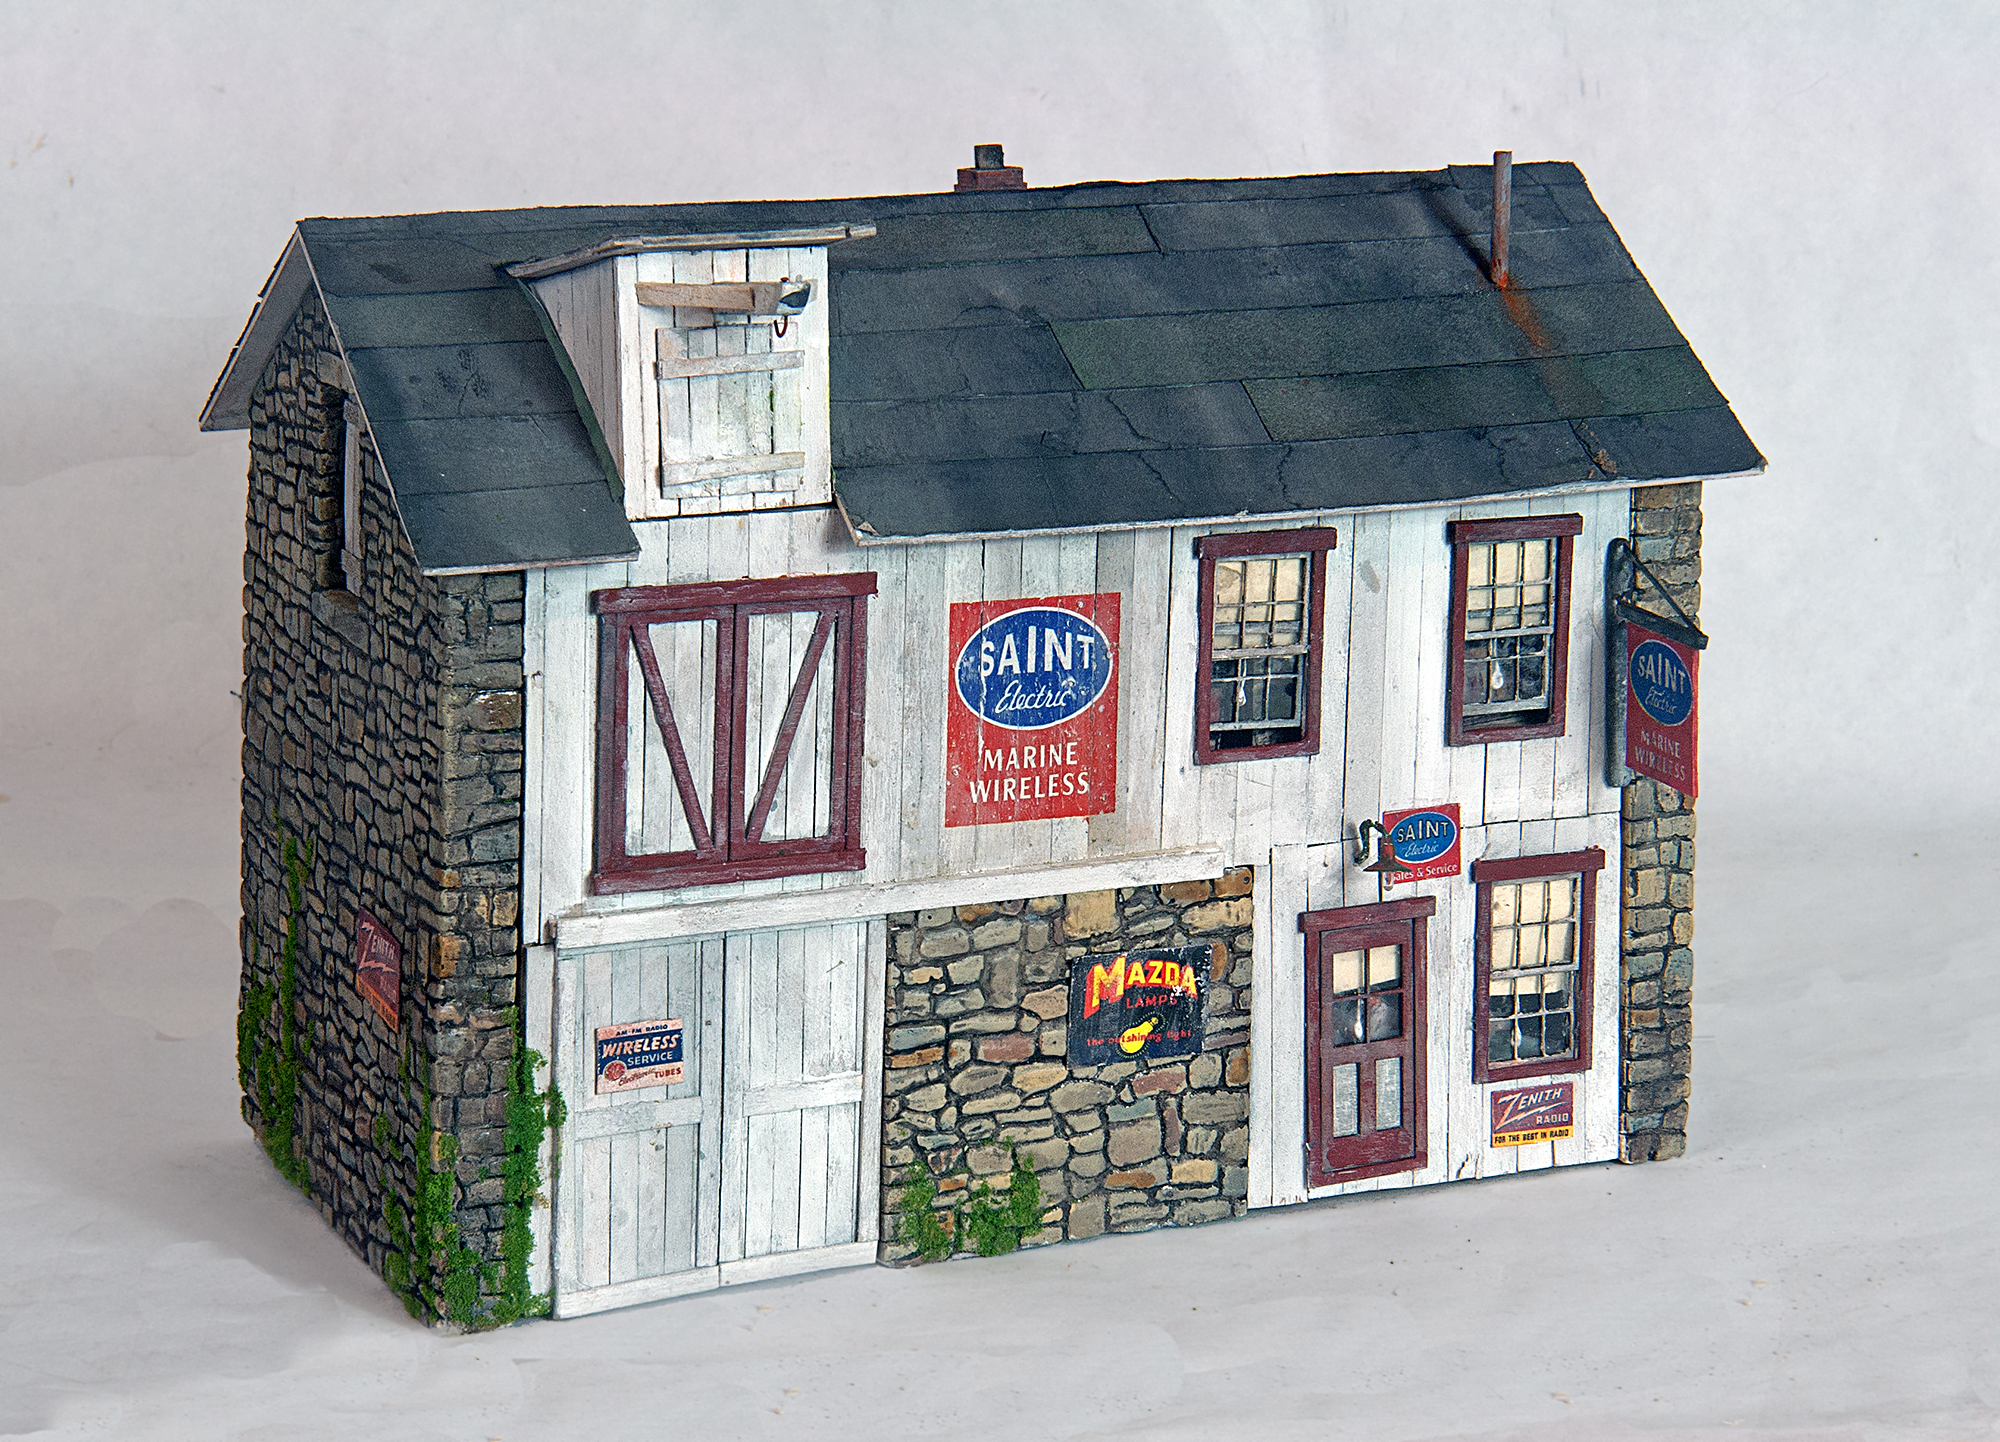
Michael Tylick, MMR
Paul StMartin gave me this O scale kit he found in his closet. He really couldn’t use it, so Paul hoped
I a placc in a future expansion of my On30 Marshfield and Old Colony Railroad. The kit was produced
by Morgan Hill Models, who appears to have had a short lived career. The box contained little more than
some plaster casting, some laser cut windows and doors, several bags of stripwood and some detail parts.
There were no directions, only the box photograph for guidance. This proved a blessing since I was left
on my own to figure out my own design.
I named the business Saint Electric after Paul, using his old high school nickname. Paul works for
Ratheon, so my logo was inspired by older style Ratheon artwork. I will probably end up building a
seaside town when I get to it, so ”Marine Wireless” seemed like a good old time nautical/technical term.
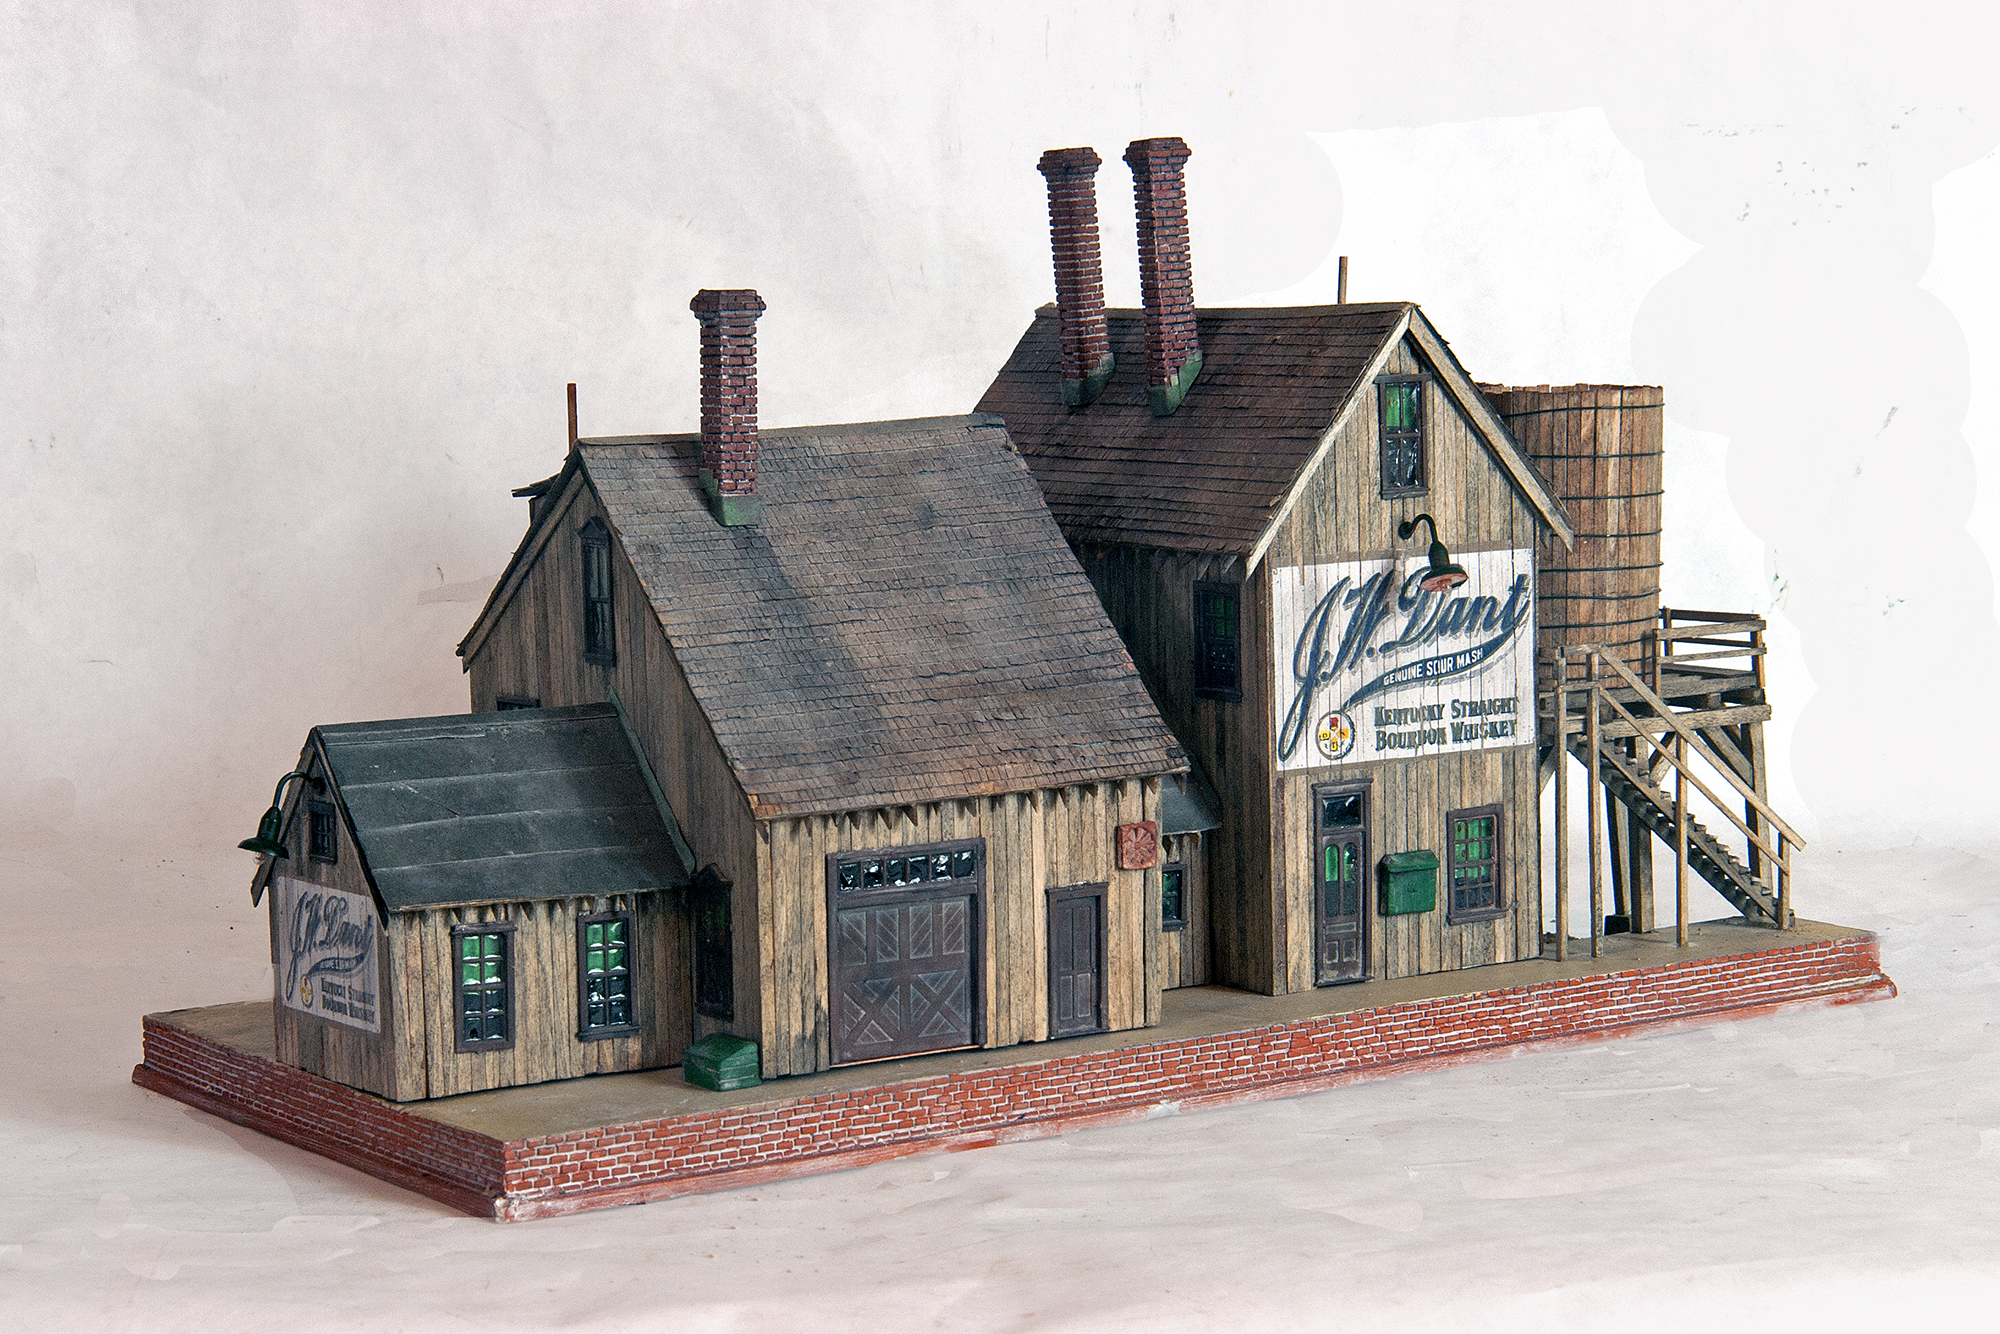
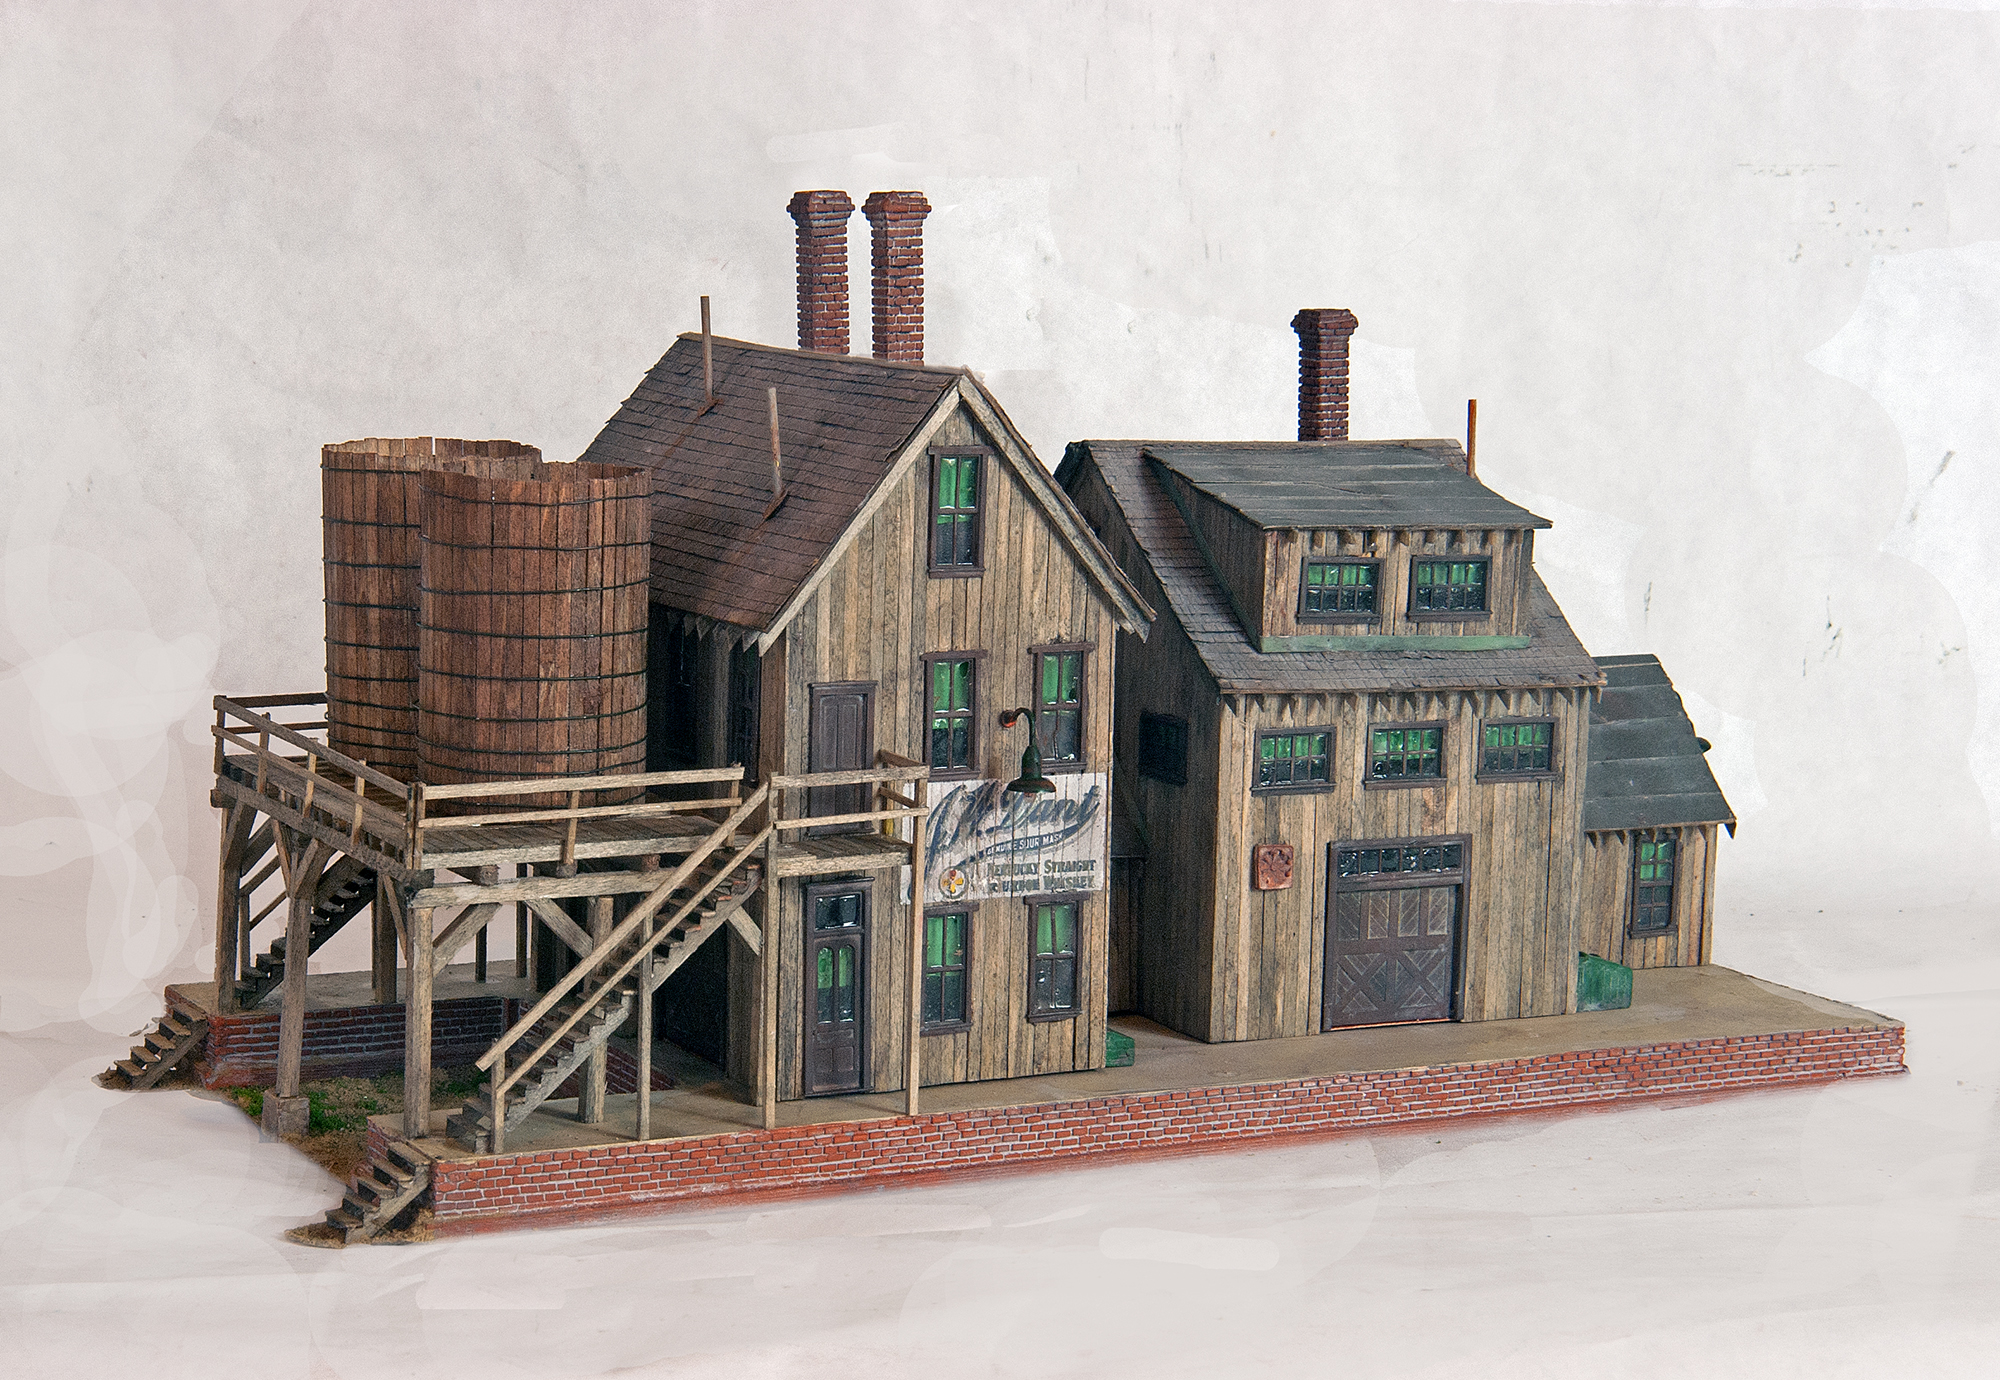
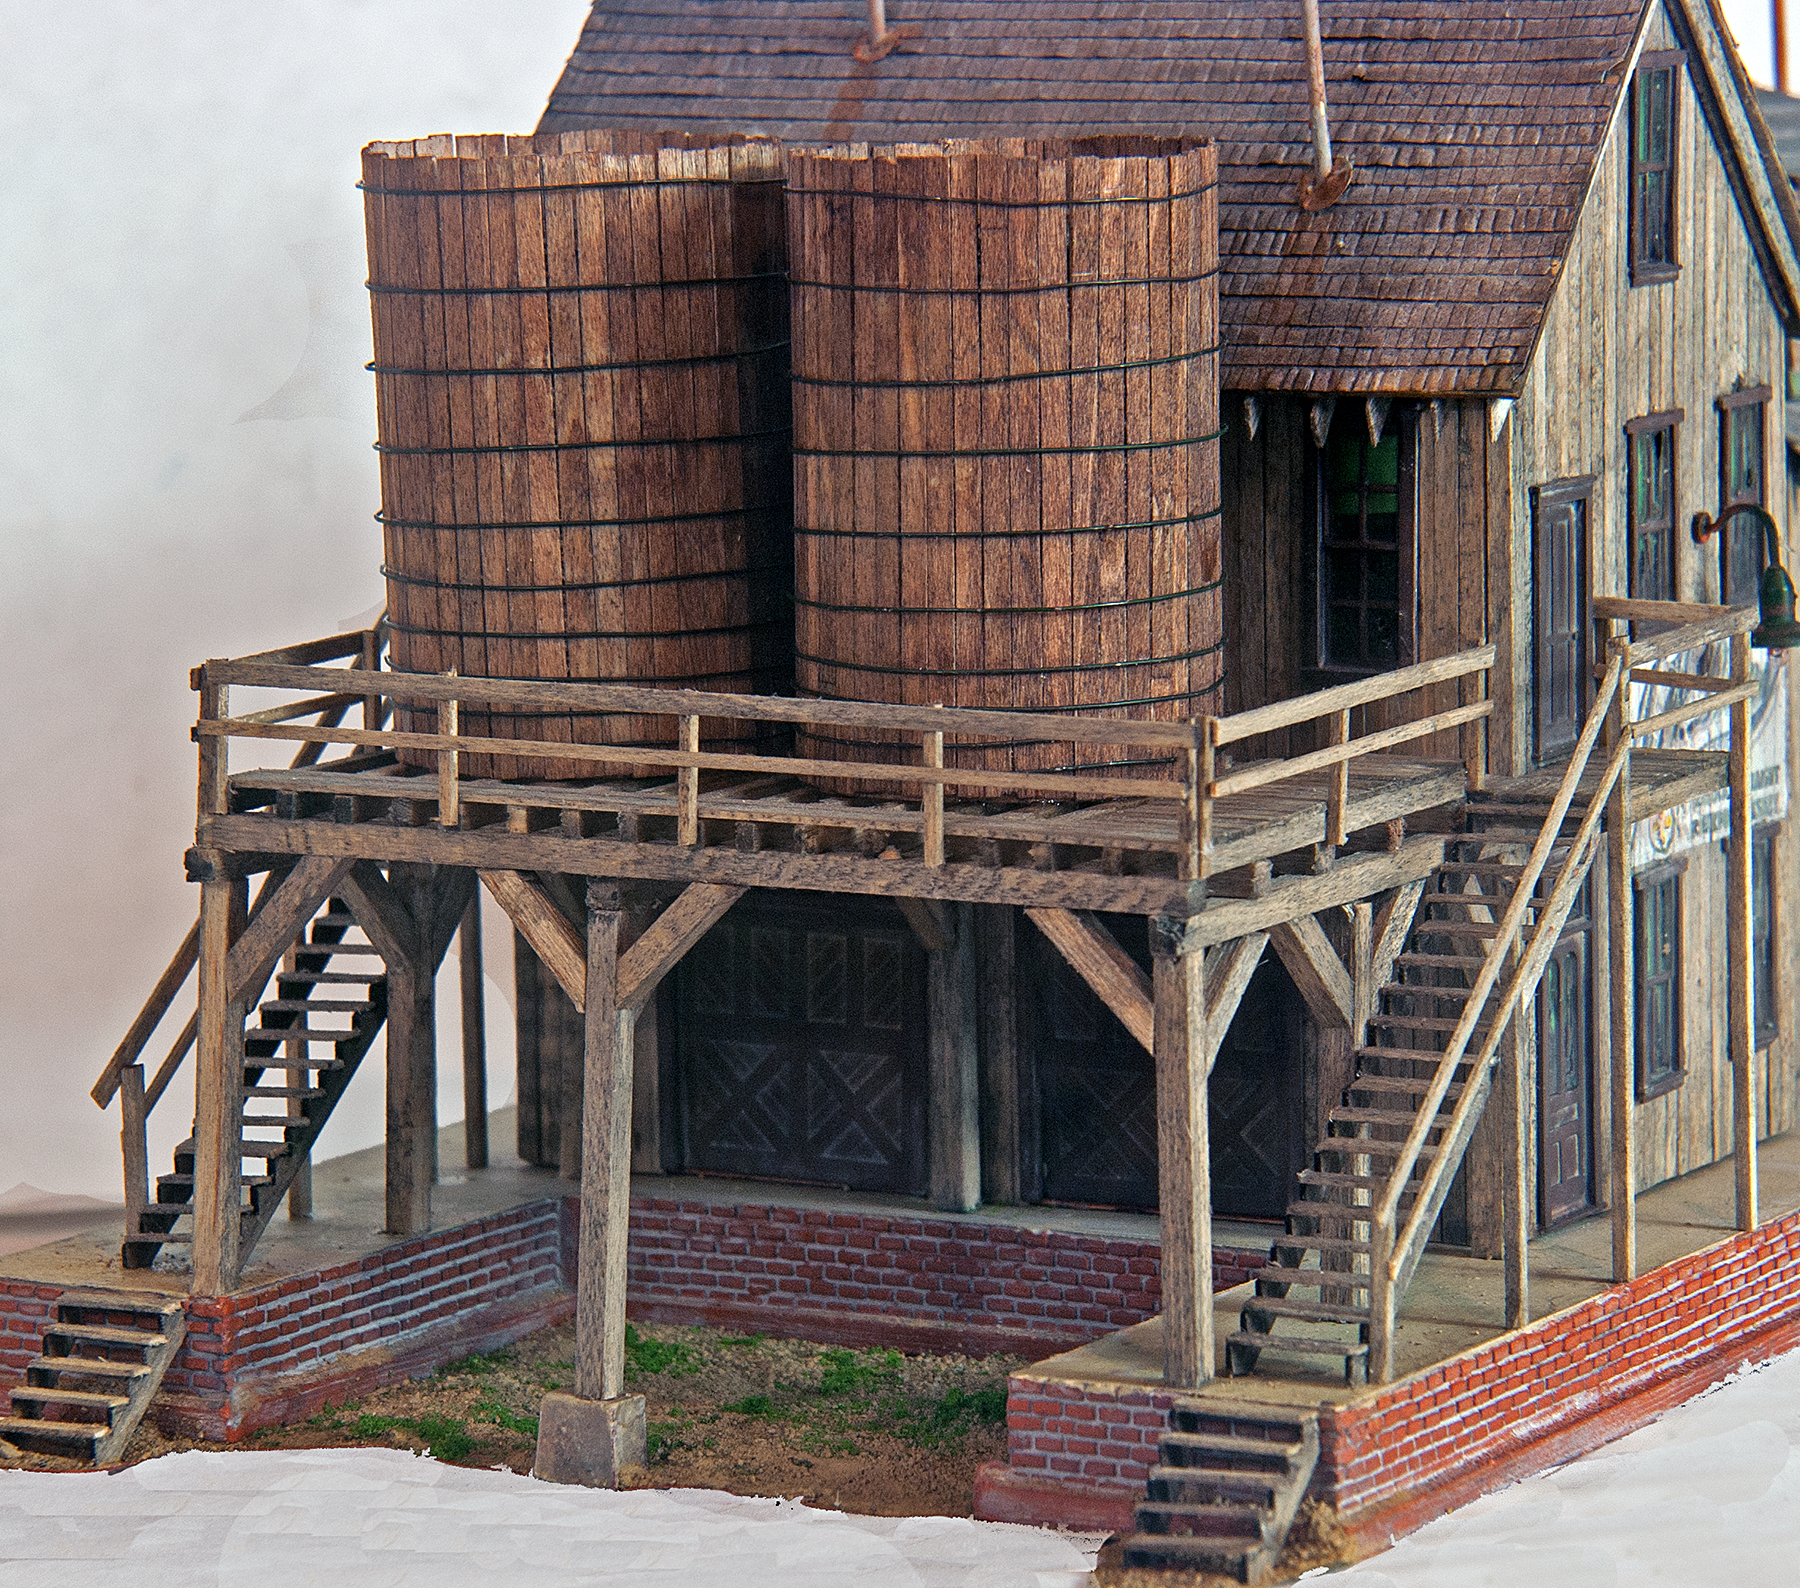
J.W. Dant distillery was built from a kit sold by Micro-Scale Models in the 1990’sl It features board
by board construction over a laser cut wood shell. The signs are custom decals were designed from an
original Dant label. They were printed by Highball Graphics. A zillion small details were included
with the kit, but these will not be installed until the model reaches its new home.
It was as part of a display to celebrate the former J.W. Dant Distillery at the Heaven Hill’s new
visitor’s center in Bardstown, Kentucky. Dant was one of the largest of the Kentucky bourbon distillers
in the nineteenth century but was sold in the 1930's to the Heaven Hill Distilleries group. J.W. Dant bourbon
is still distributed under its original name and label. A descendant of Joseph Dant is a close friend and
asked me to assemble the kit for the diorama he is currently building.
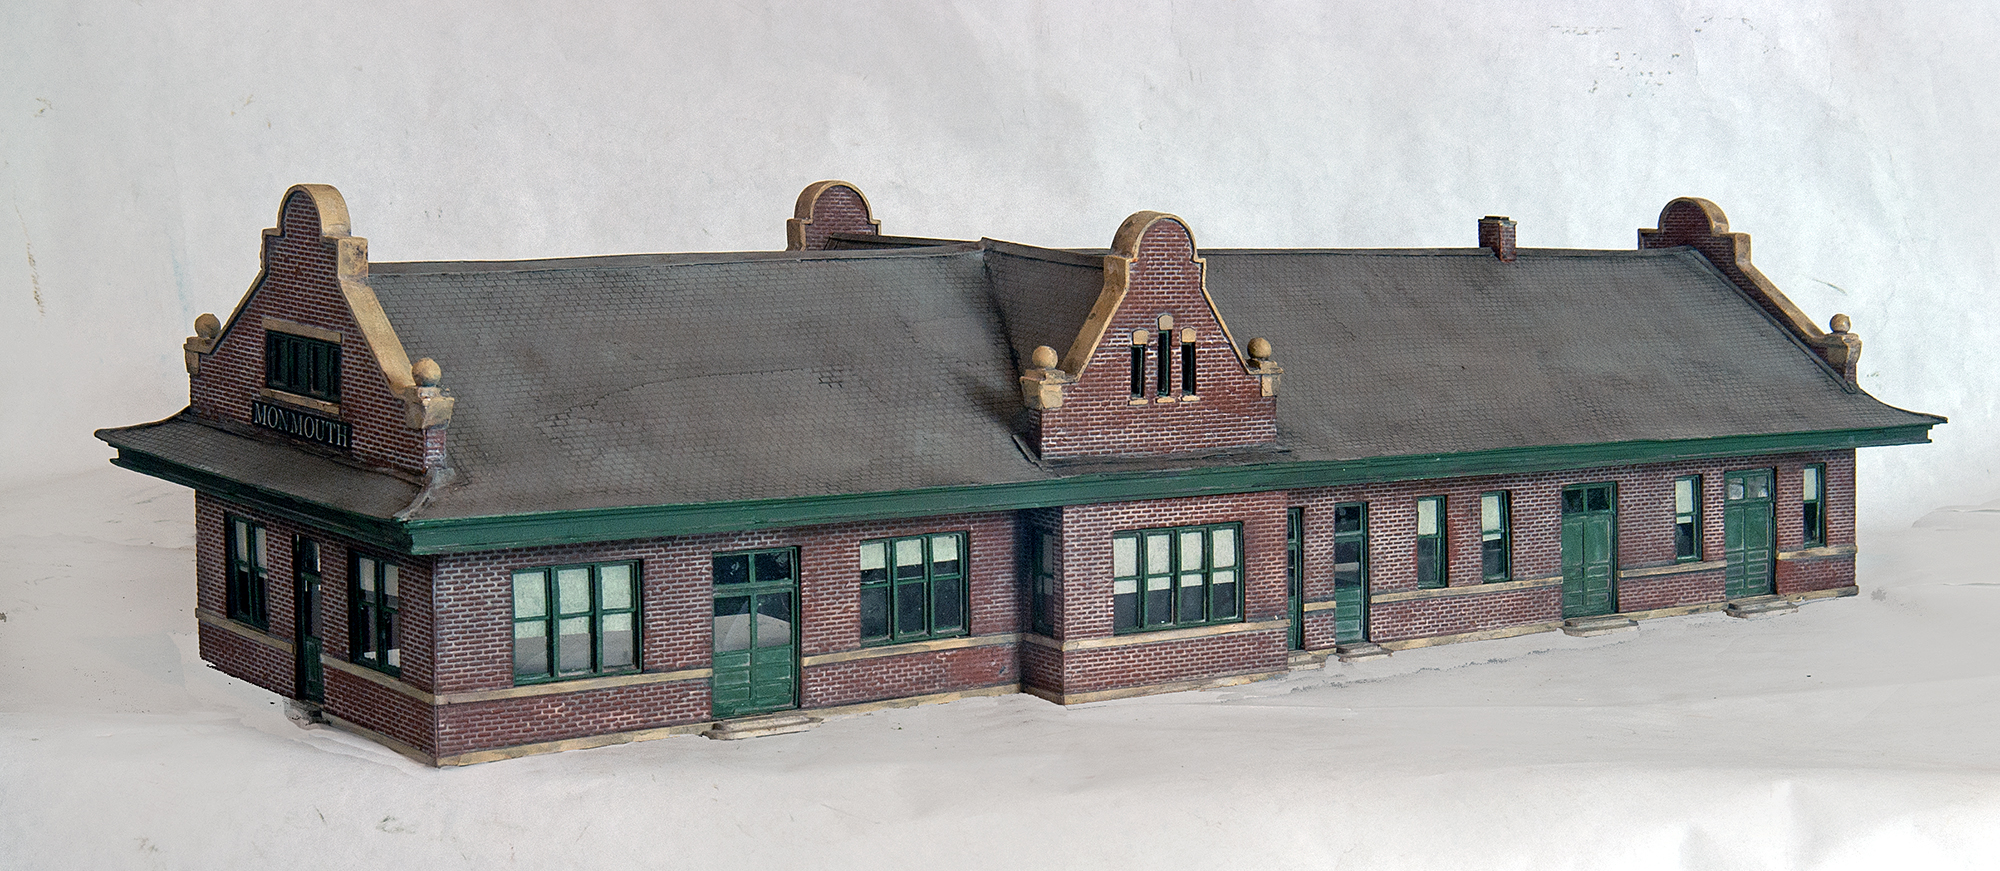
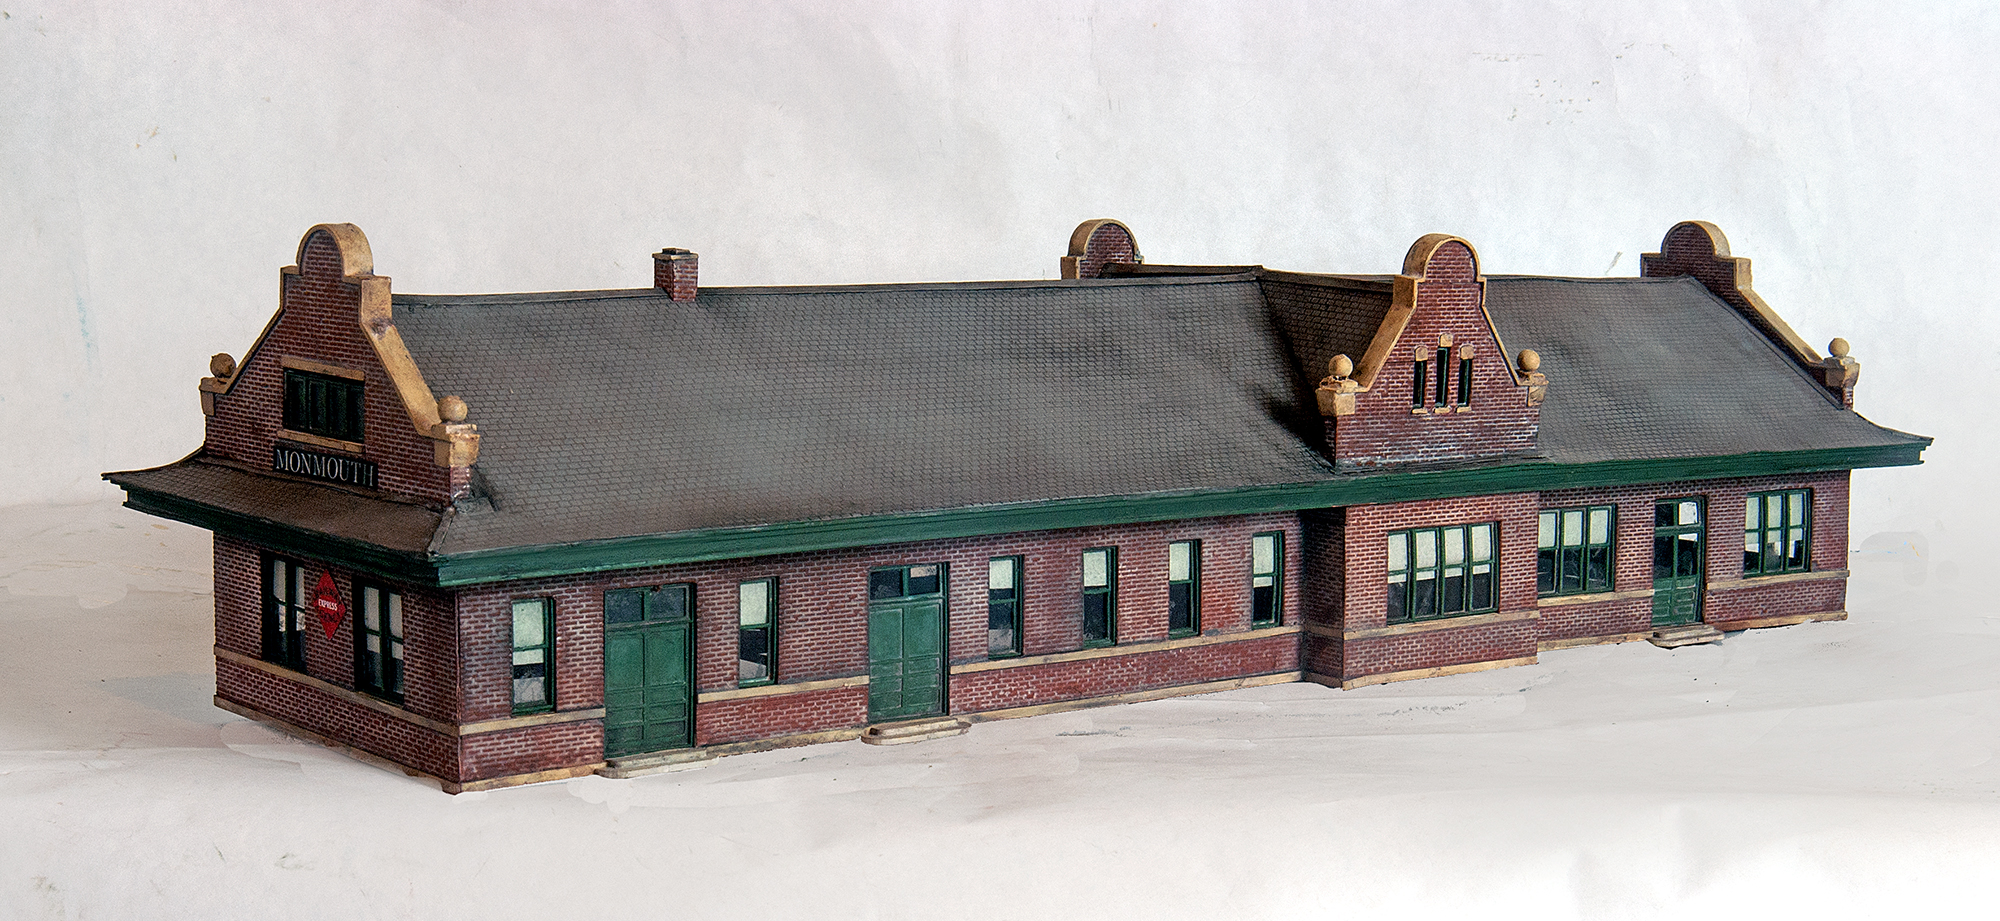
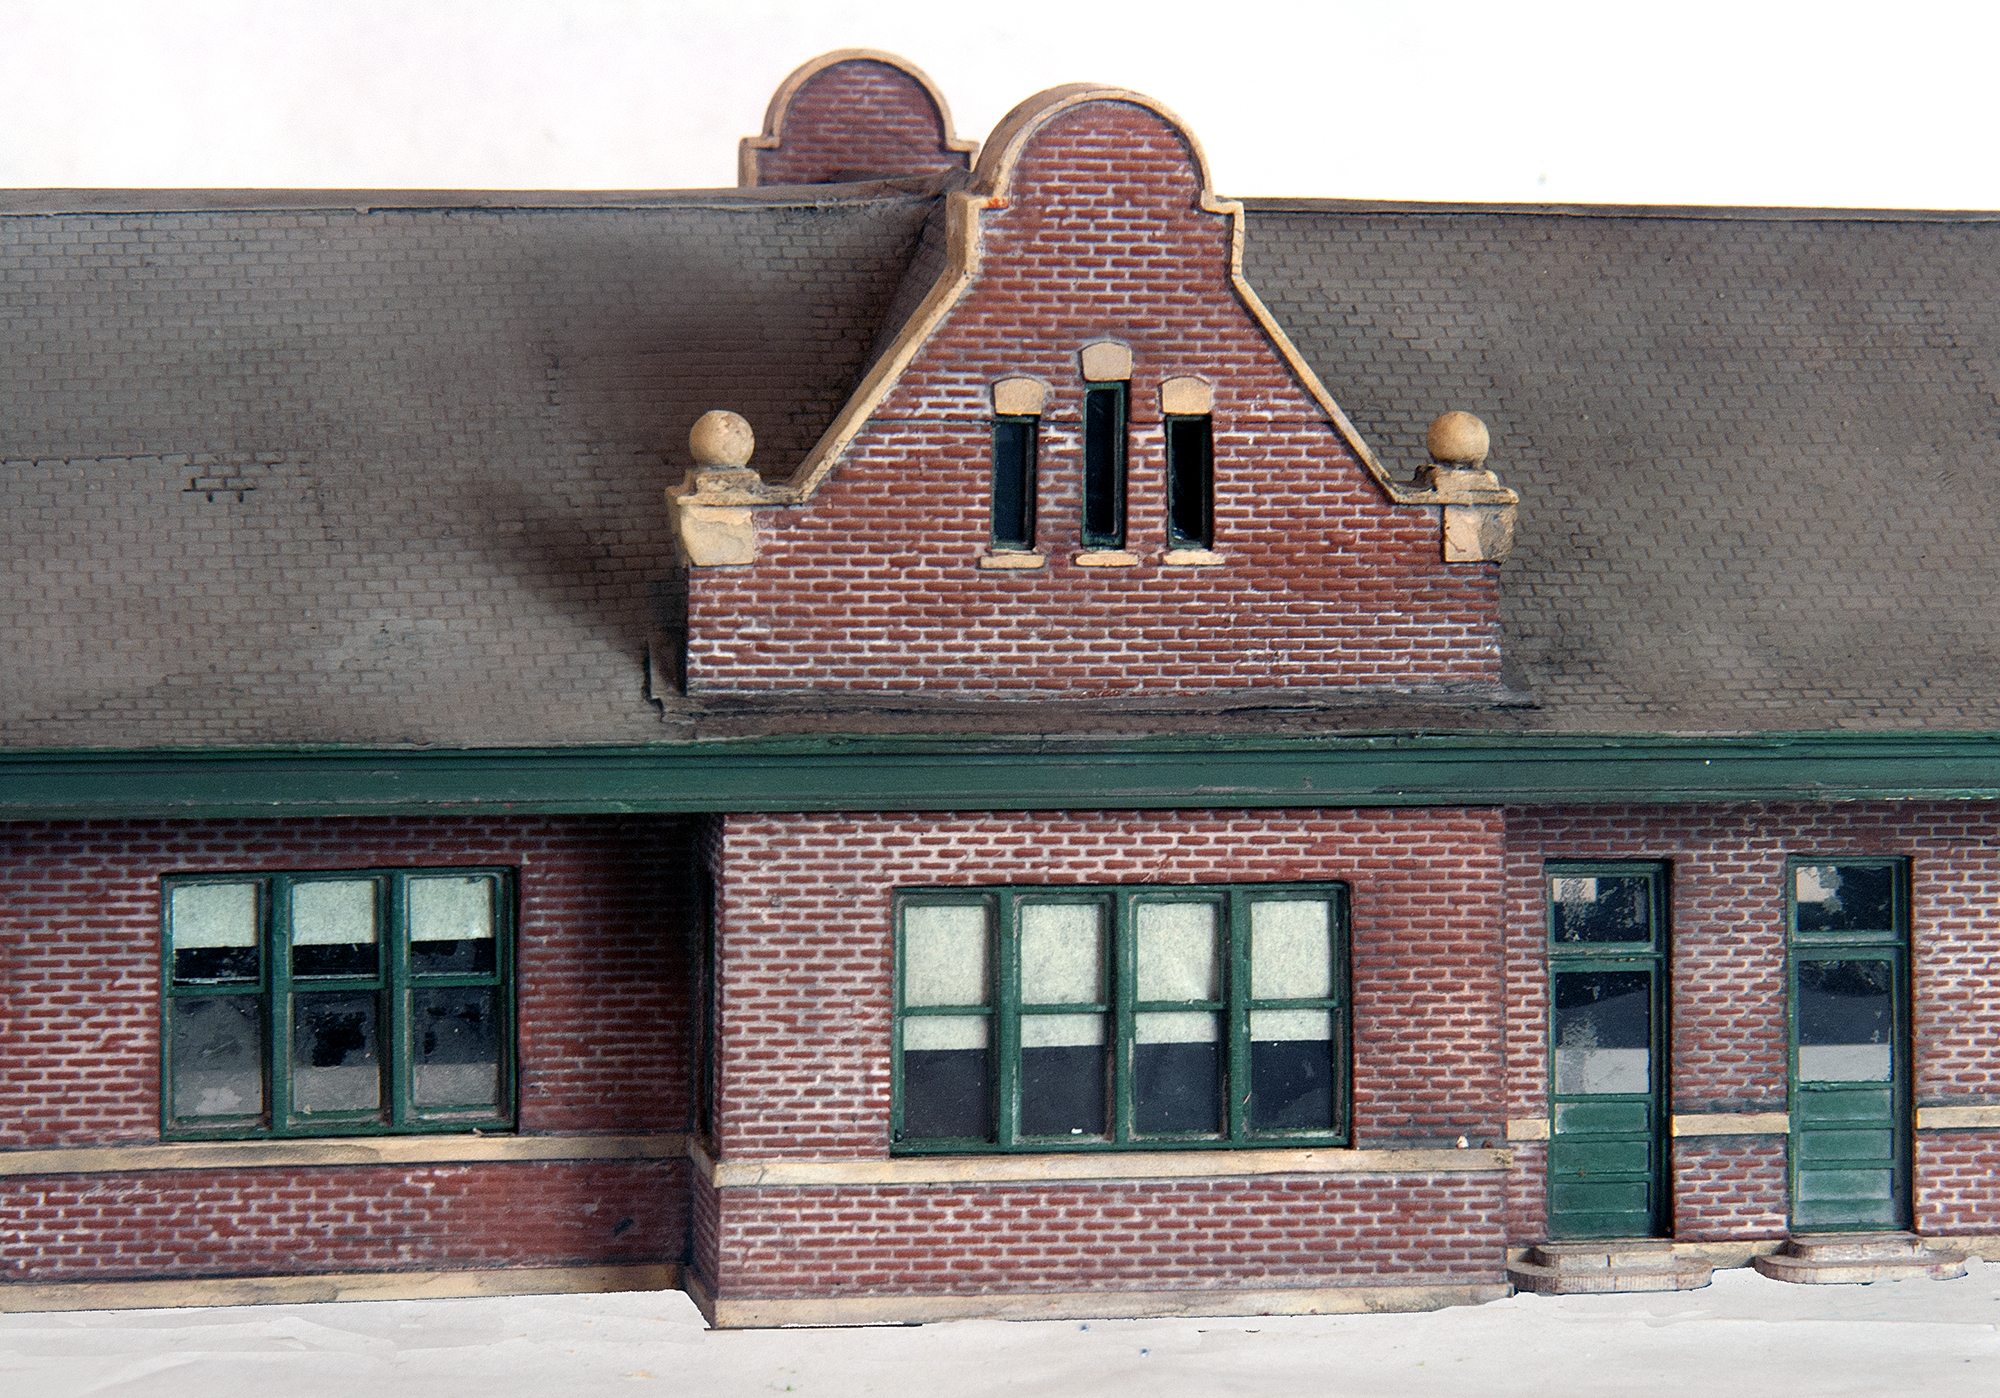
I built two copies of this station at the same time, one for a layout, the other for the city’s historical society.
Working from supplied drawings and a few photographs, the model is over twenty-two inches long over the roof eaves.
With the exception of a few laser cut parts (windows, doors, gable trim, roof forms, and steps) they were built
completely from styrene sheet overlaid with appropriate Plastruct textured sheets.
Monmouth, Illinois (Pop. 9444) is about eighteen miles west of the major BNSF class yard at Galesburg or about
two hundred miles southwest of Chicago. It was the birthplace of famed western gunfighter Wyatt Earp, and a childhood
home for both former president Ronald Reagan and mass murder Richard Speck. The unused station is still standing.
Glenn Glasstetter
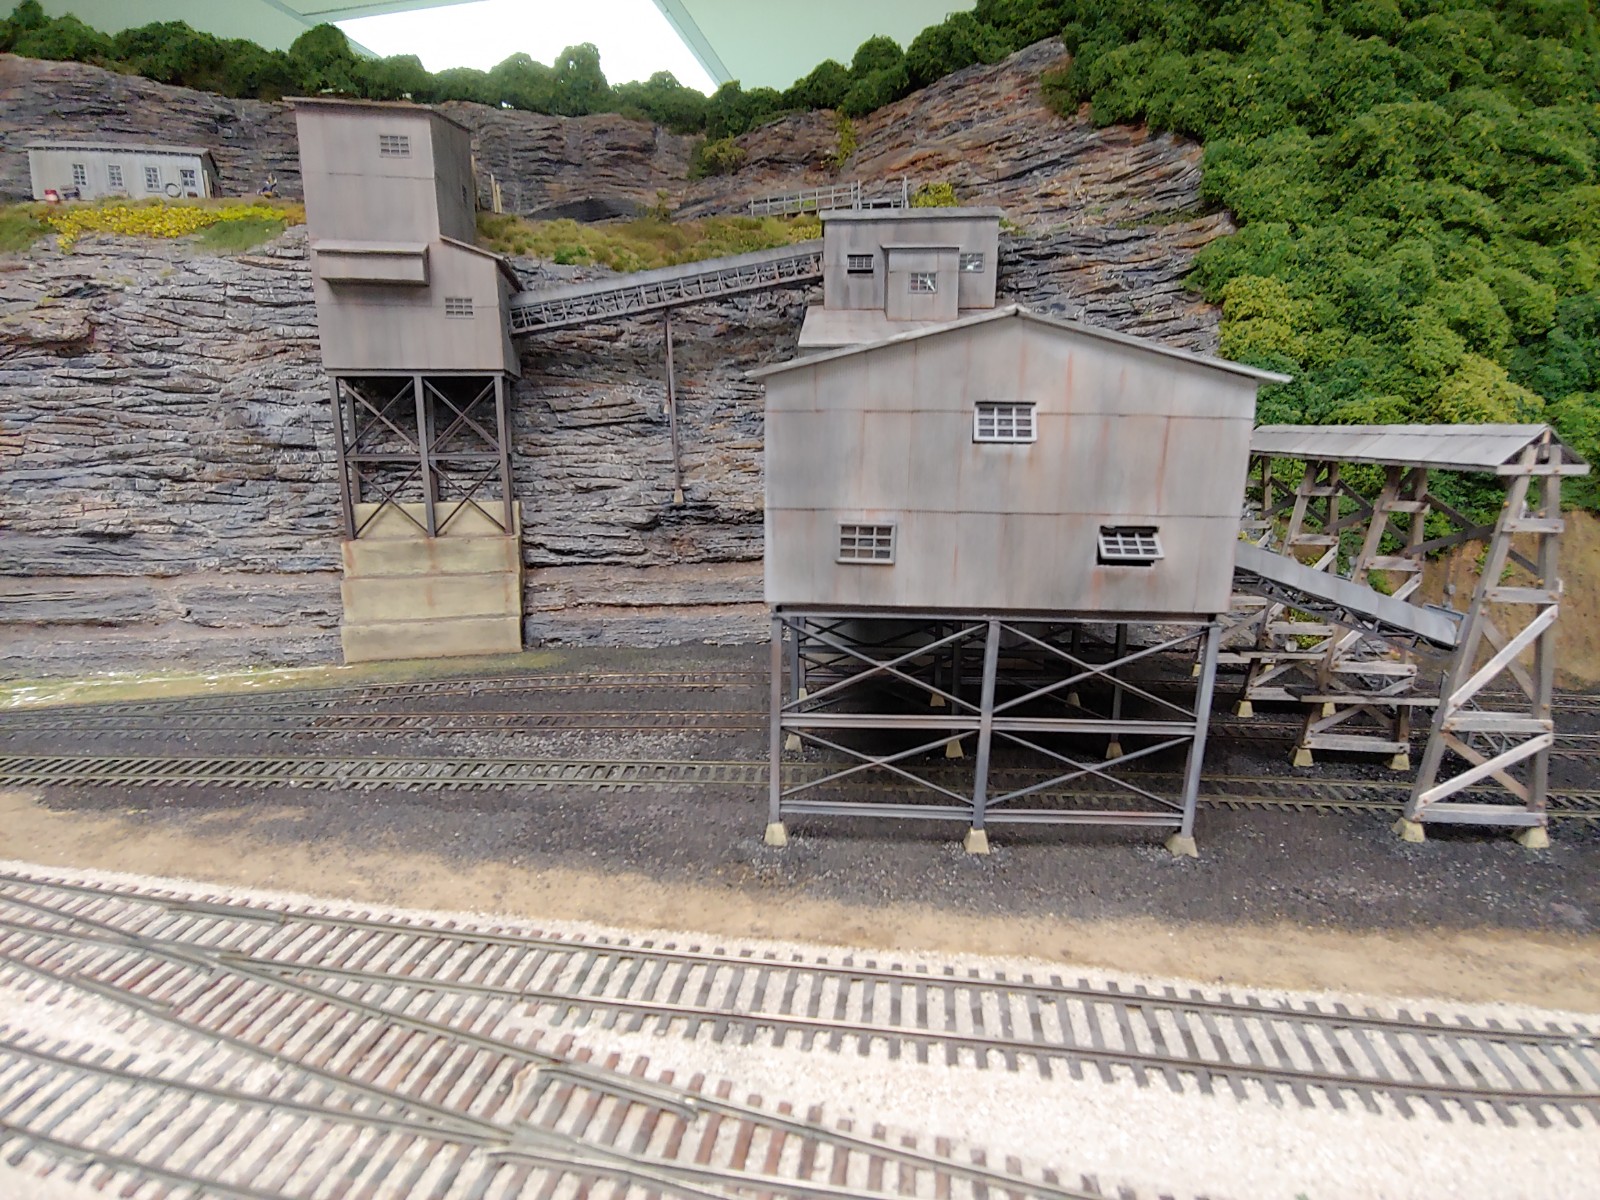
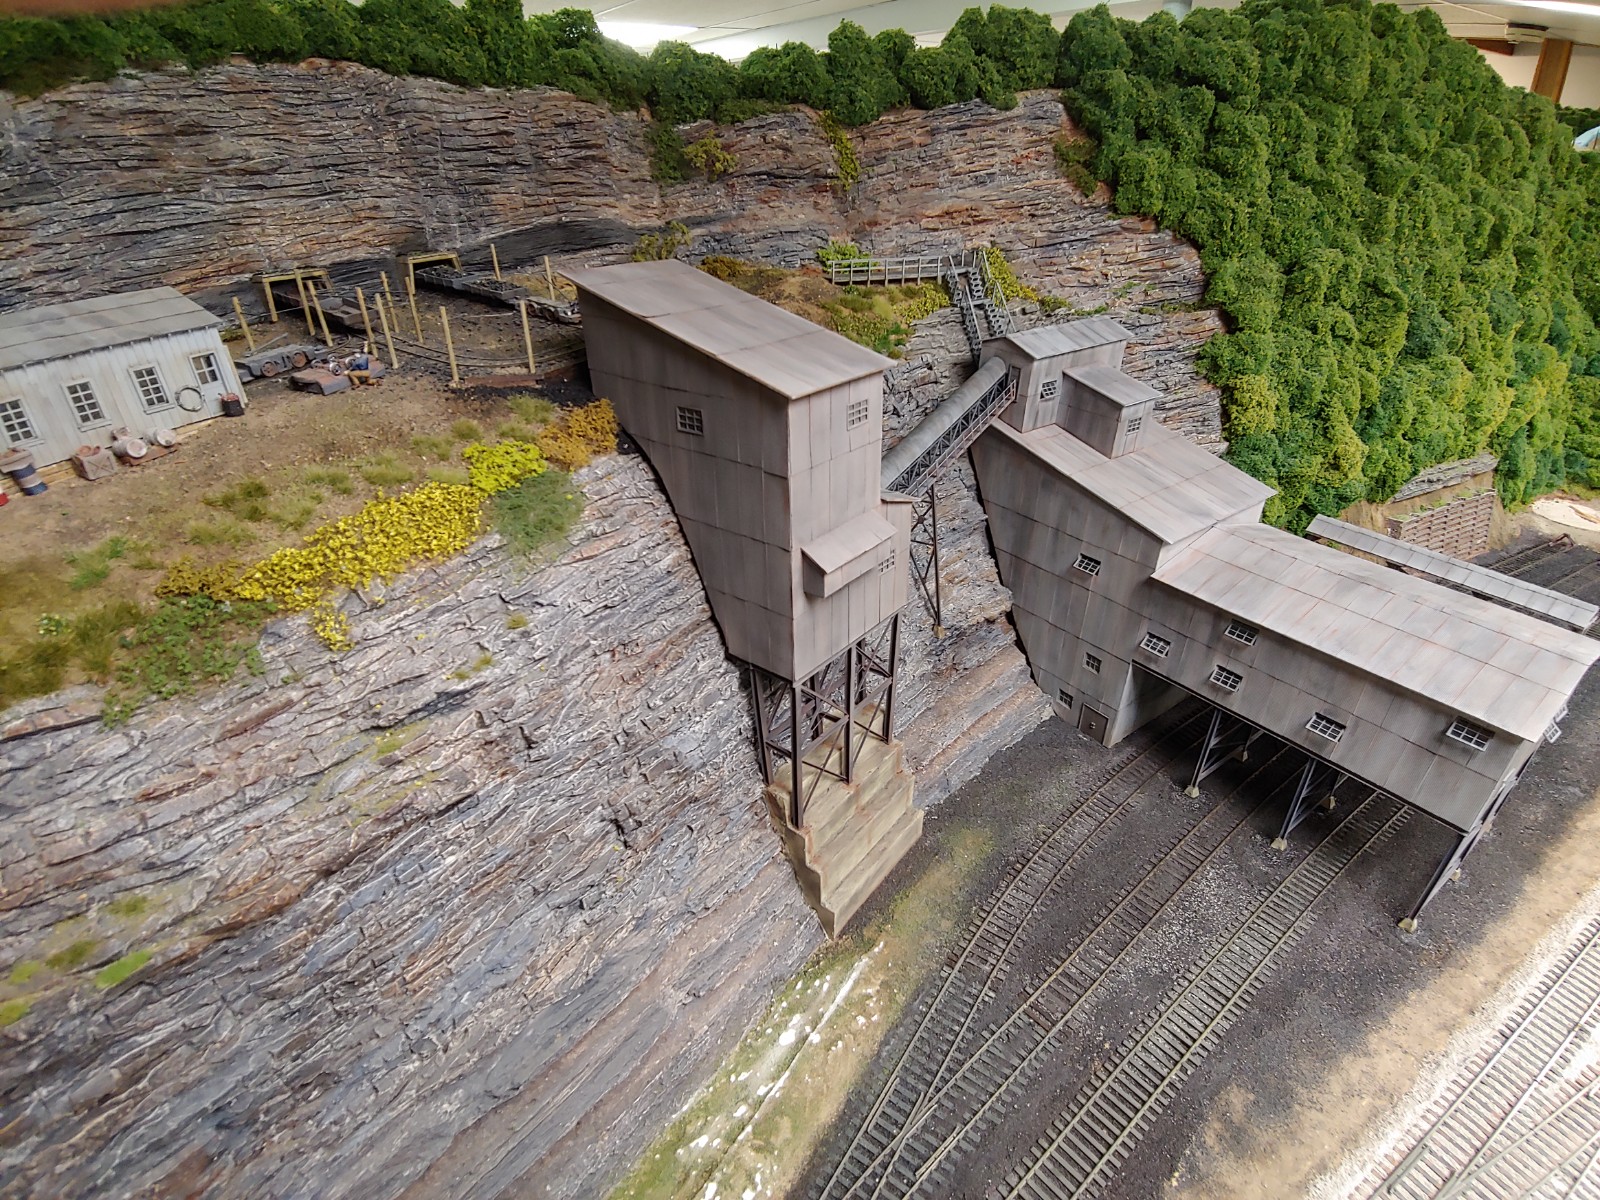
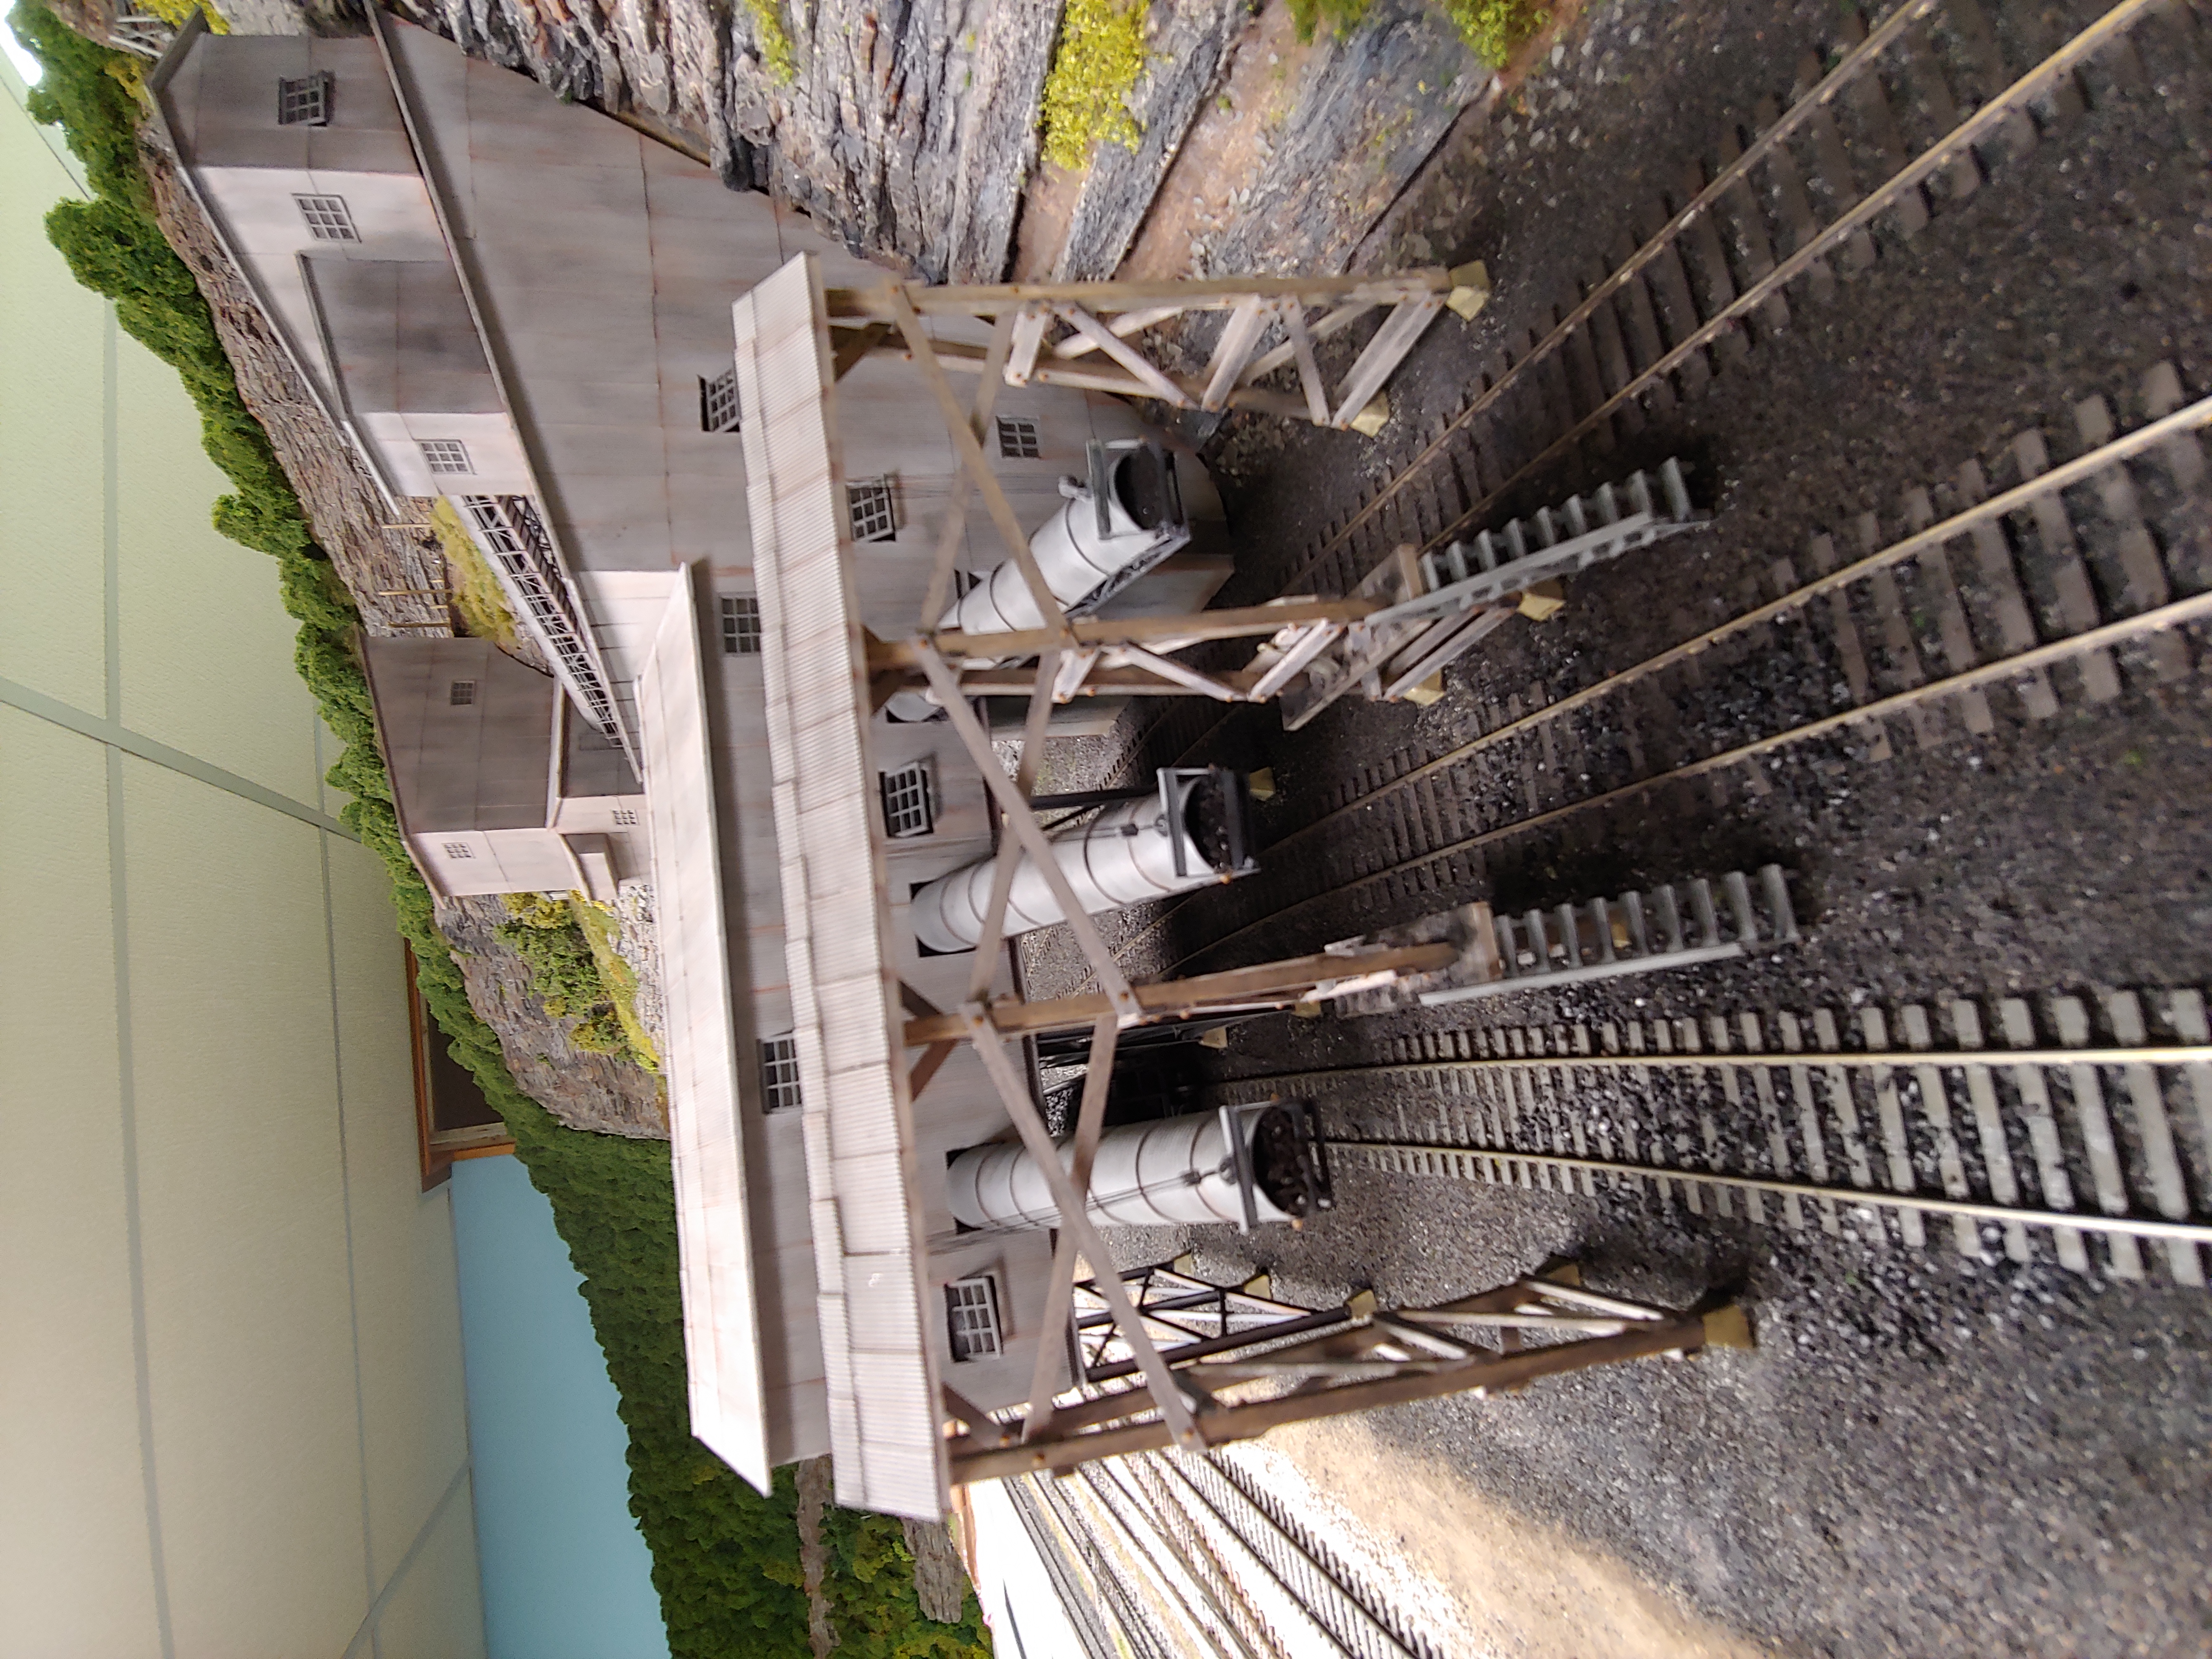
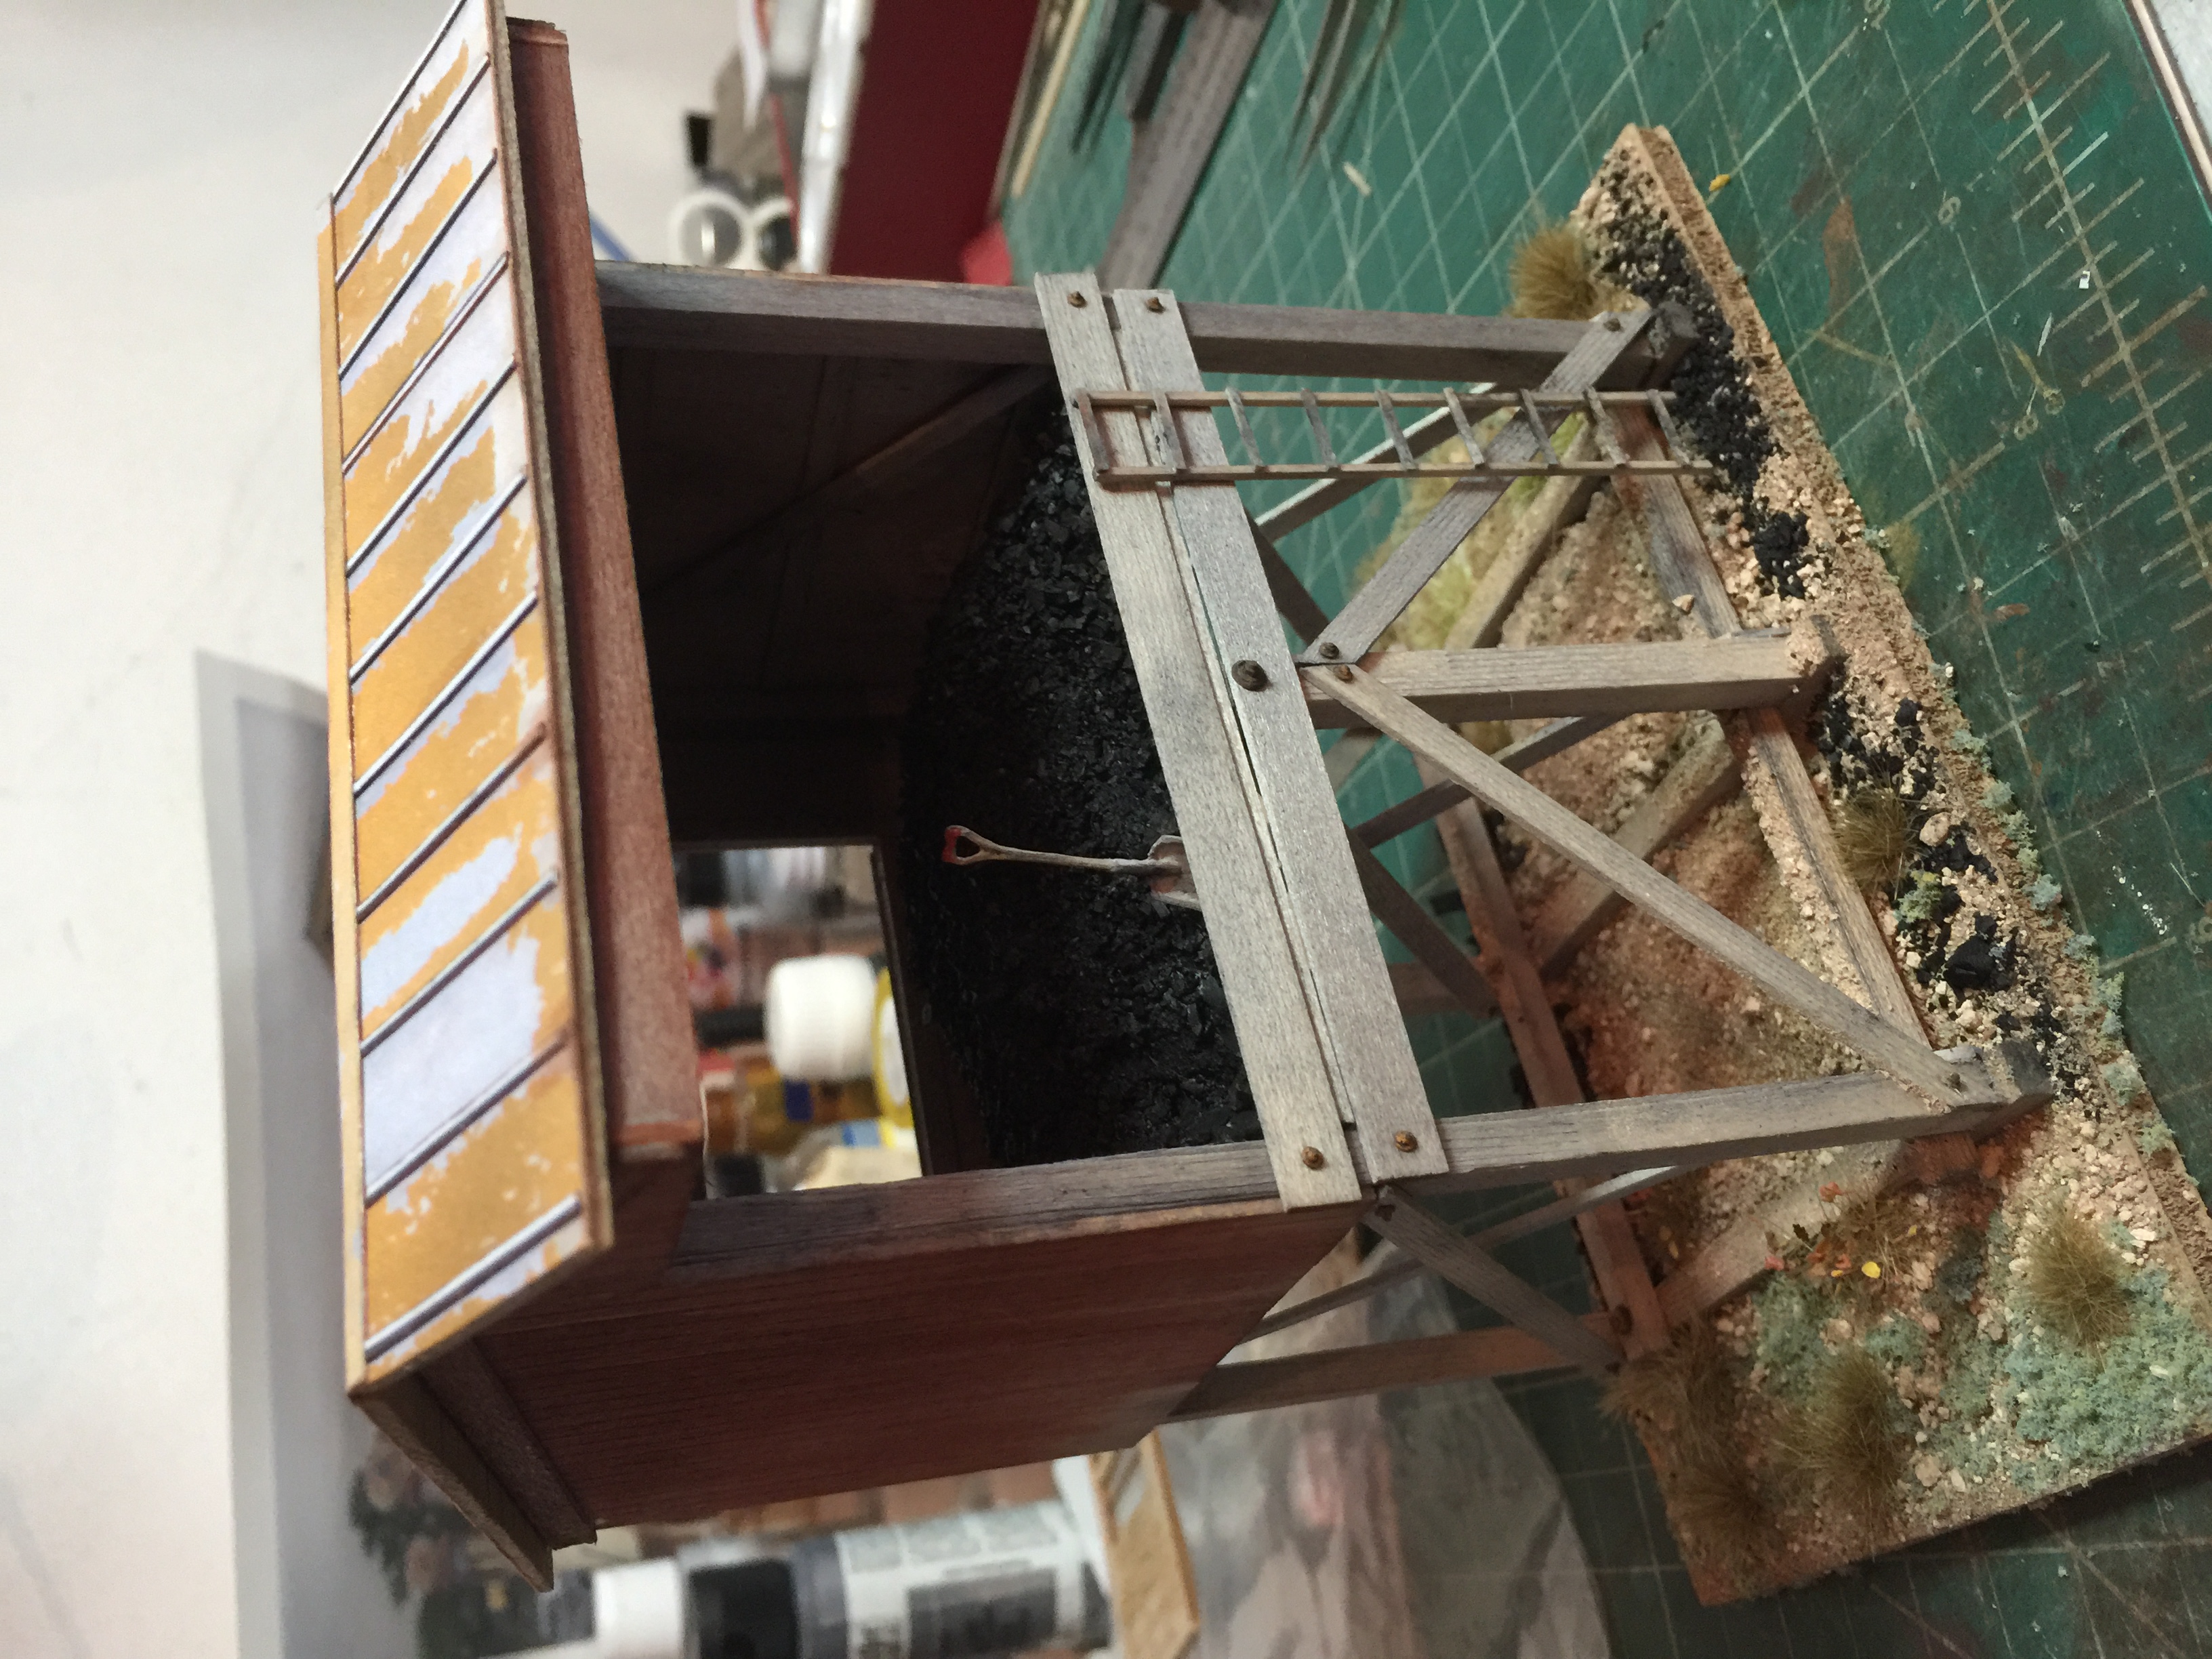
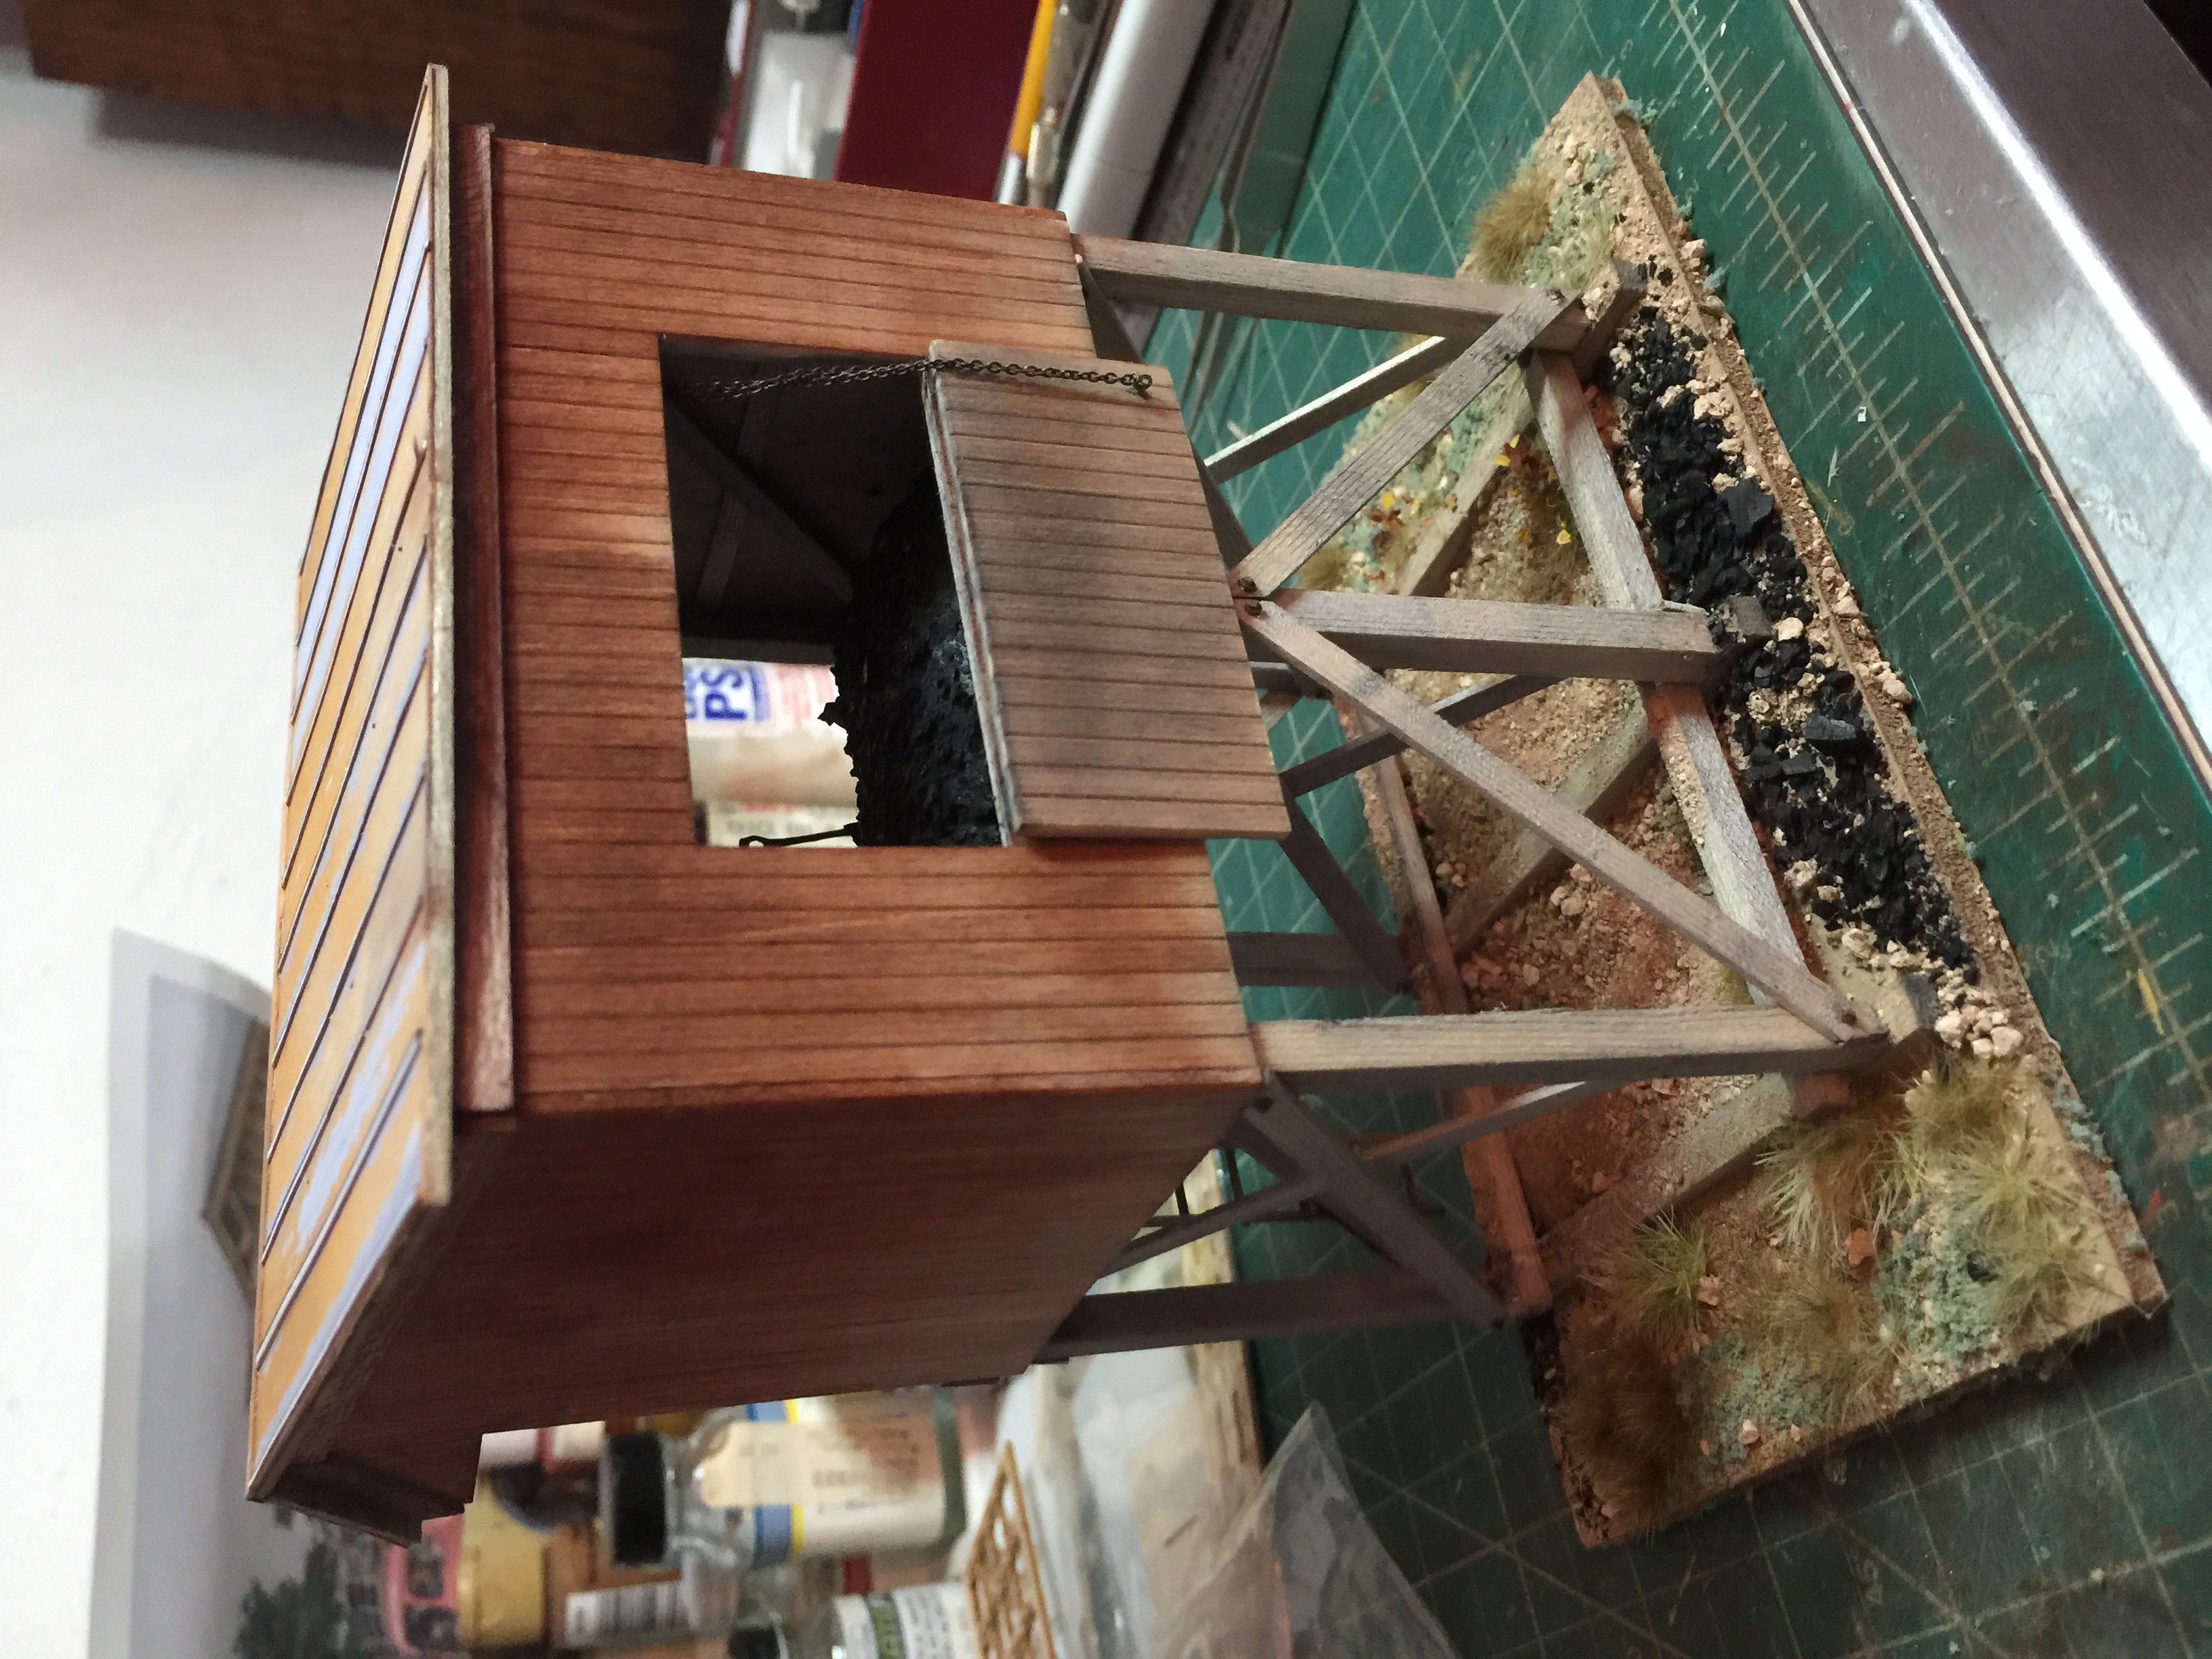
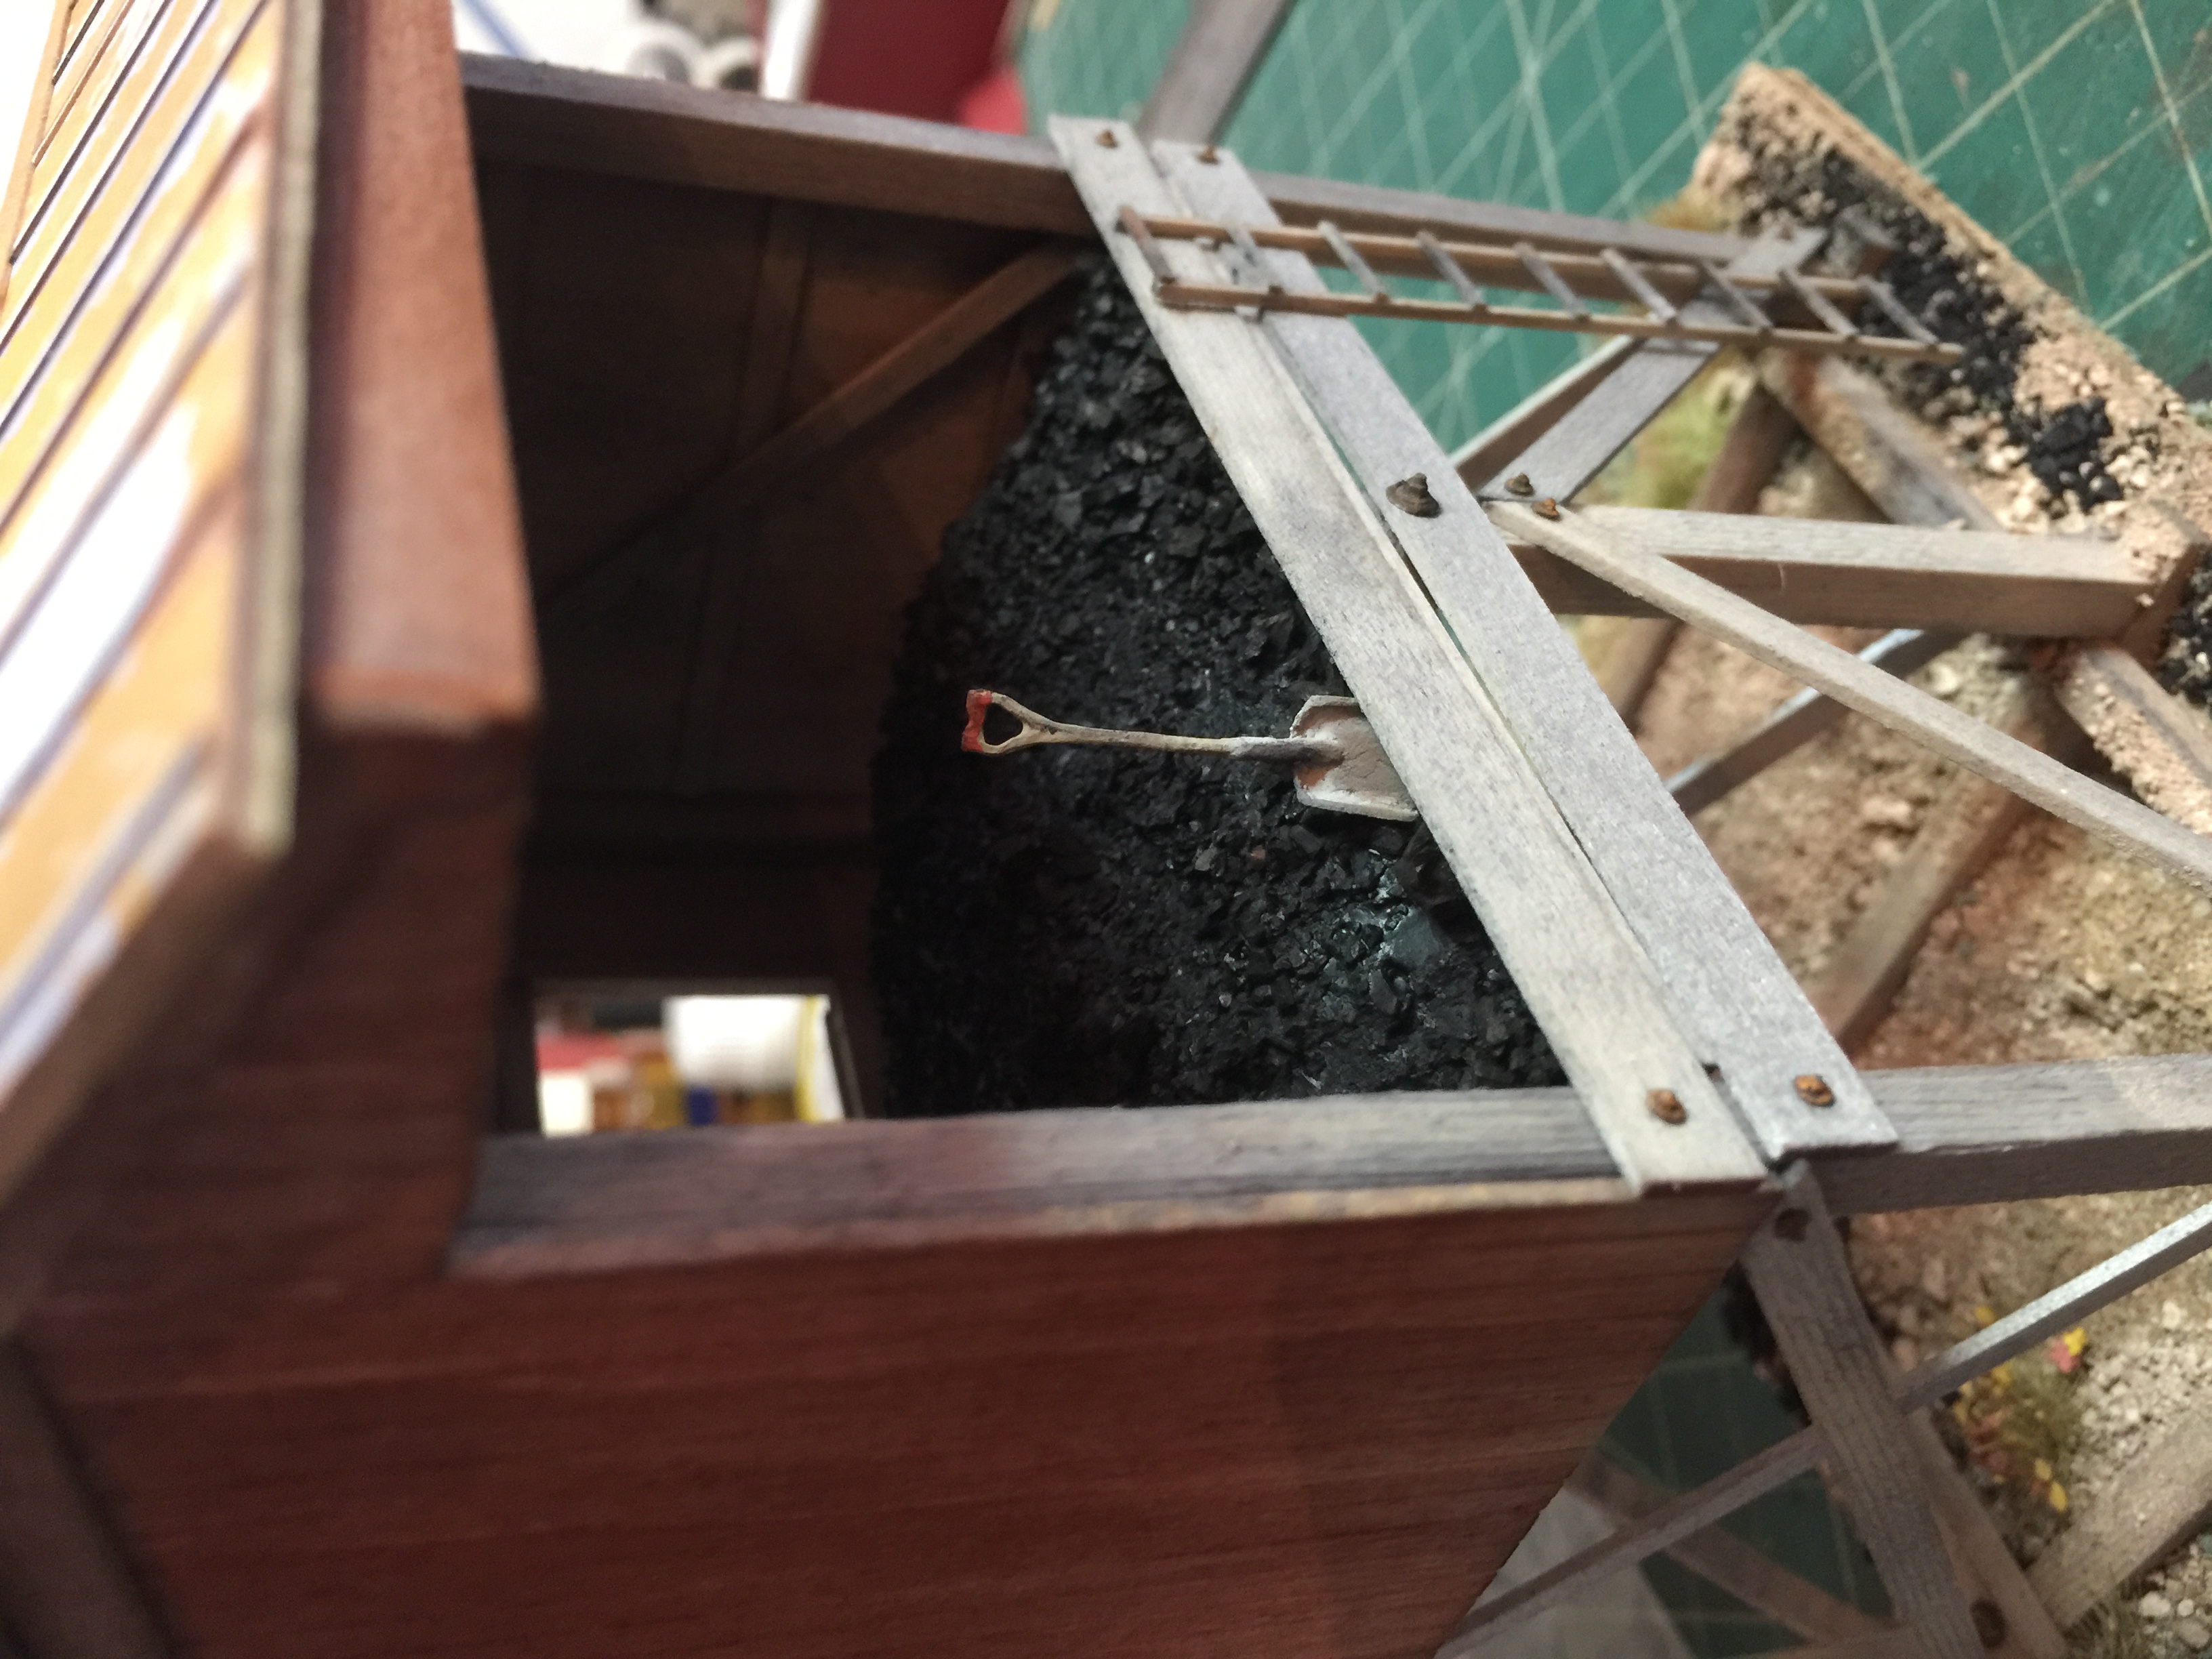
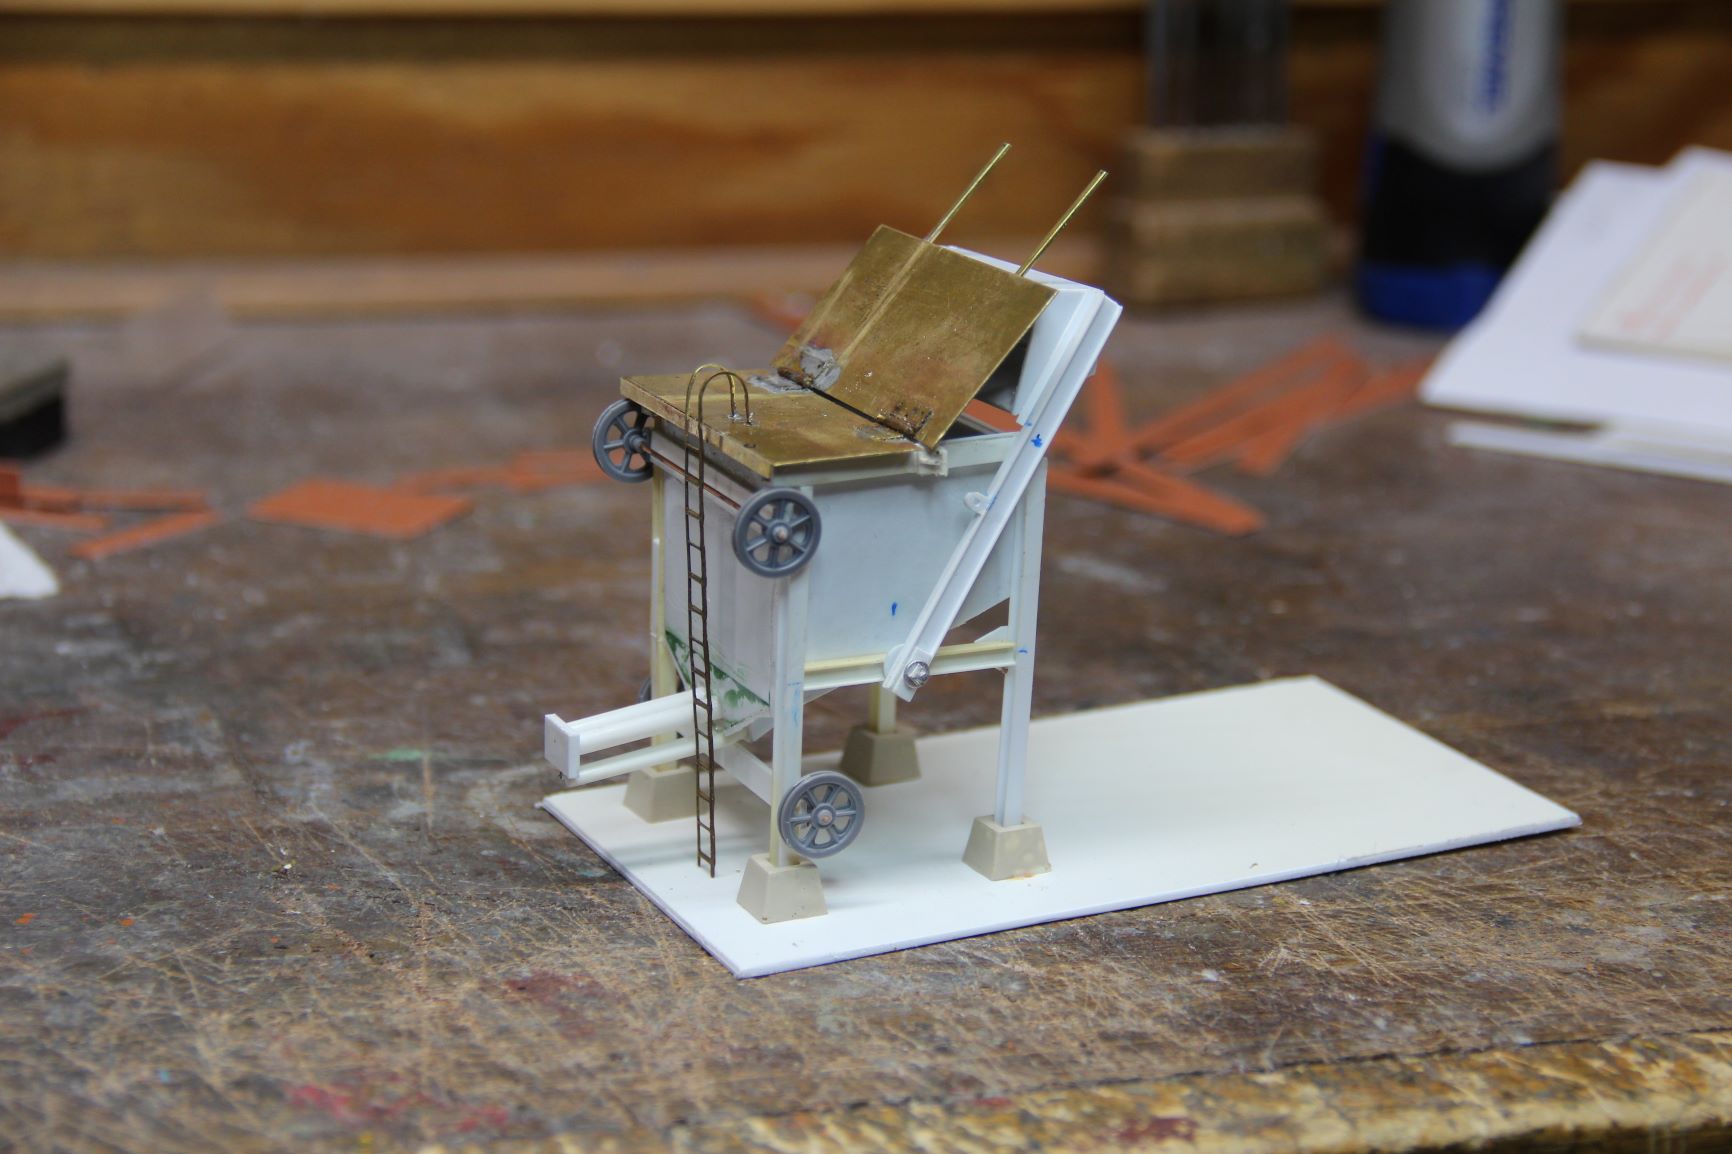
This is a model of my recently completed HO Cliffside Coal Tipple on my prototype freelance C&O Railway.
The mine scene near the top of the cliff is 43 inches from the edge of the layout and was completed a number
of years ago before the last 15 inches of benchwork was added from the mainline in the foreground to the edge.
The tipple consists of the headhouse that receives and stores coal, the tipple, which processes the coal and
the load-out conveyor gantry.
Bob Mitchell
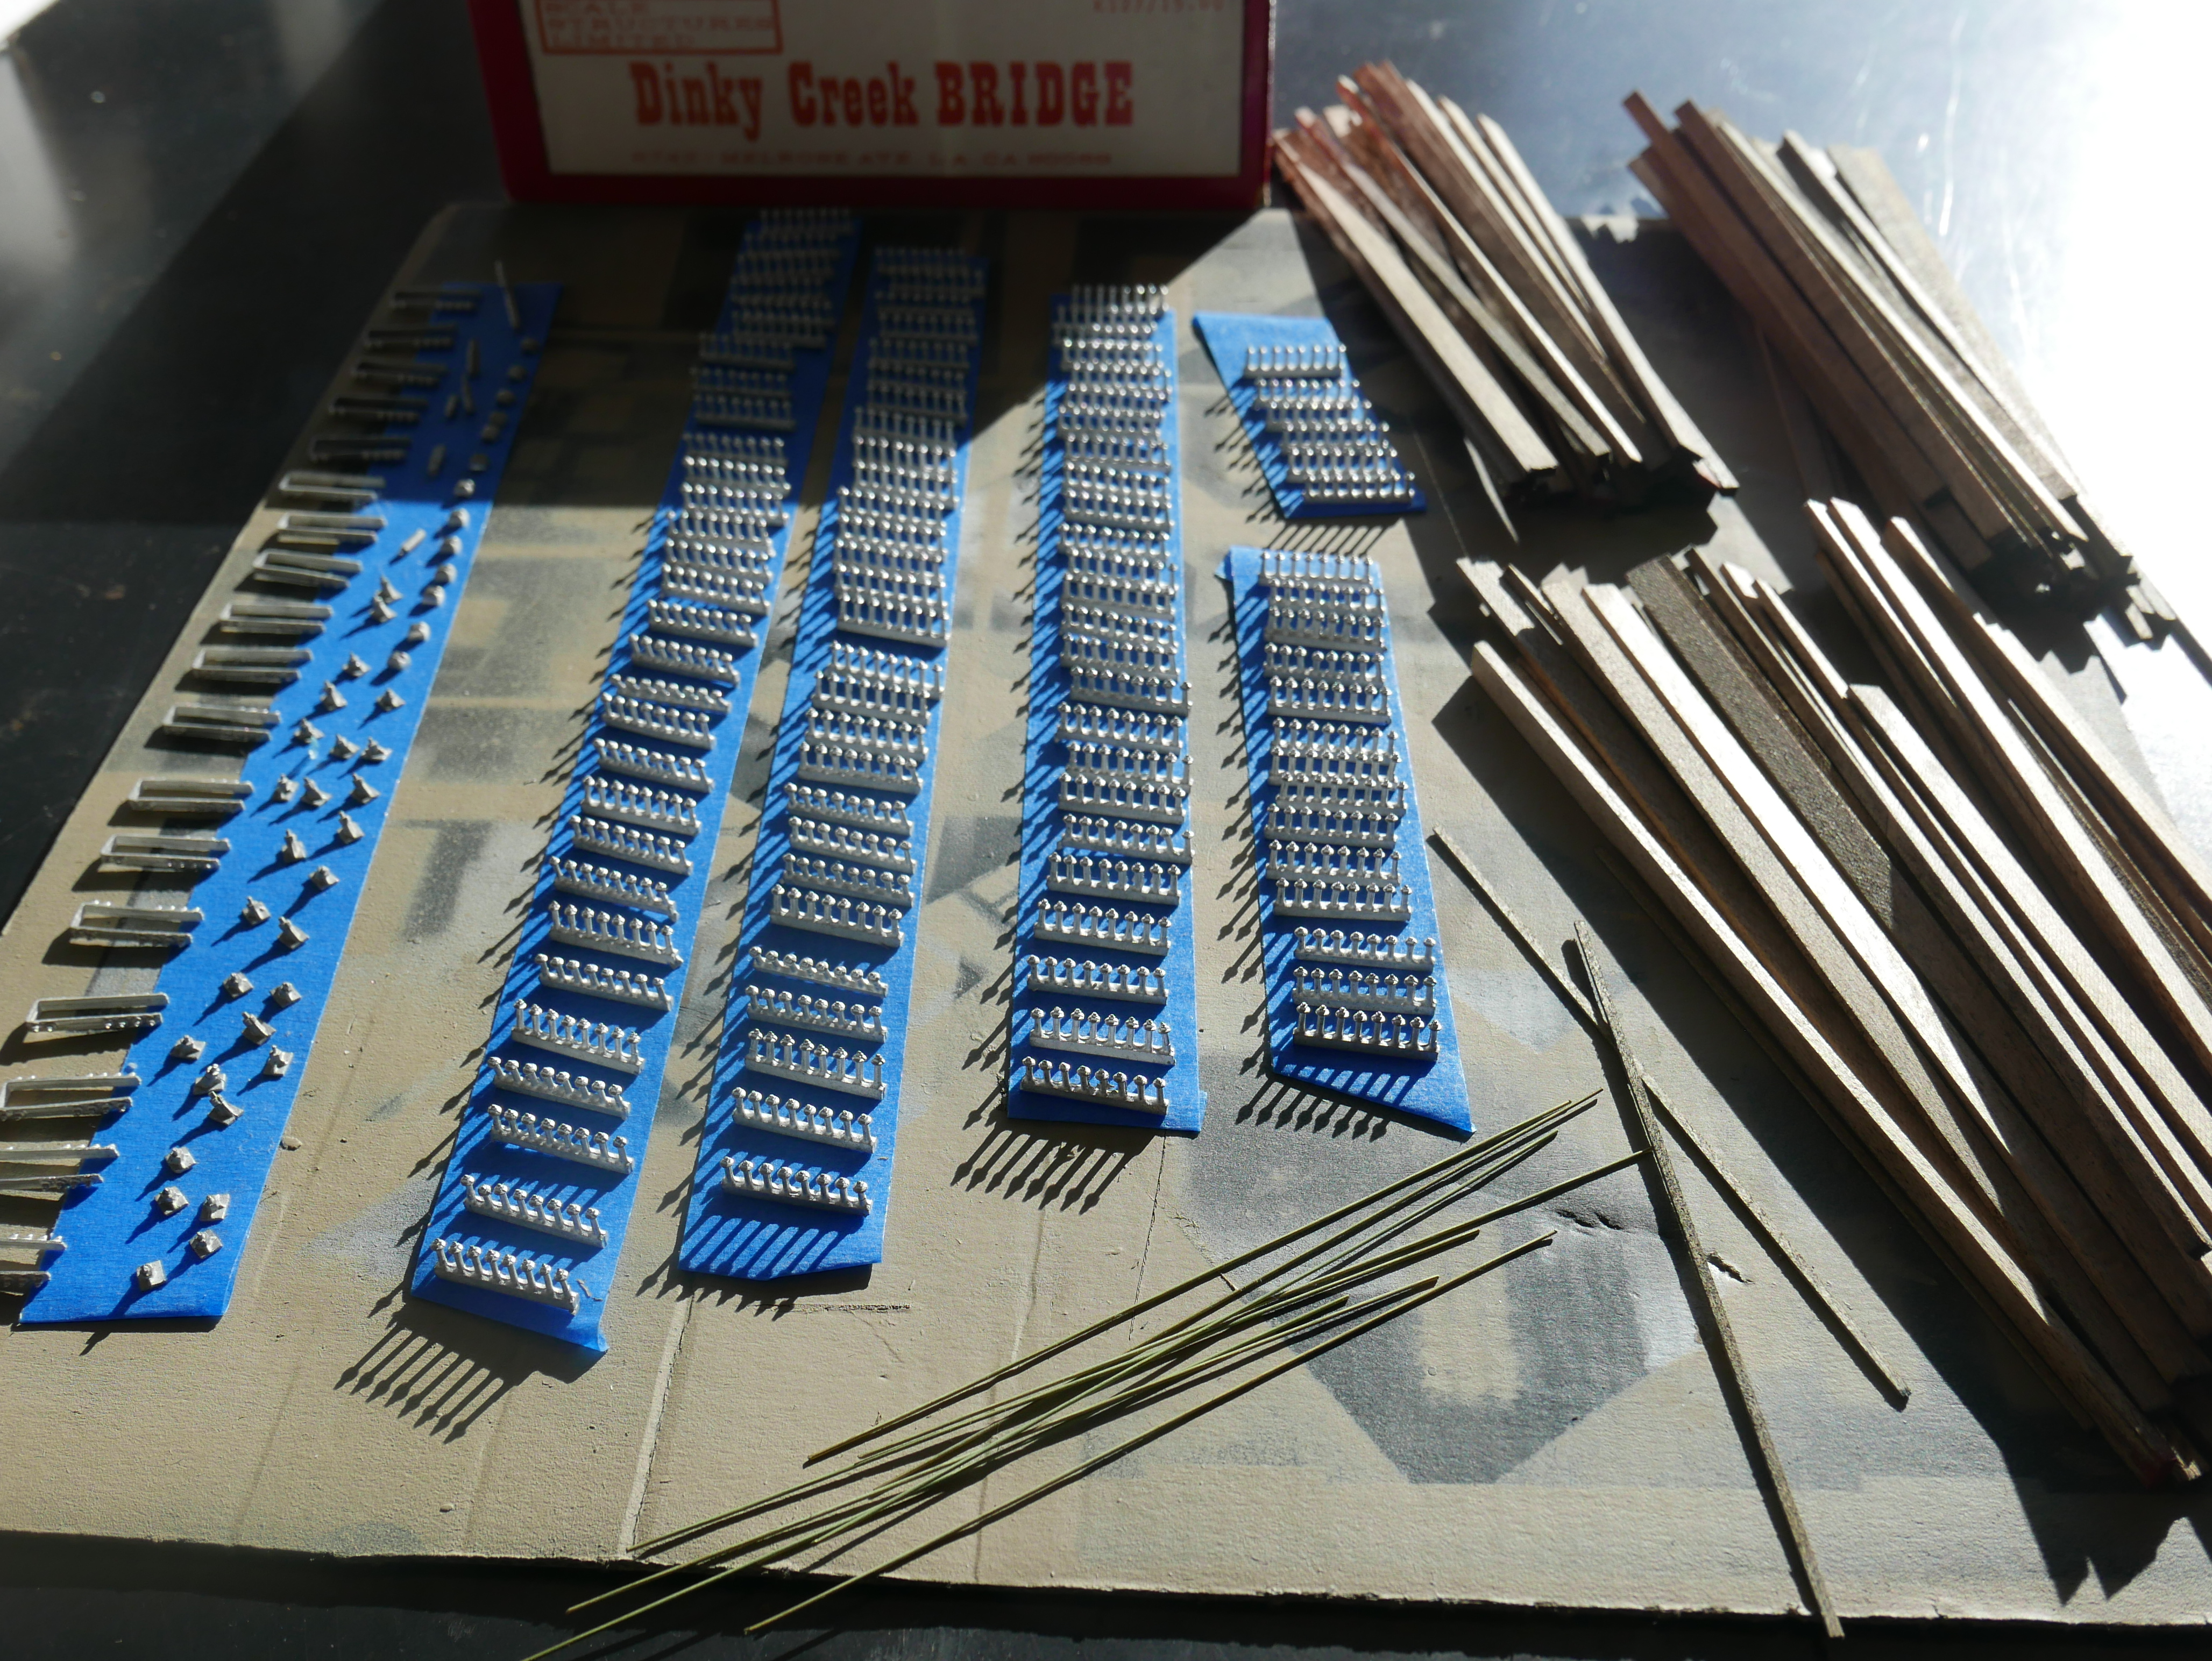
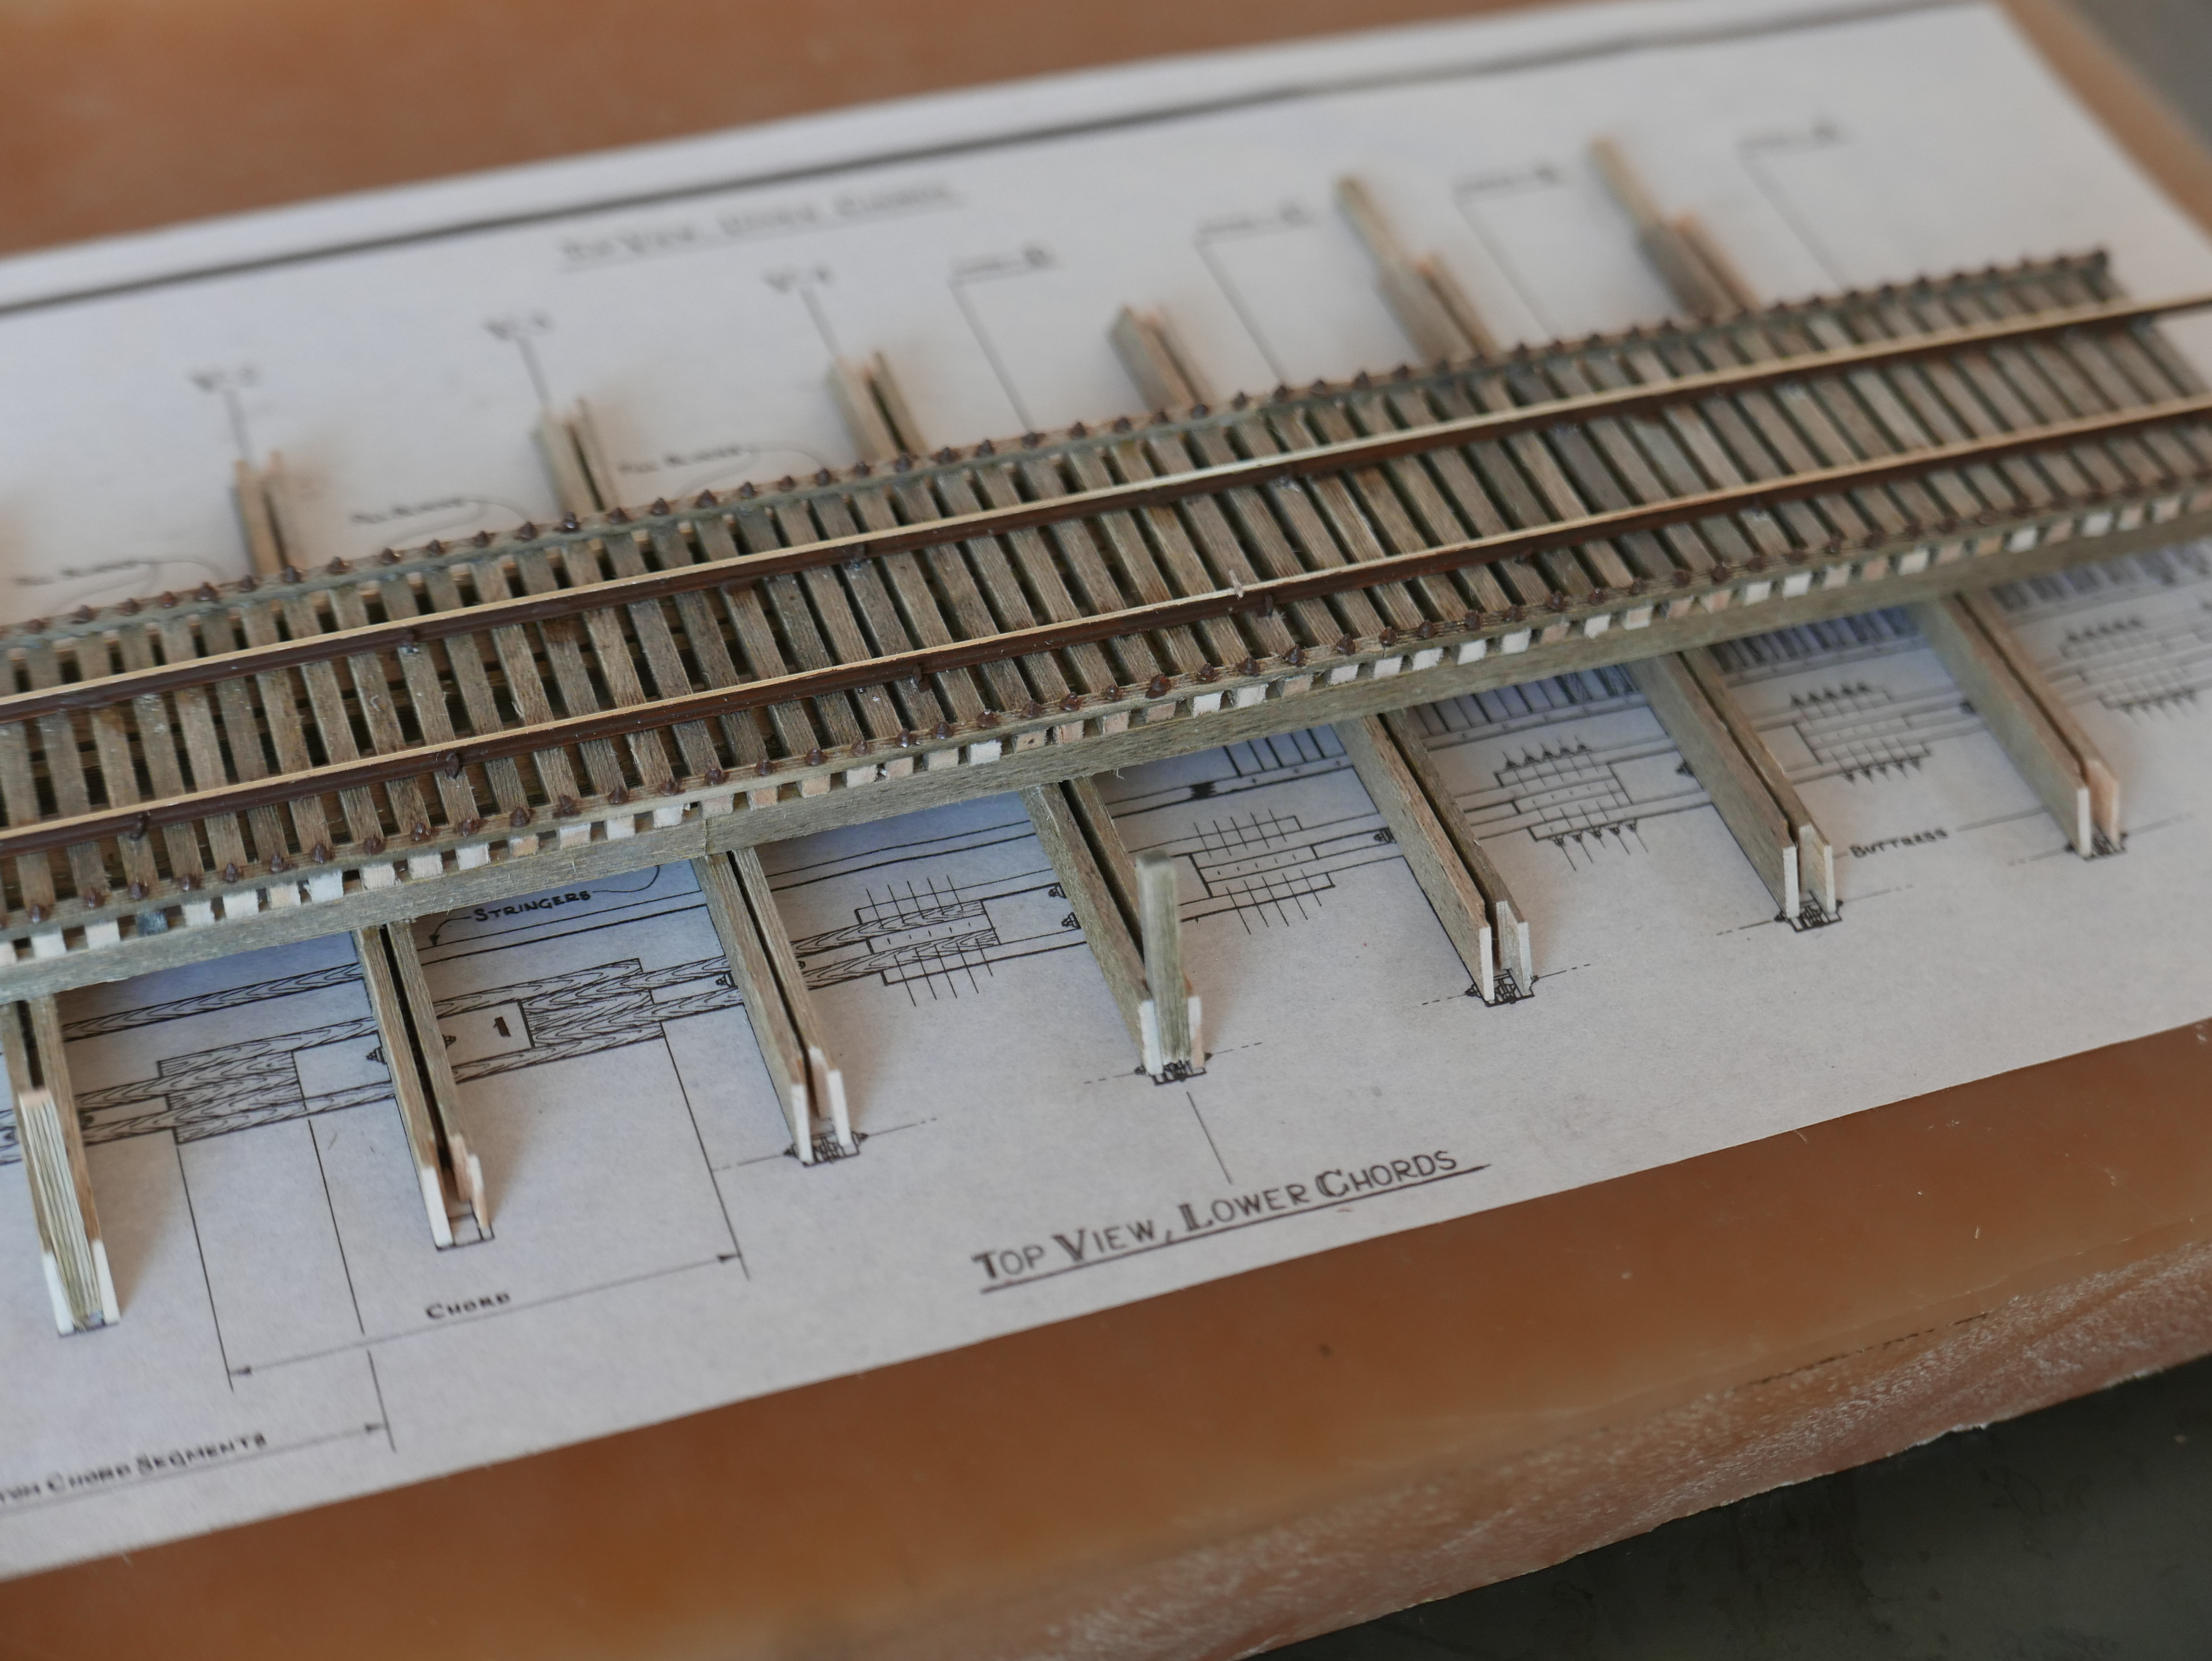
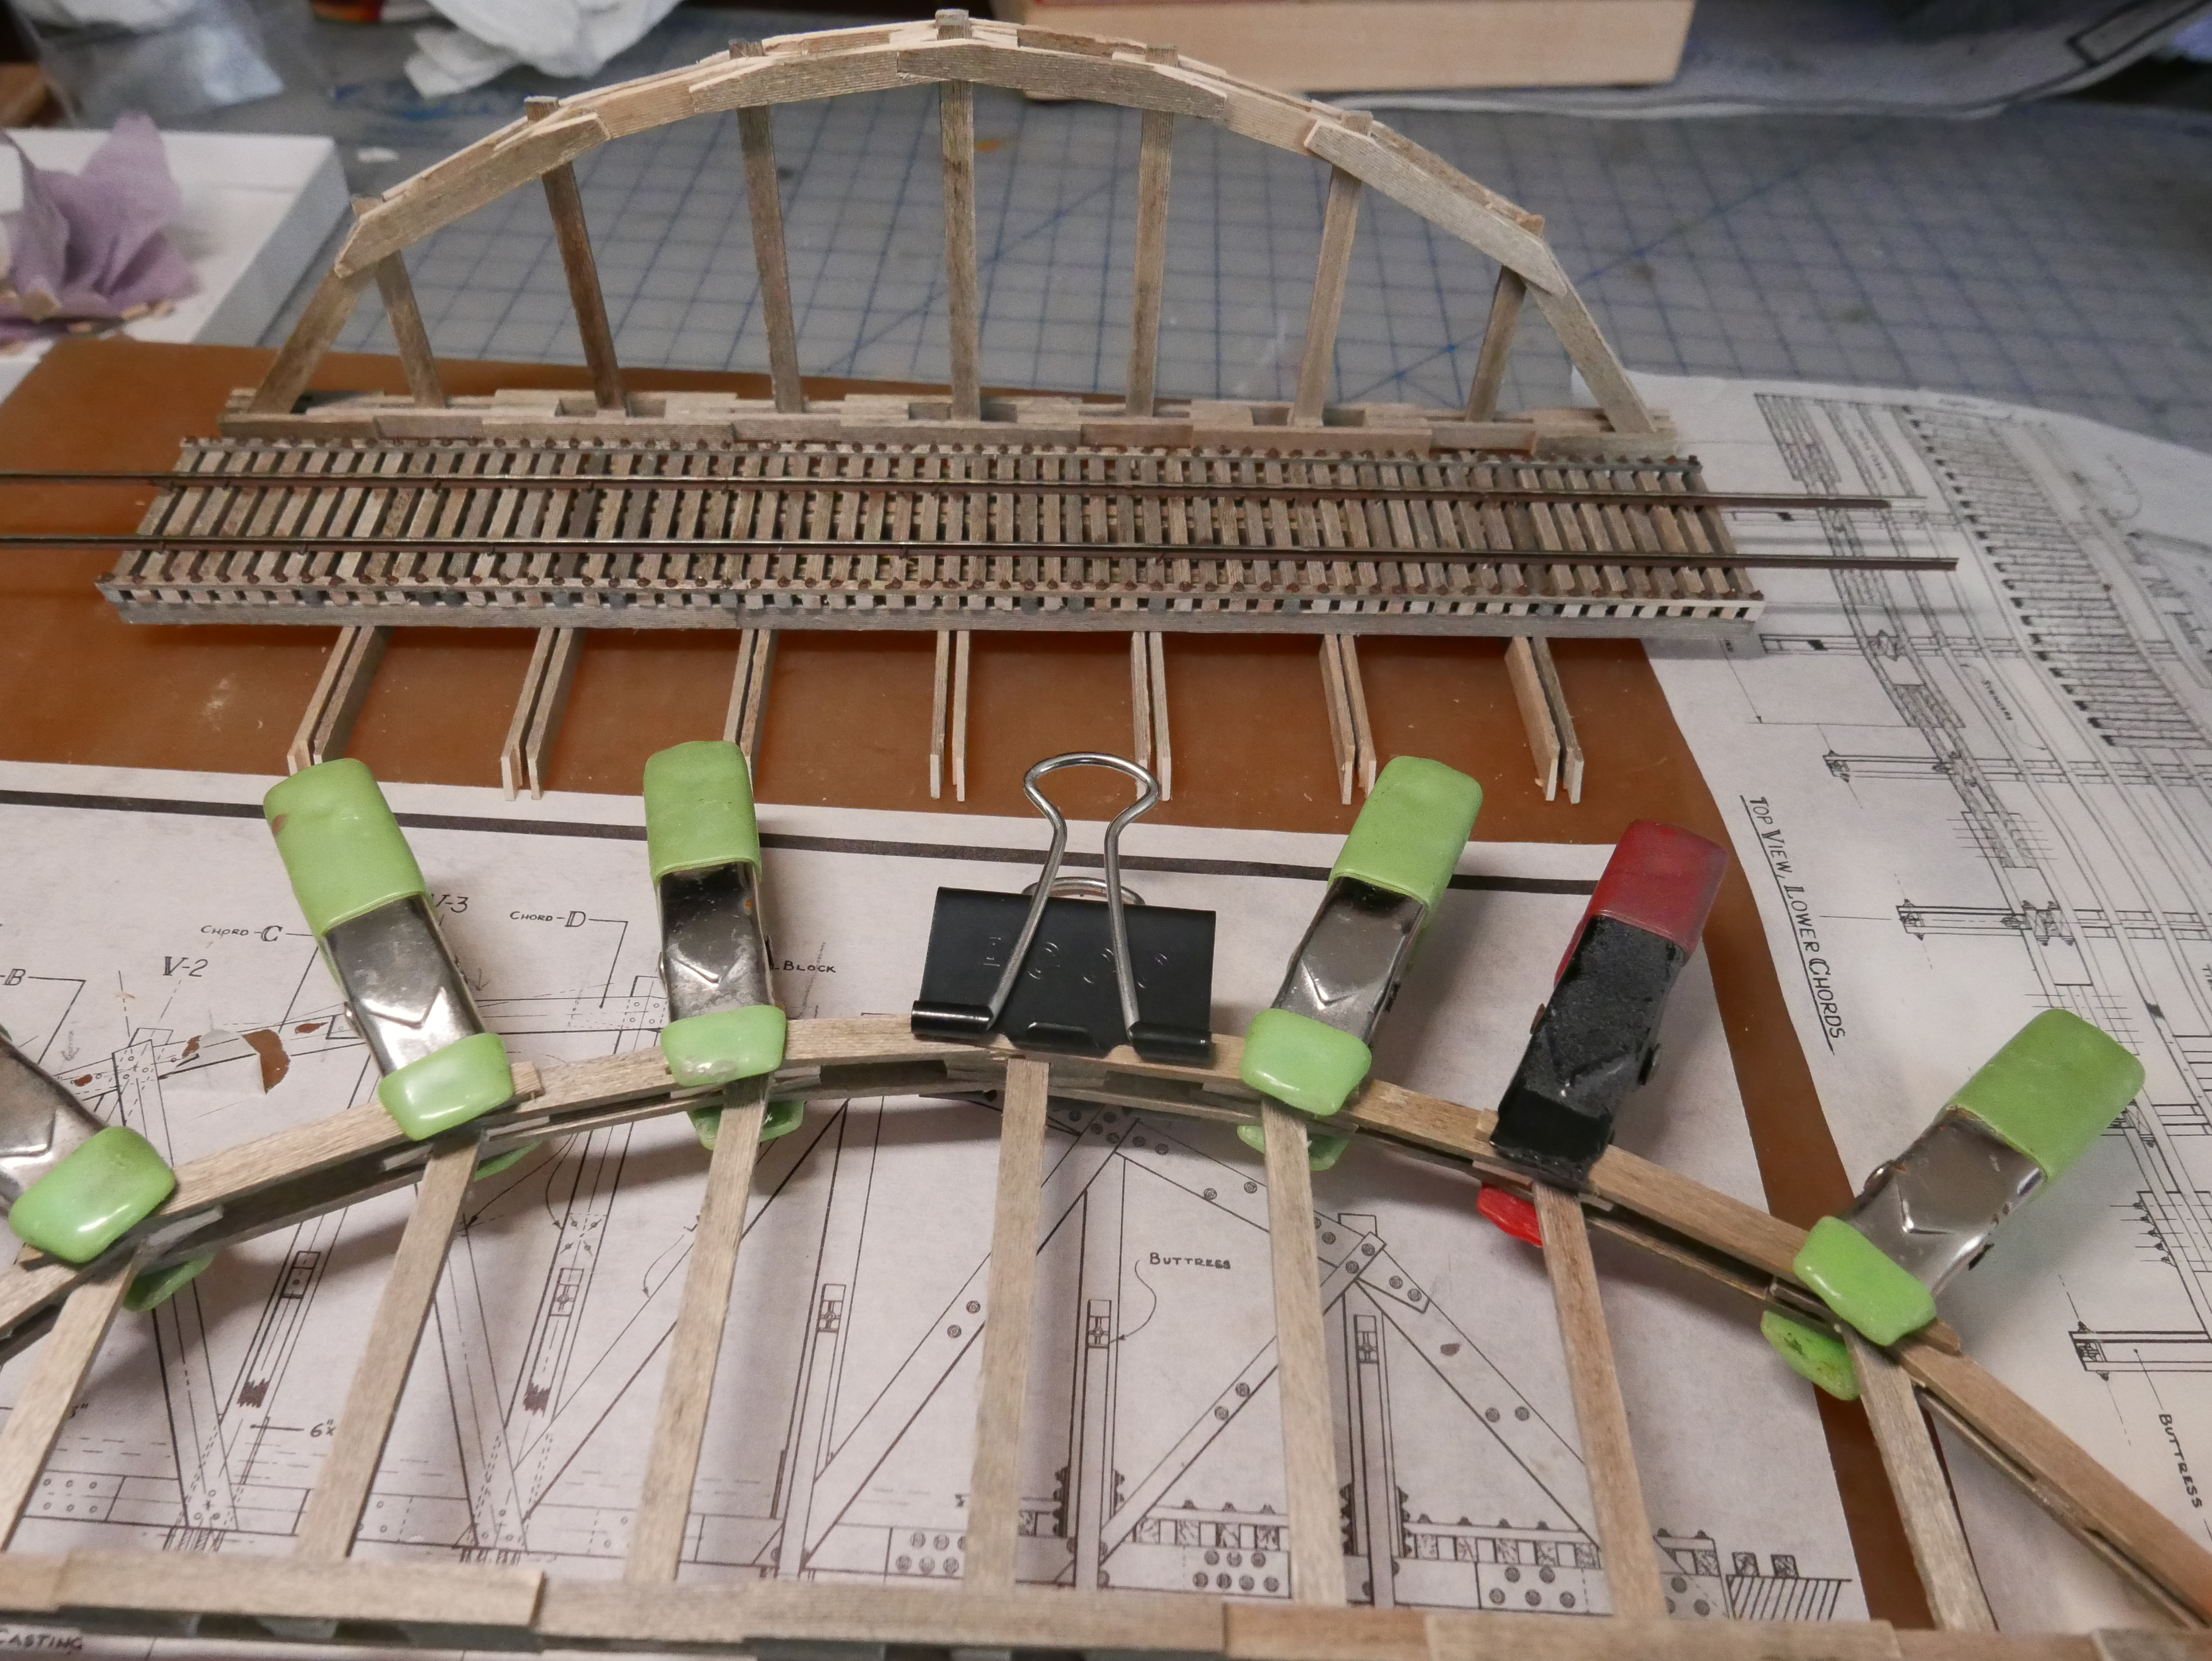
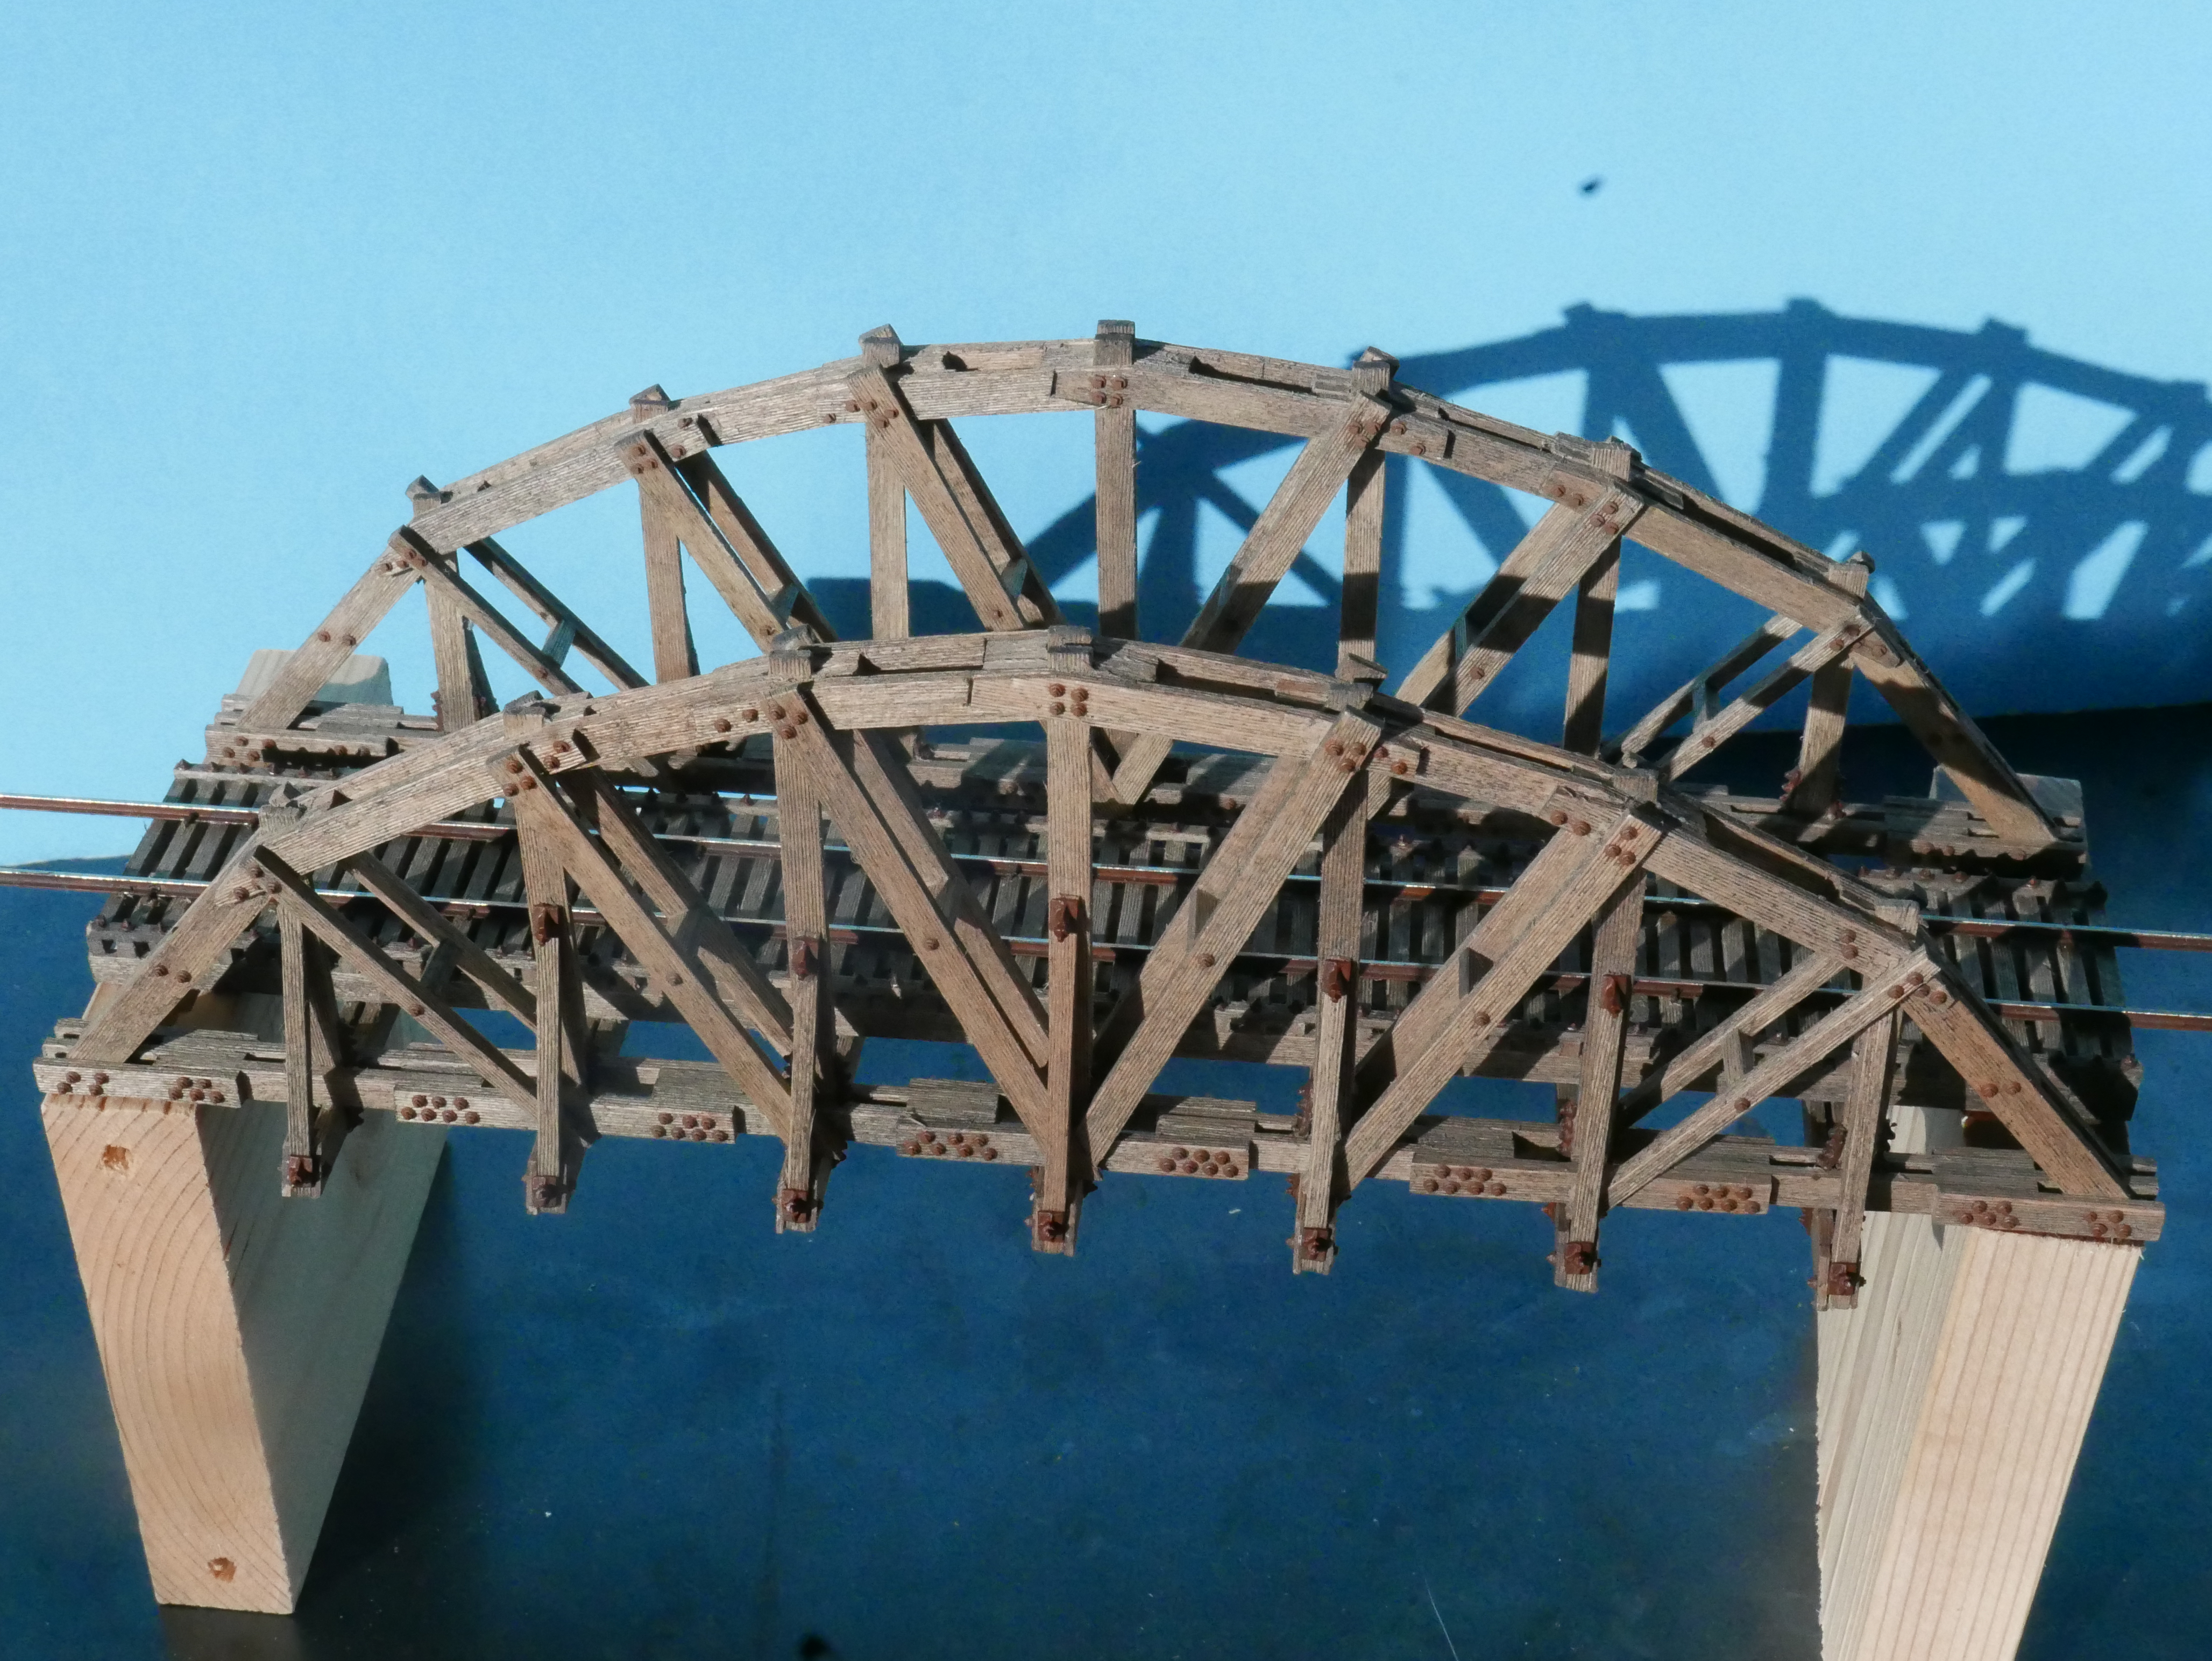
S Scale, Bar Mills store kit
I'm Bob Mitchell, in Weston, CT, and am an inveterate structure-builder. Inexplicably, I started building wood bridge kits,
and just finished the sixth one: blame it on the pandemic and the weather ! The most compelling, engaging, and challenging is,
hands-down, the S.S. Ltd. "Dinkey Creek" bridge, based on a still-extant CA prototype. The kit is a pile of sticks and a passel
of metal castings, with beautiful drawings, and brief directions. Manufactured in HO since the 1970's, I chose Sn3, which required
only a small adjustment in the width between the uprights, no big deal. It is a serious undertaking, far more complex than your
usual Campbell bridge kit, but the smartest thing I did was swap the metal NBW castings for Tichy plastic ones, as it's a challenge
to get paint to adhere to the kit's metal ones, when the model is handled during construction. There are numerous castings that are
unavailable in plastic, so, lots of touch-ups !
BUILDING A PICKLE SALTING STATION
by
Joe Kavanagh
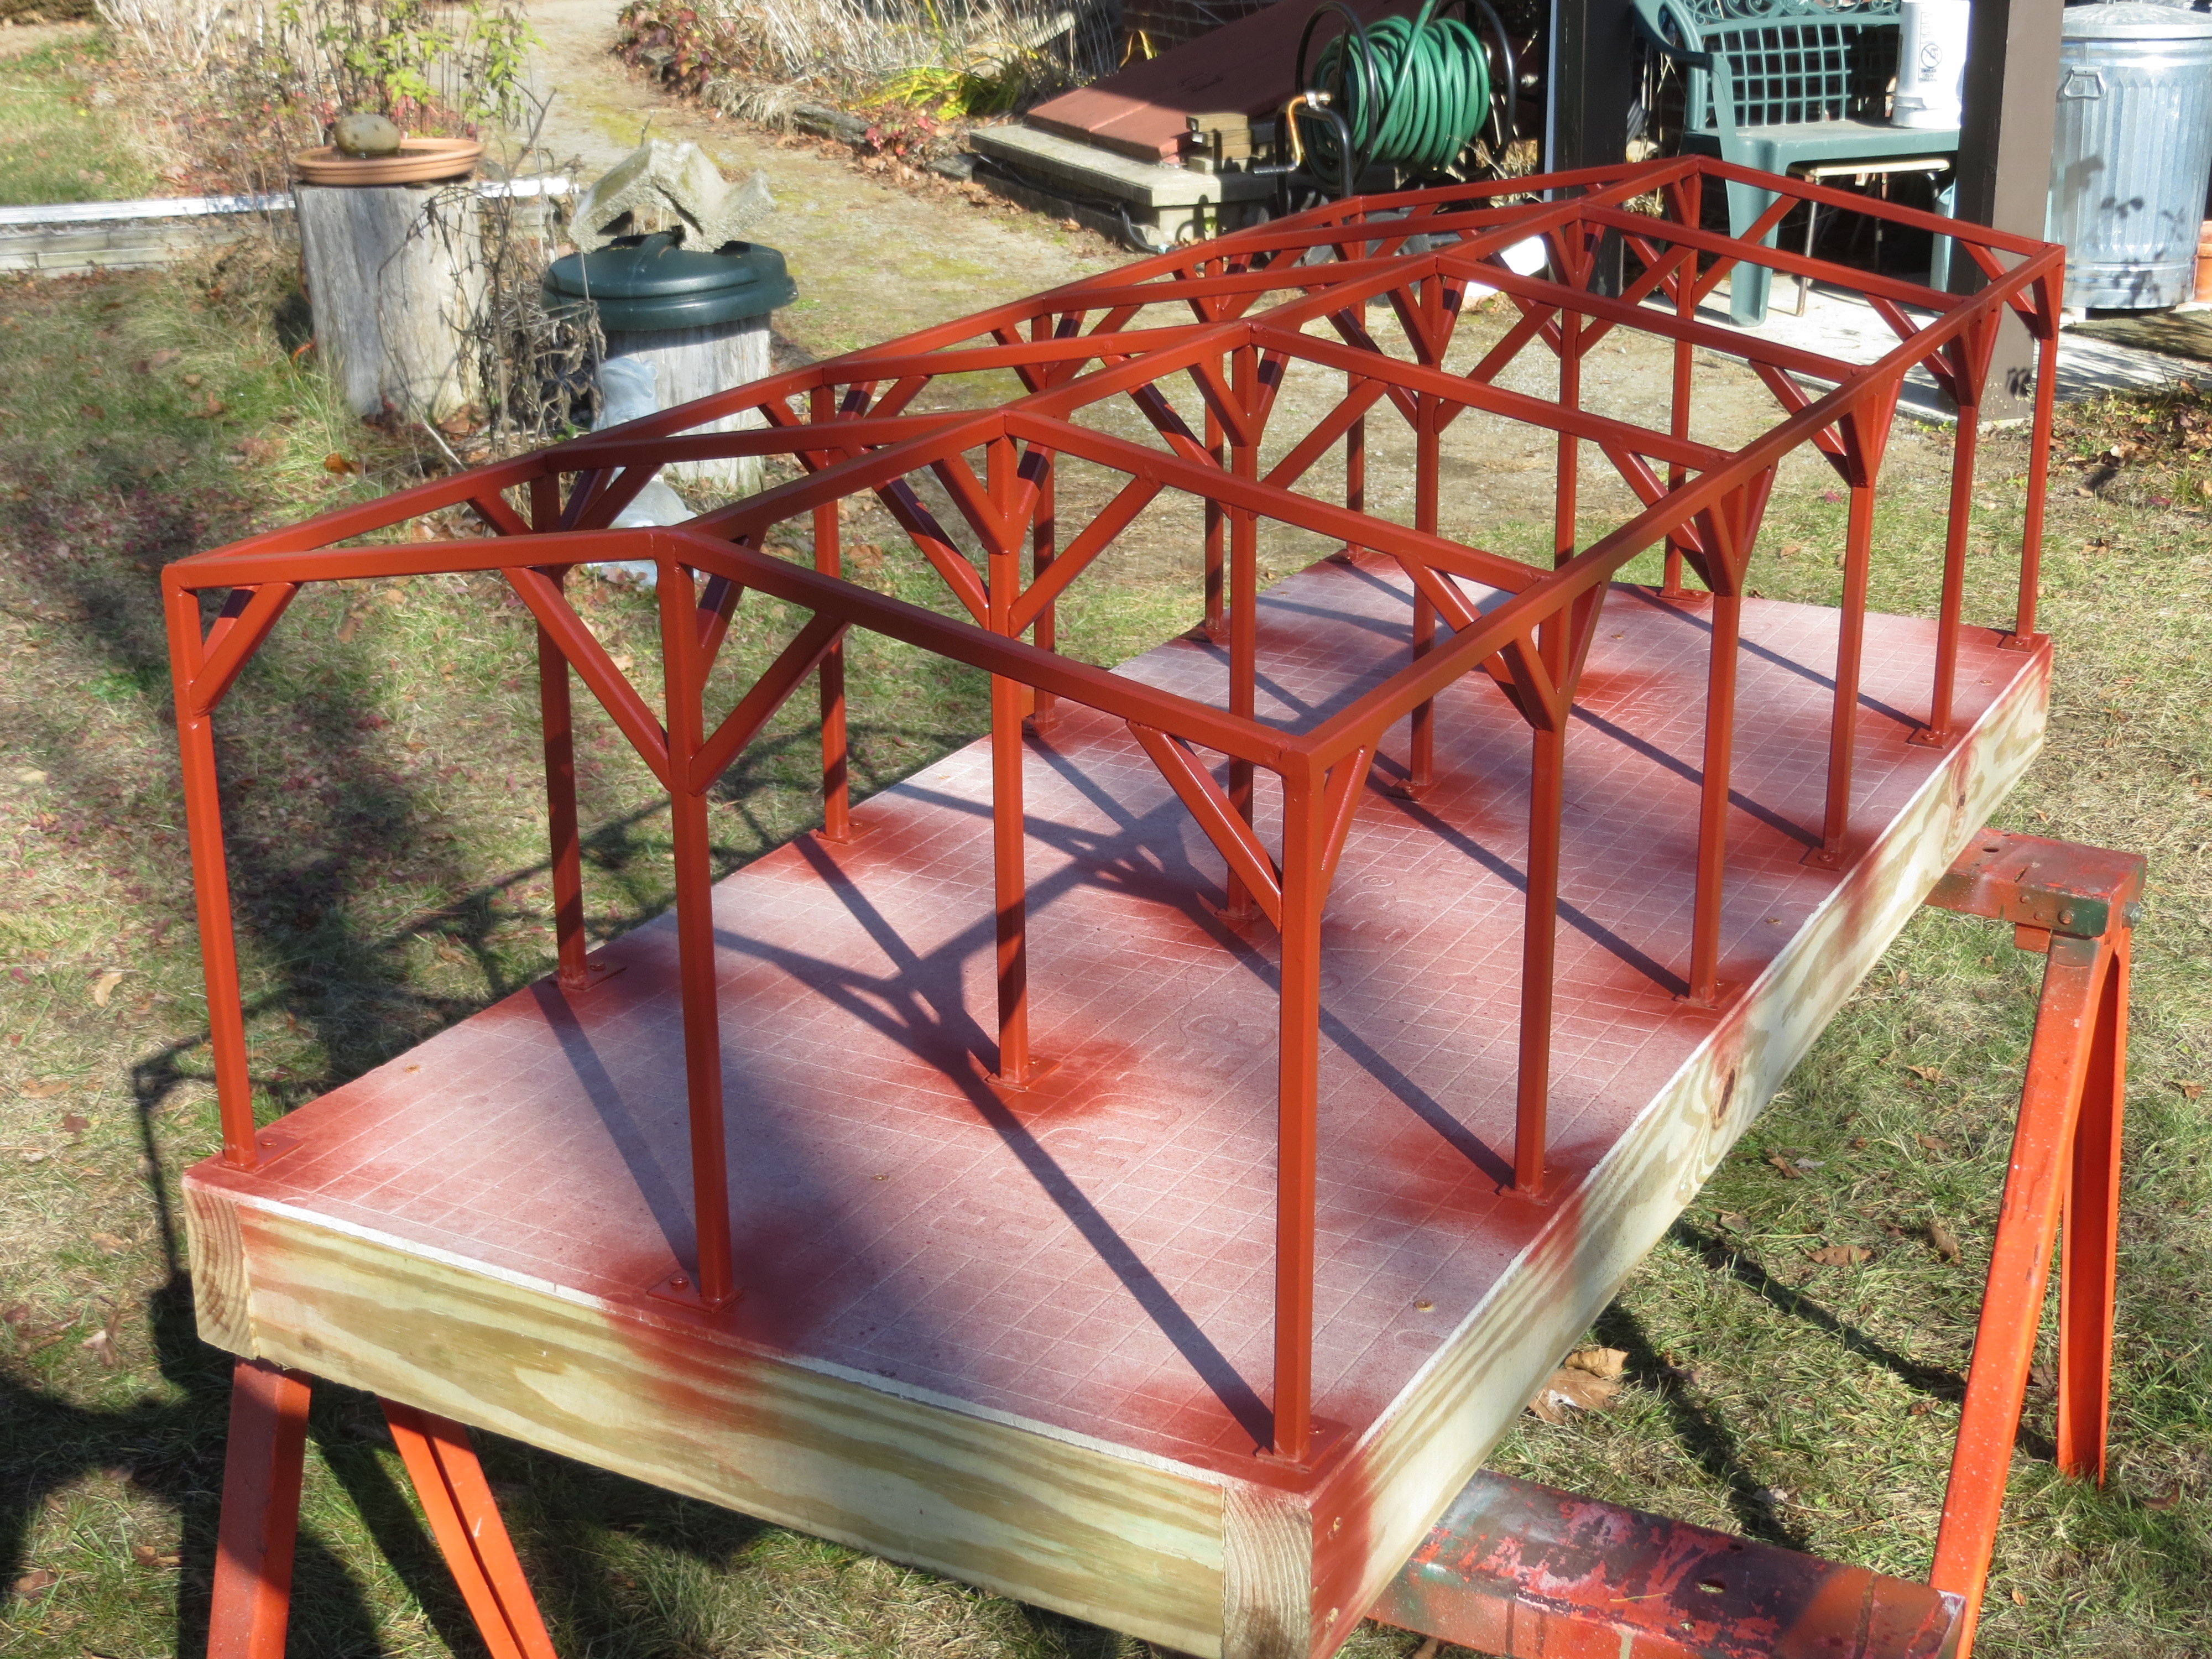
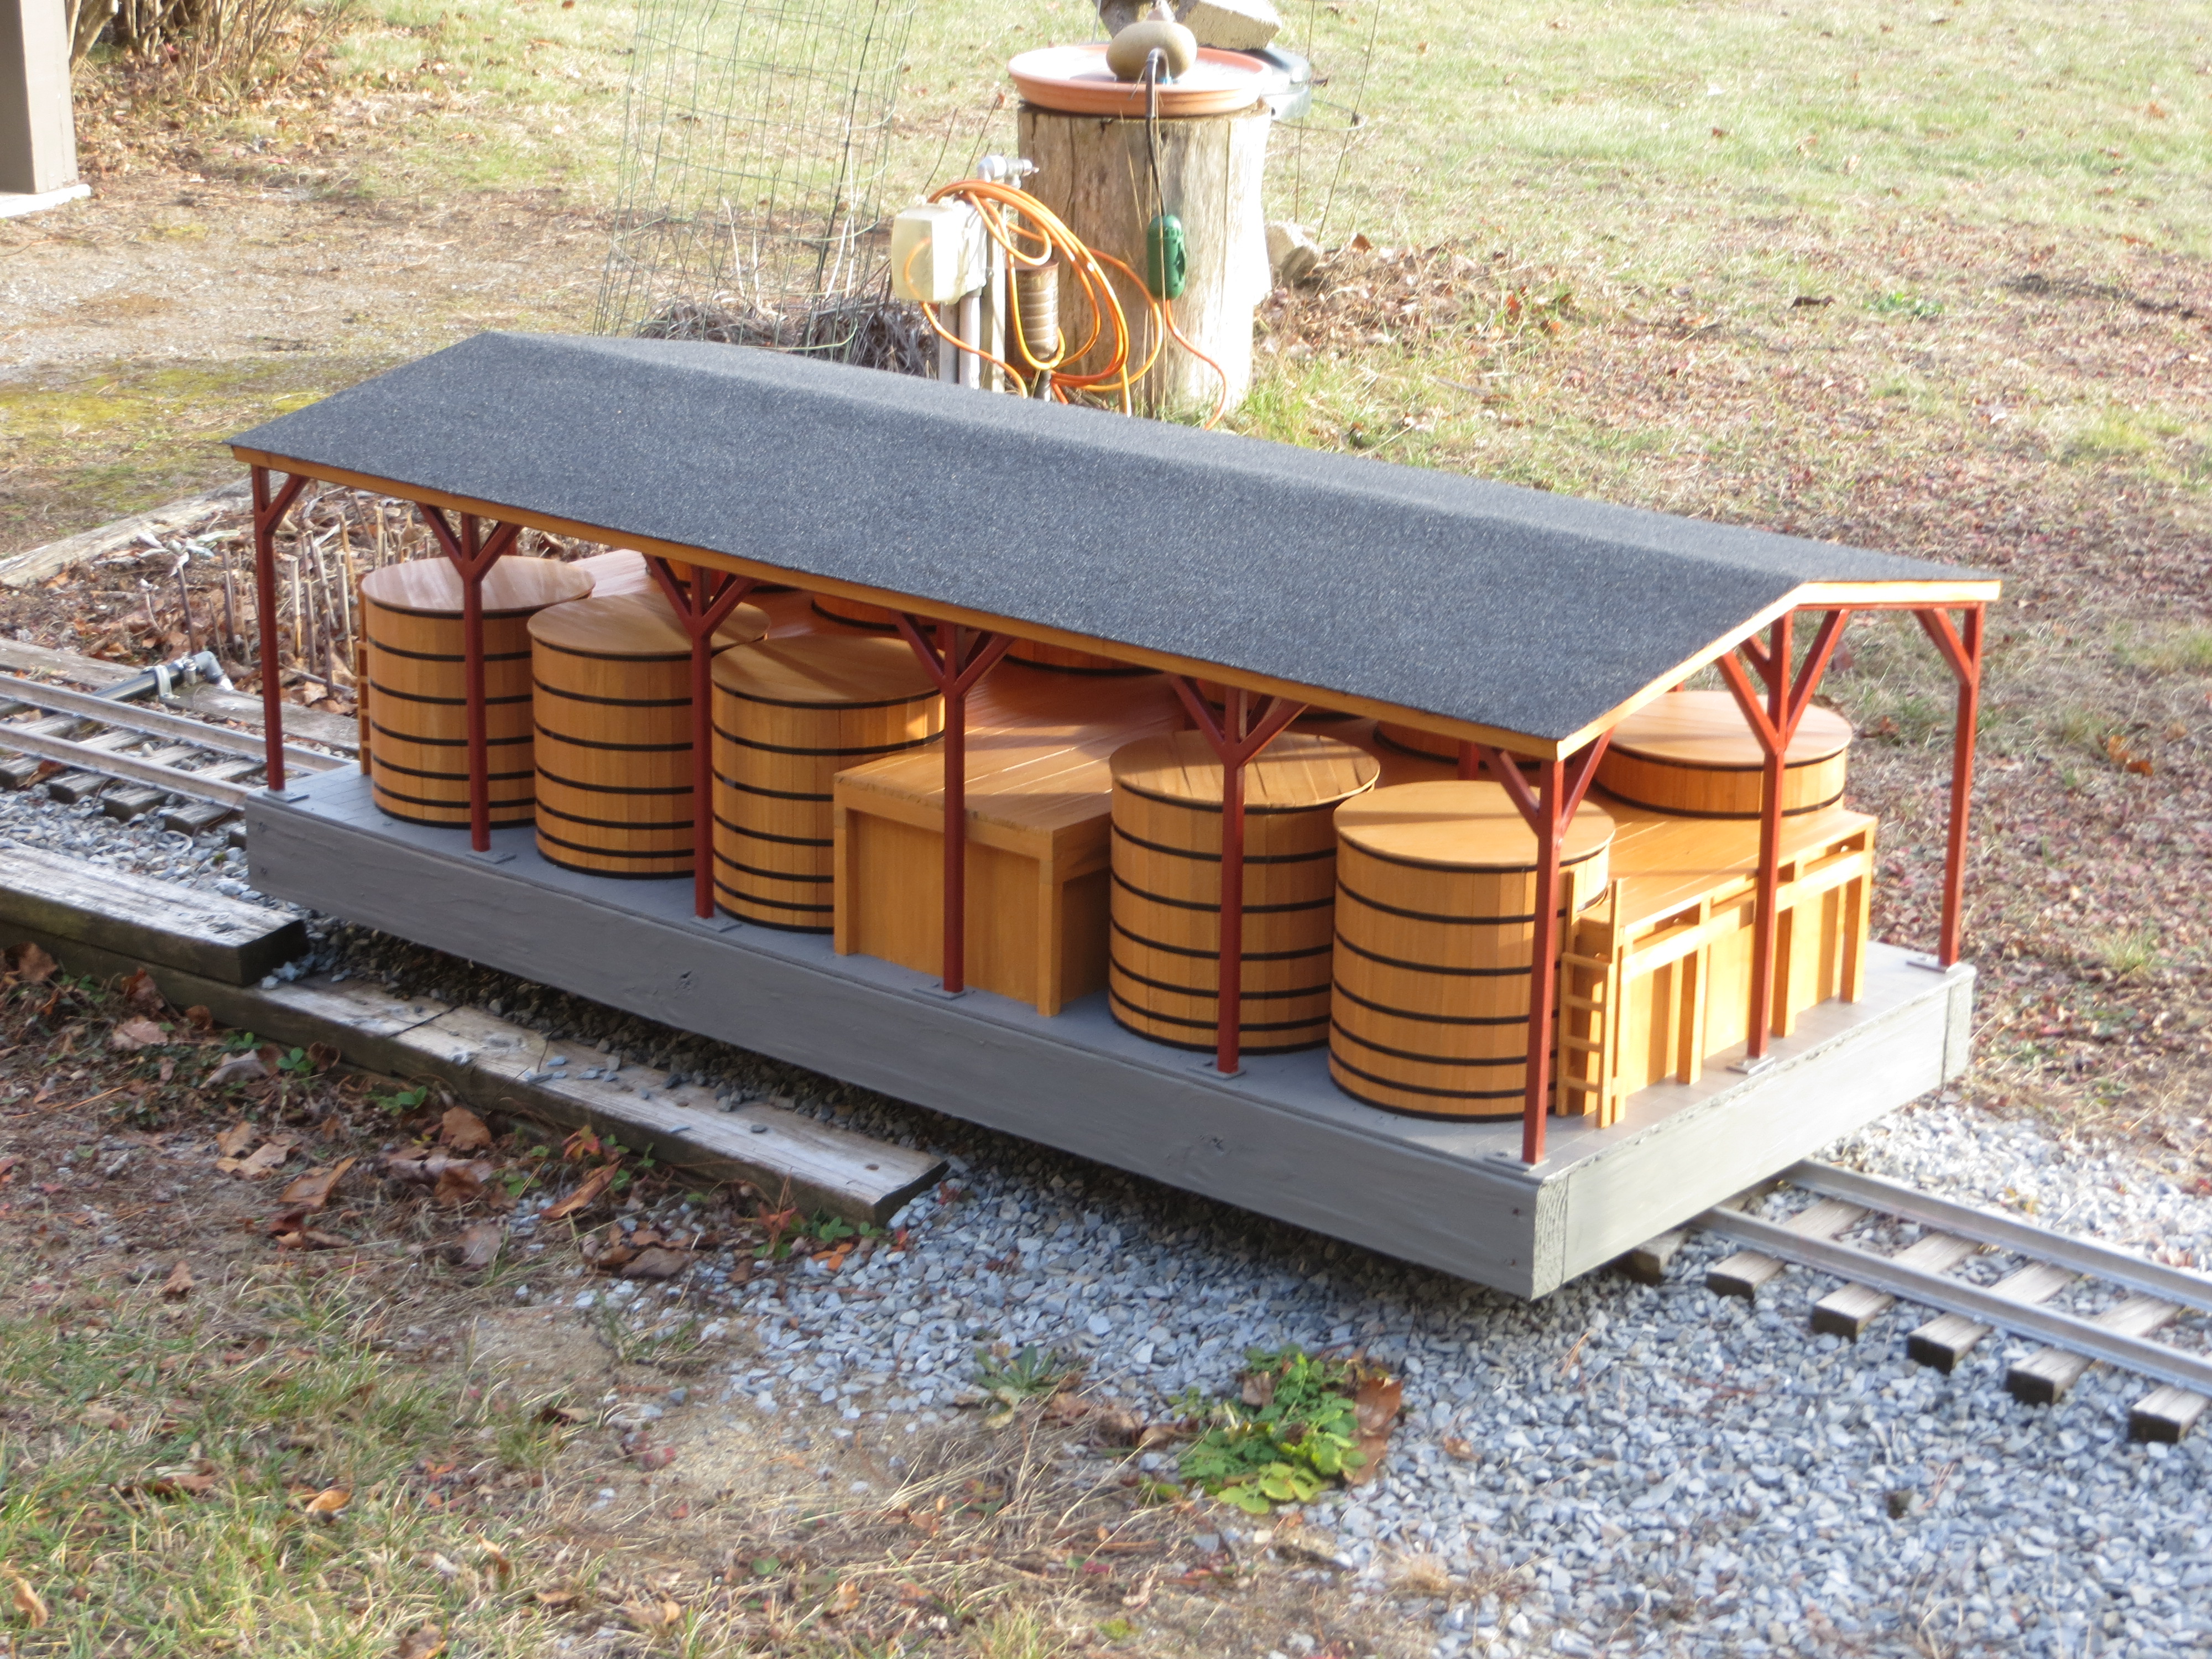
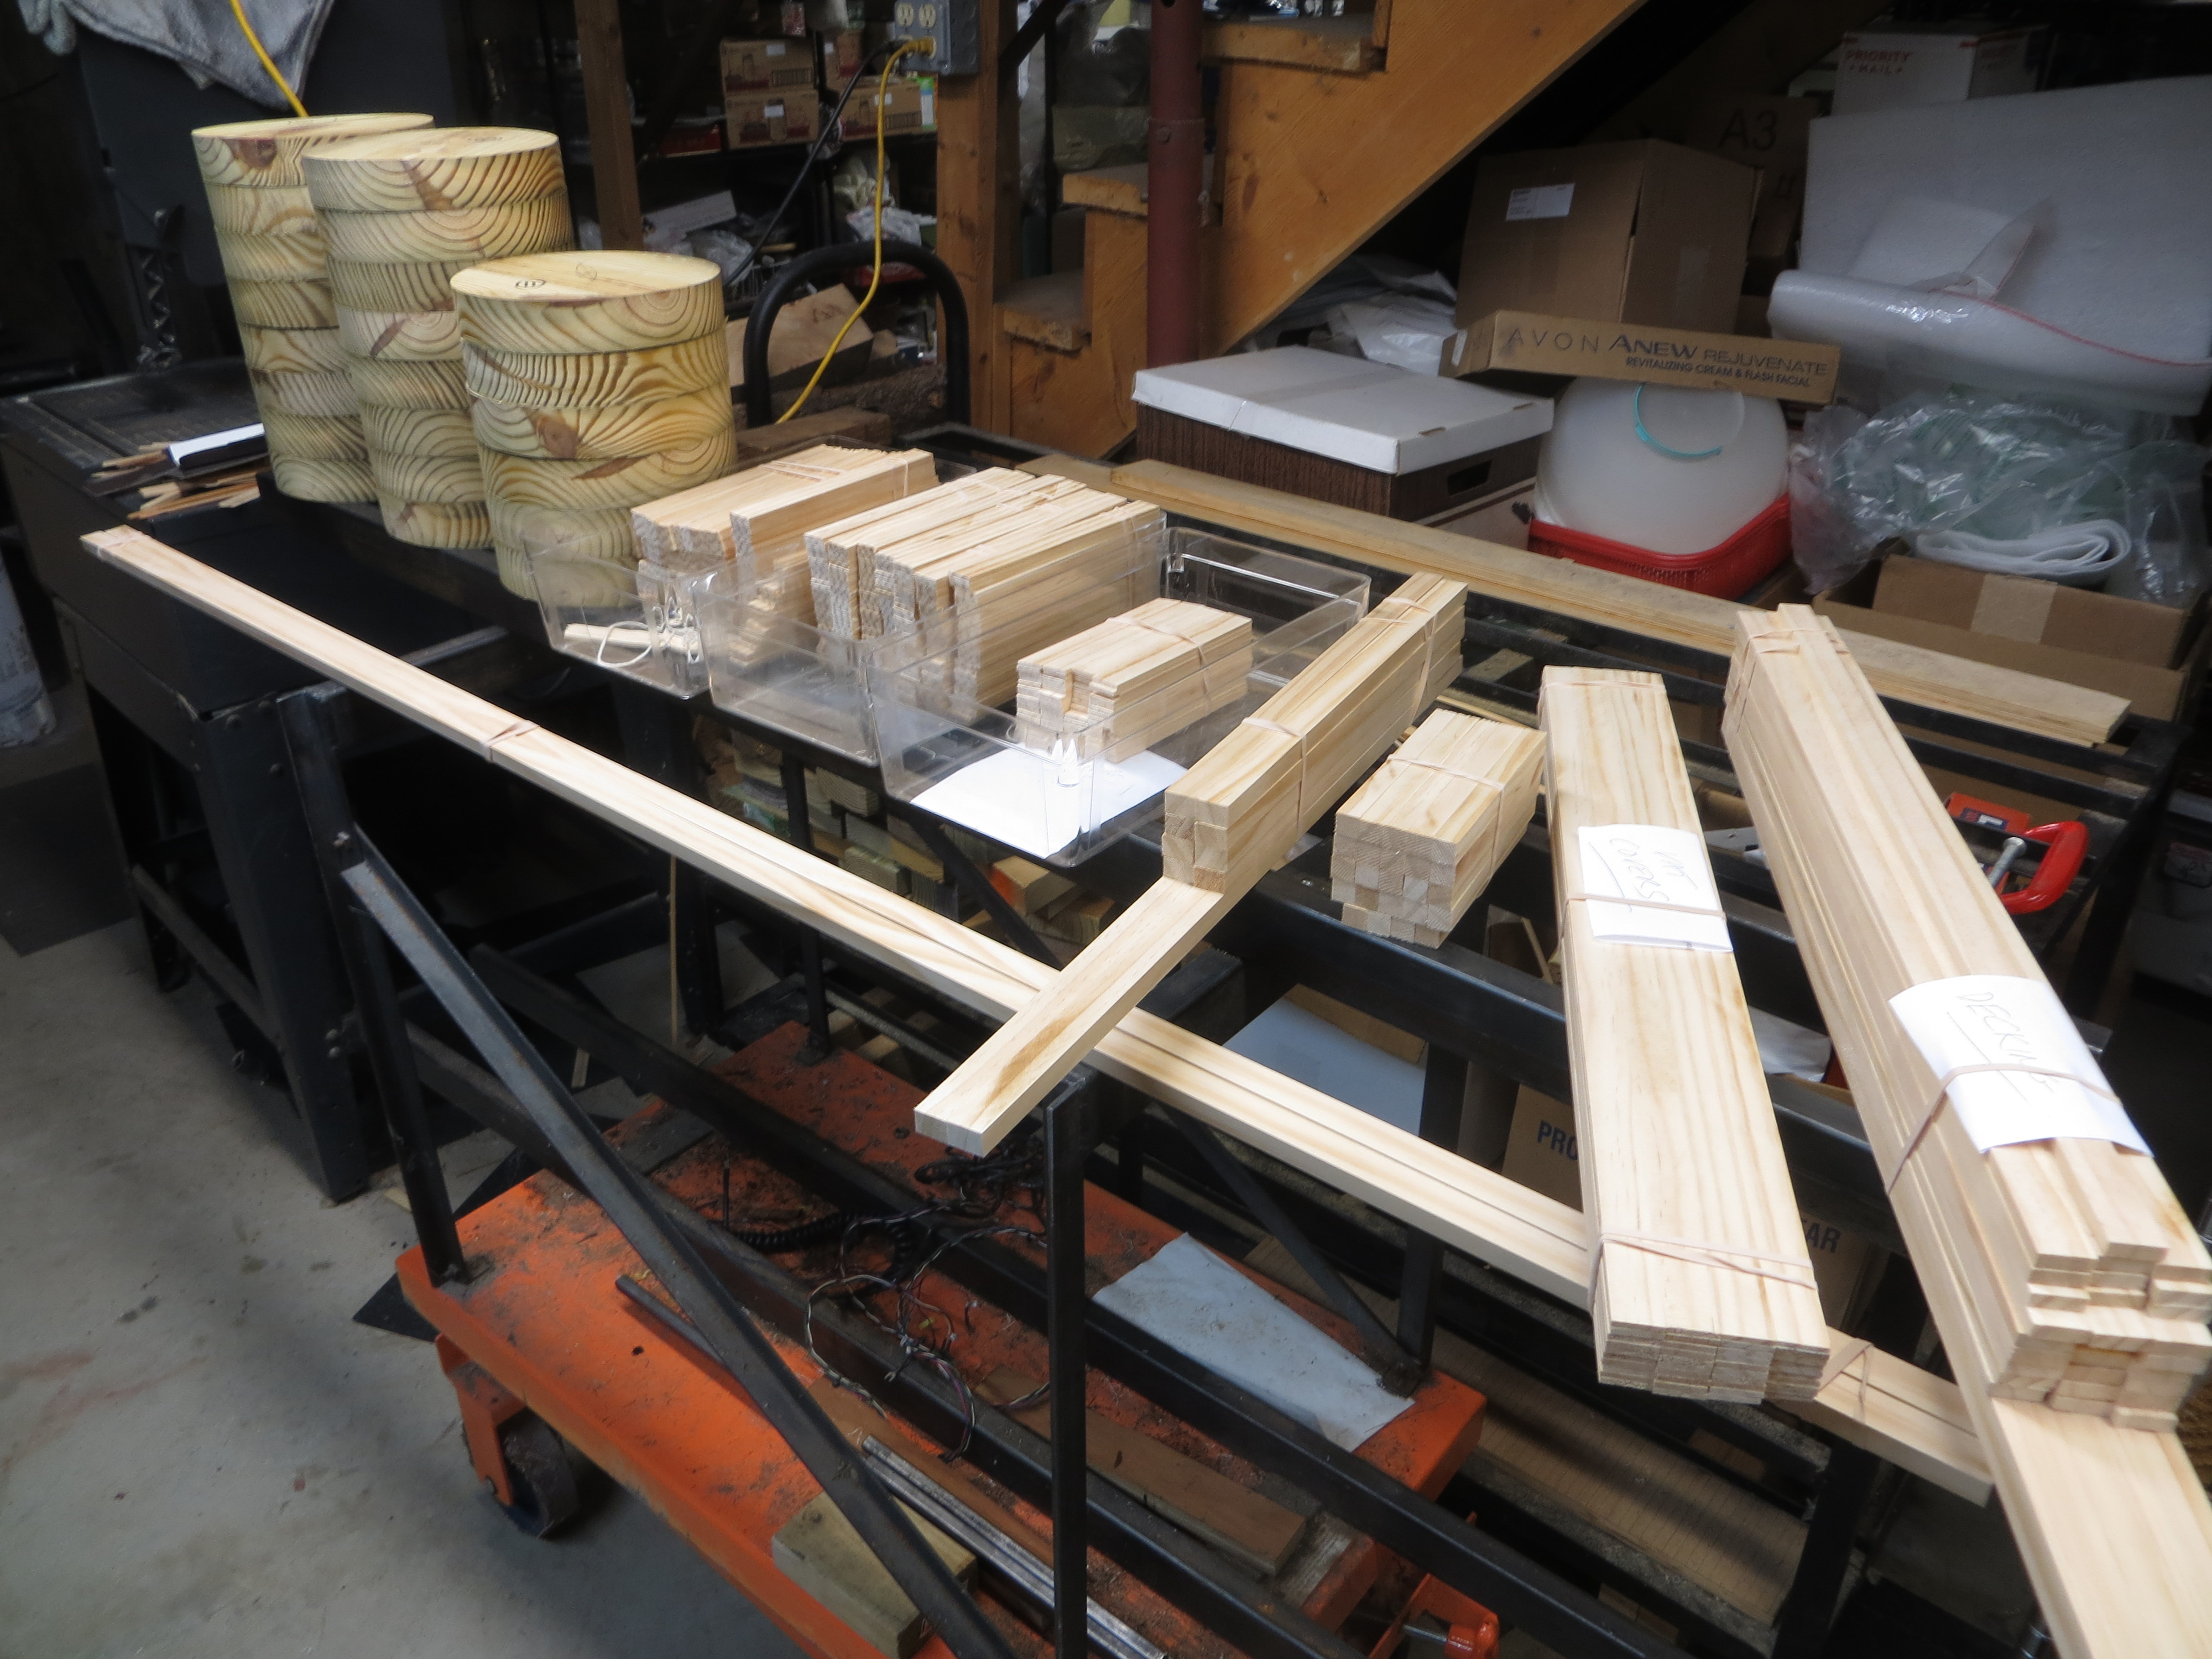
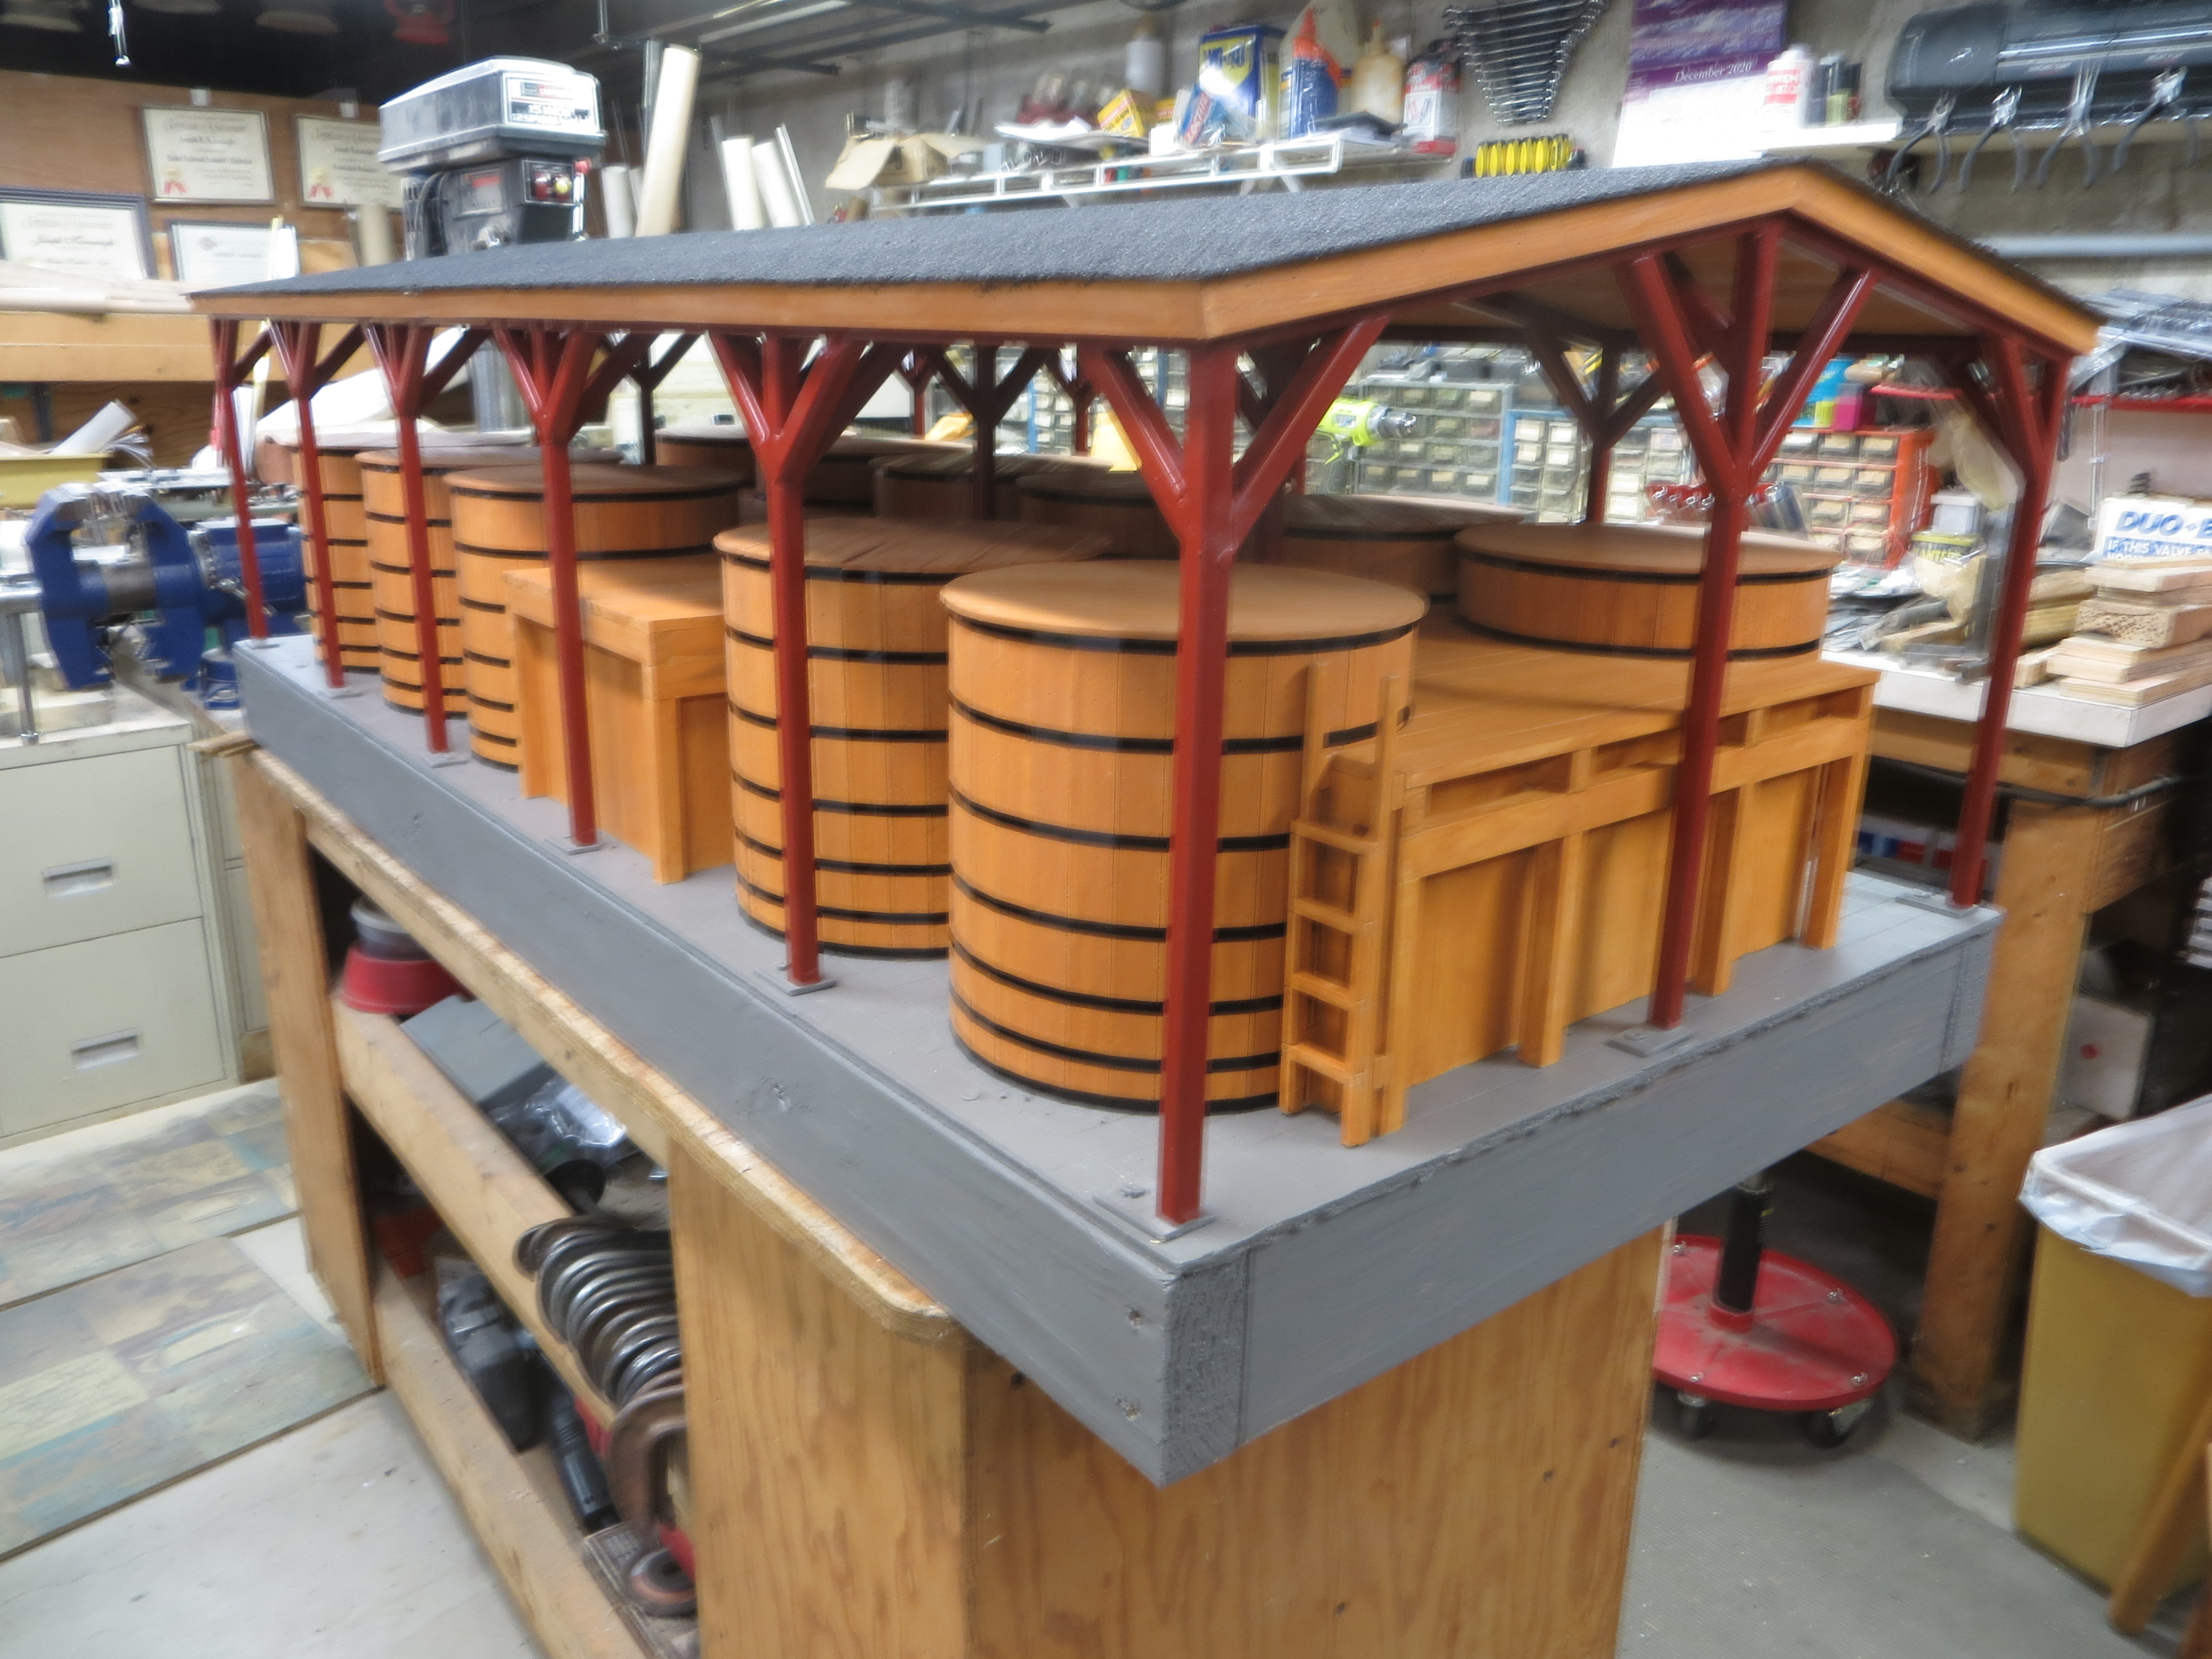
One inch scale is my chosen scale. That is modeling in one inch to the foot, or 1/12 full size.
David Leider wrote an article in the March 2009 issue of RMC about pickle salting stations on his
O scale layout and I saved it in a manila folder along with articles of other interesting industries
to model. Starting actual construction this past October I made a model of a selectively-compressed
version of a pickle salting station. It's still four feet long and two feet wide. A modest size for
this scale. As the model is going to be located in a pine forest, the frame of the structure was
made out of 1/2" square steel tube welded or silver brazed, depending on the location of the joint.
Here is a photo of the finished and painted frame in early November
My chosen scale is 1” scale, where one inch equals one foot. My railroad is outdoors. In the March 2009 RMC,
David Leider wrote an article on building a pickle salting station. I filed that article in the
interesting-to-build folder. Early in 2020 became the time to open the file, draw plans for a selectively
compressed version and collect materials to build it. I call my model the Lamoille Pickle Company
Pickle Salting Station. The building frame is made out of ½” square steel tube.
The first photo shows the steel on a workbench mostly cut to size. The material was then brought outside and welded and silver brazed together.
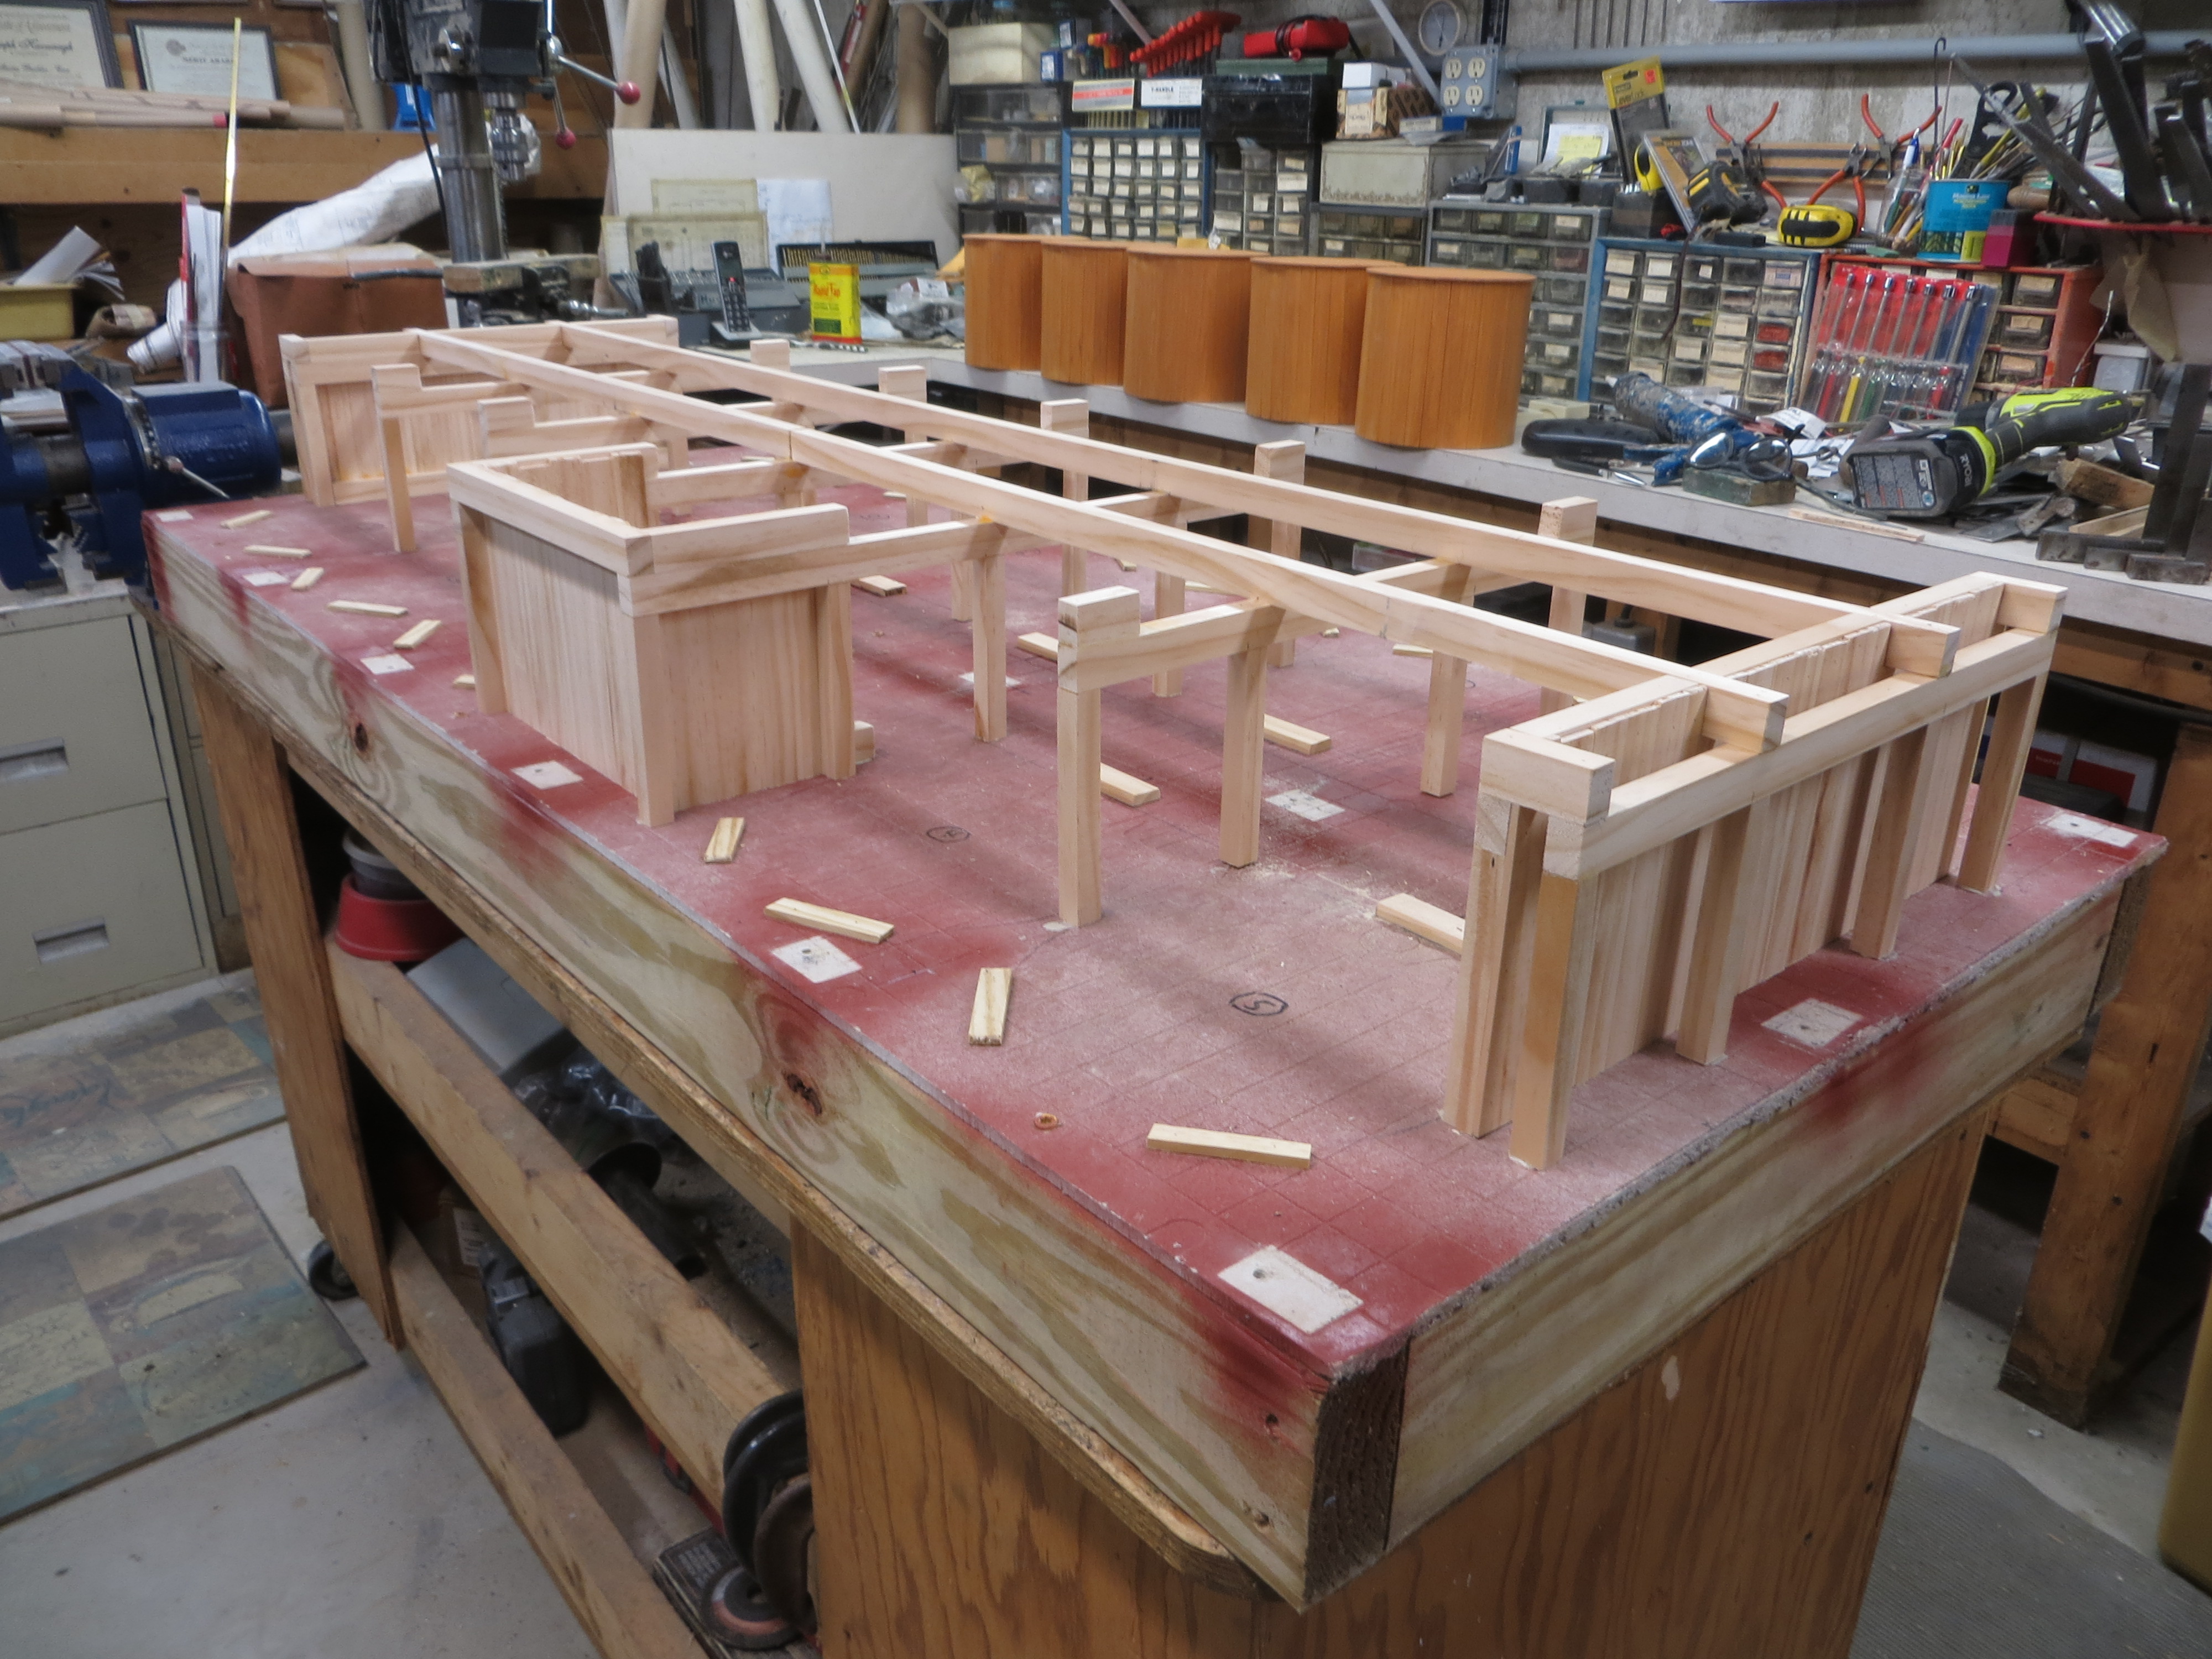
Then attention was turned to preparing the wood pieces for the project. Most of the wood used is
purchased as 1" x 10" x 8' select pine boards and ripped to size as needed. The second photo shows most
of the material cut close to the sizes needed and separated into labeled bundles so I don't pick the
wrong piece for something.
Typically, after shaking the workbench a few times the parts fall into place and the model is finished.
The model is two feet wide and five feet long. The track side is the long left wall. The spur for the model
was already laid and the area cleared a couple of years ago in anticipation of building the model
some day. The model will be set in place when the snow melts and the ground firms up.
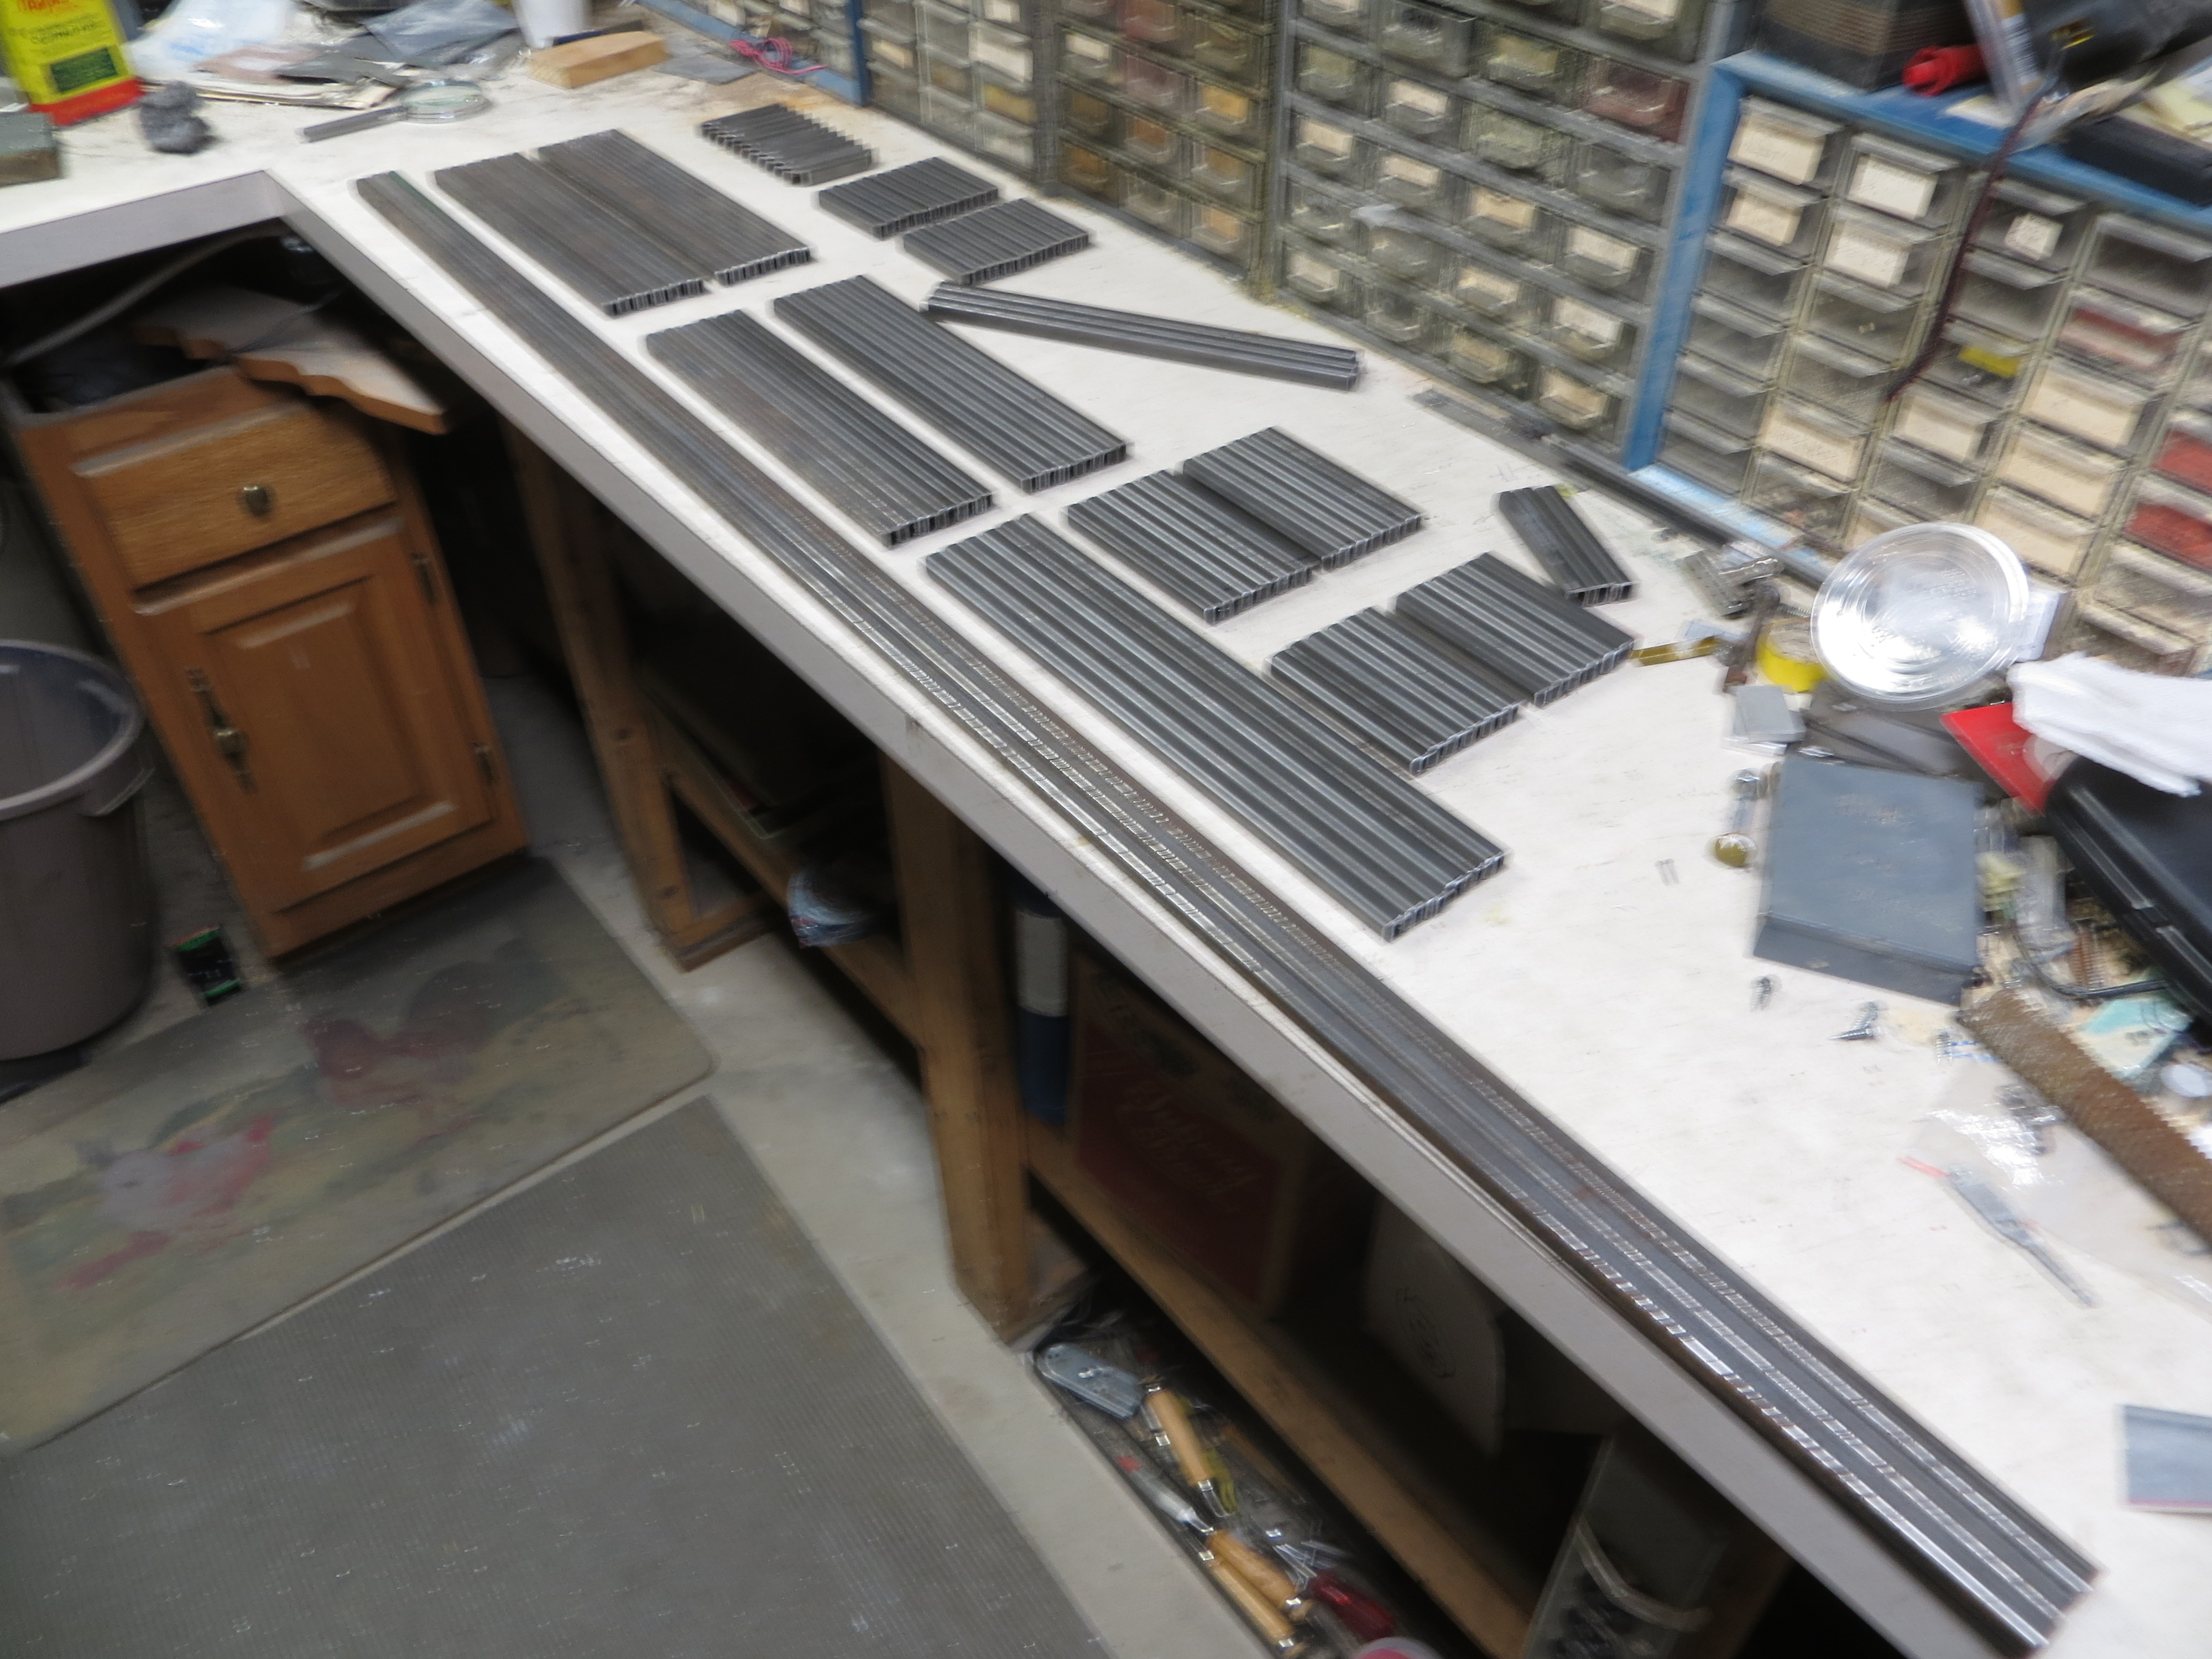
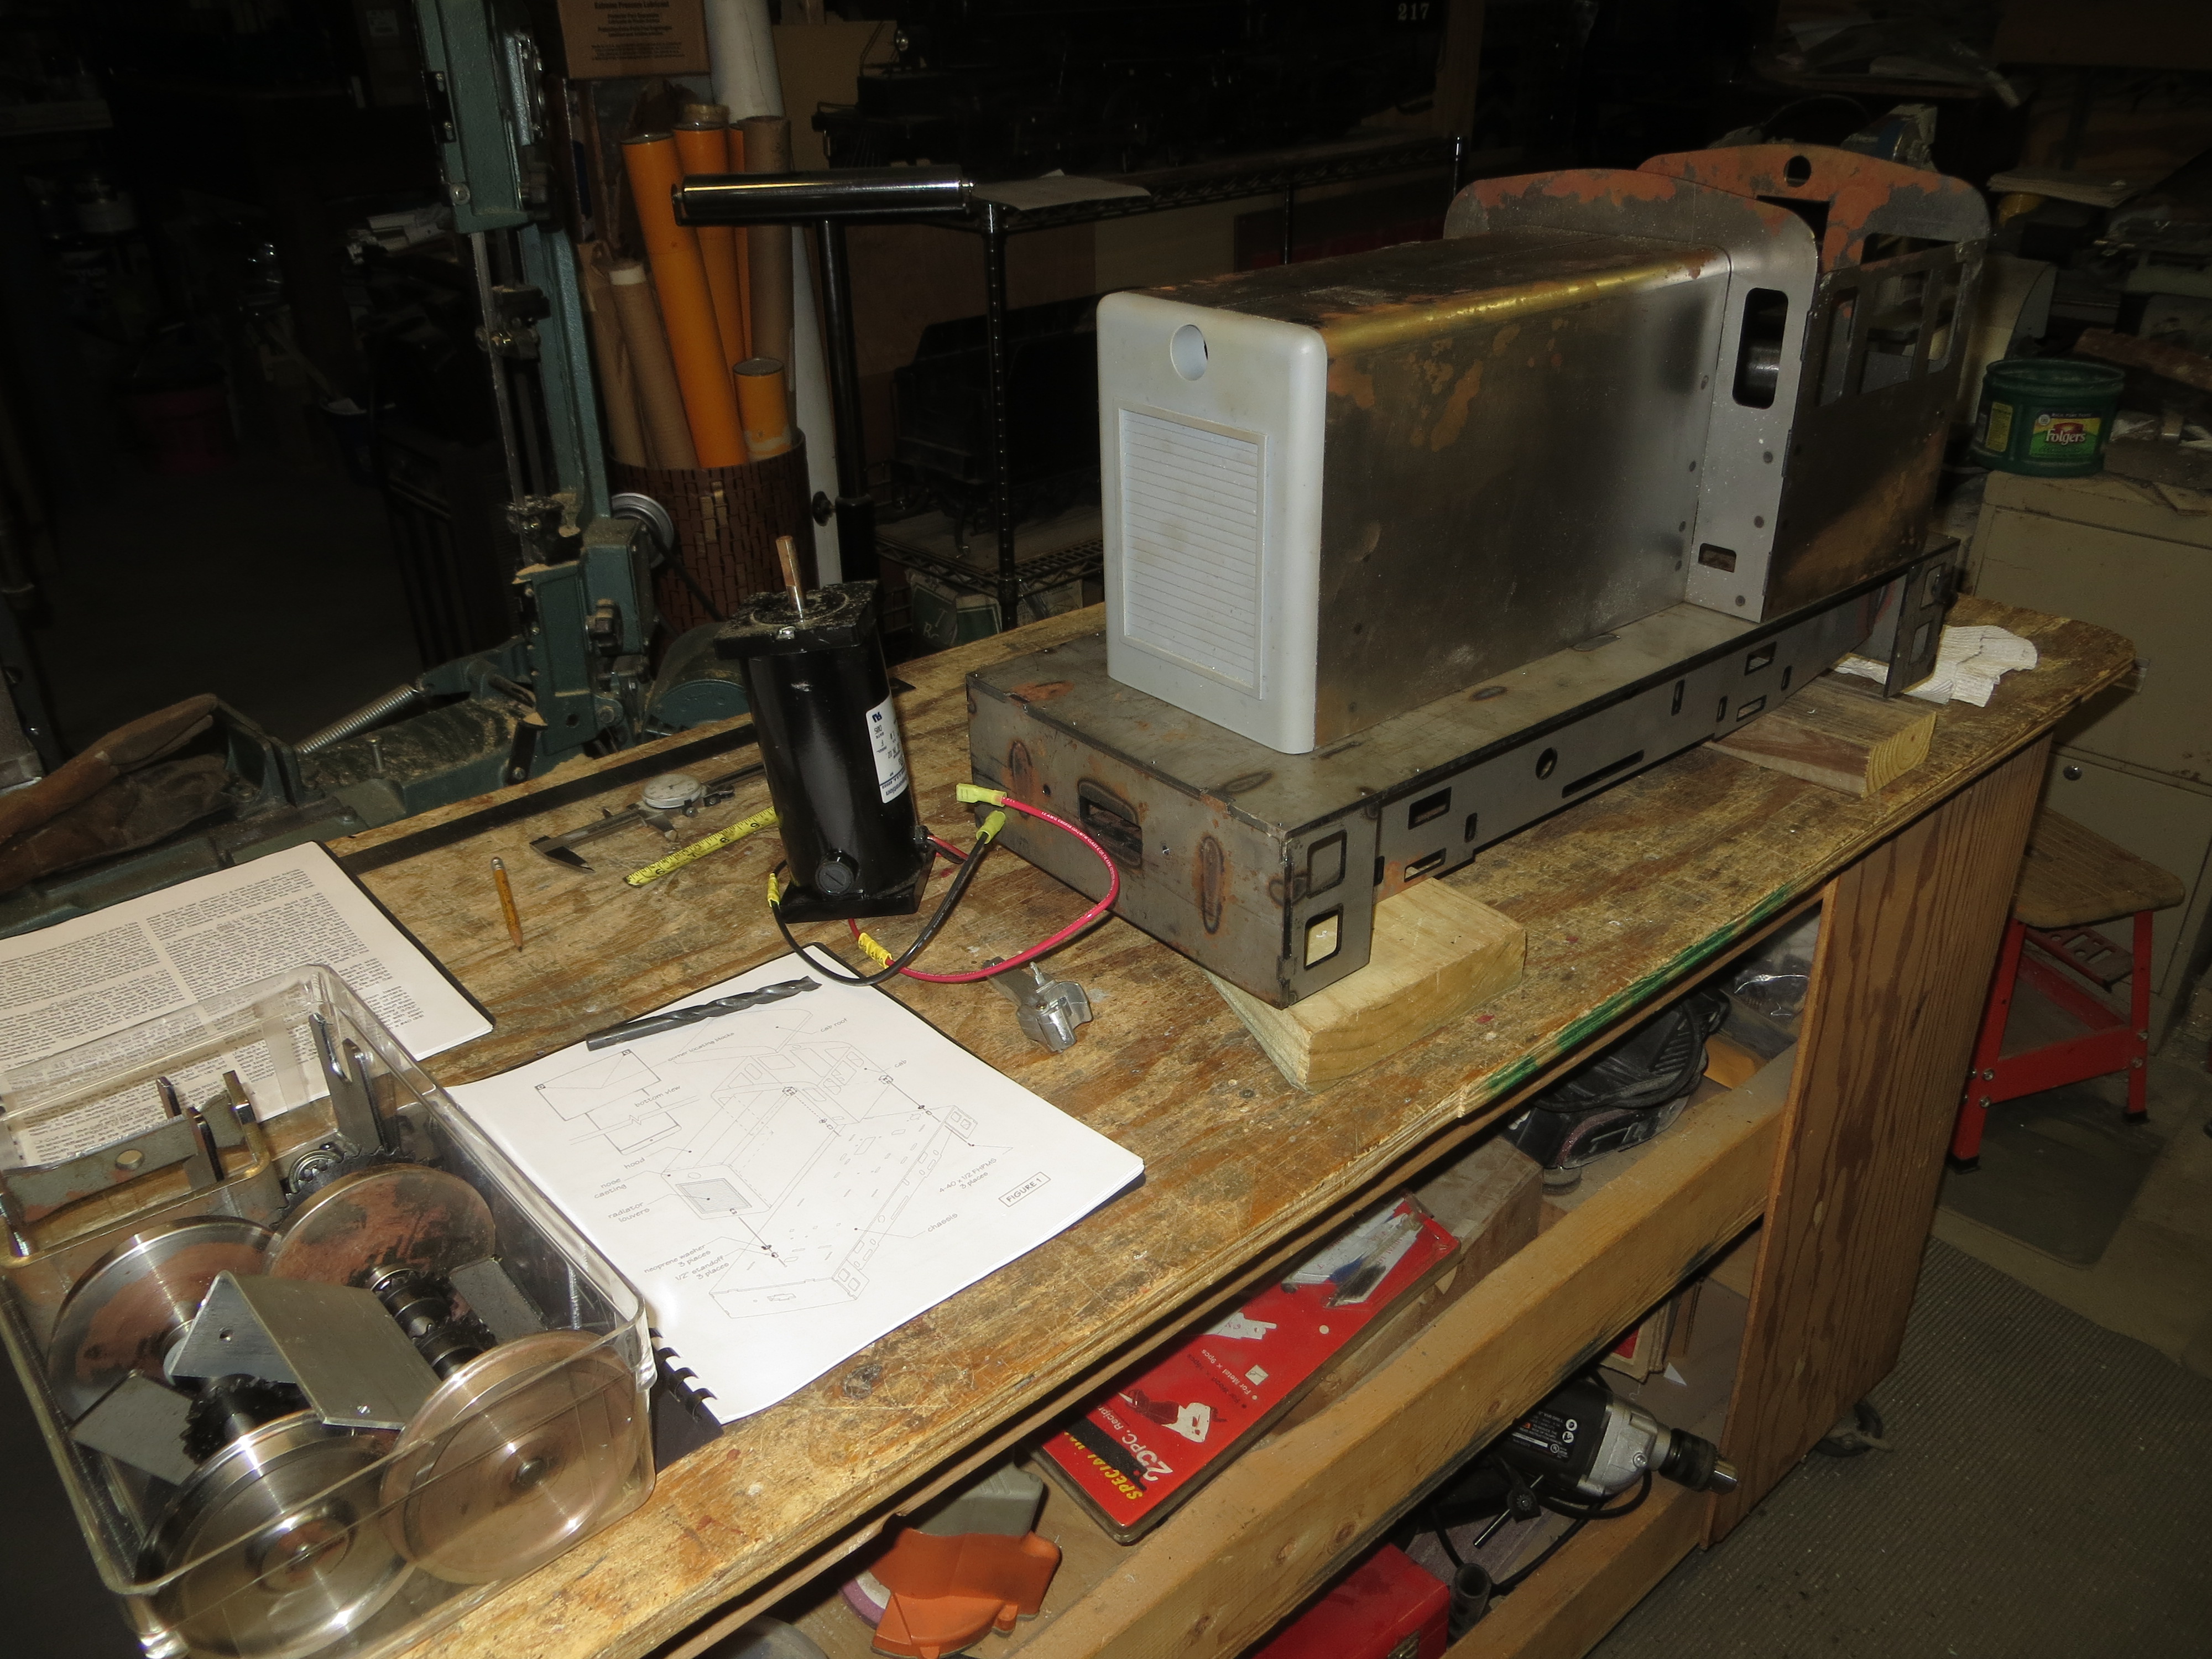
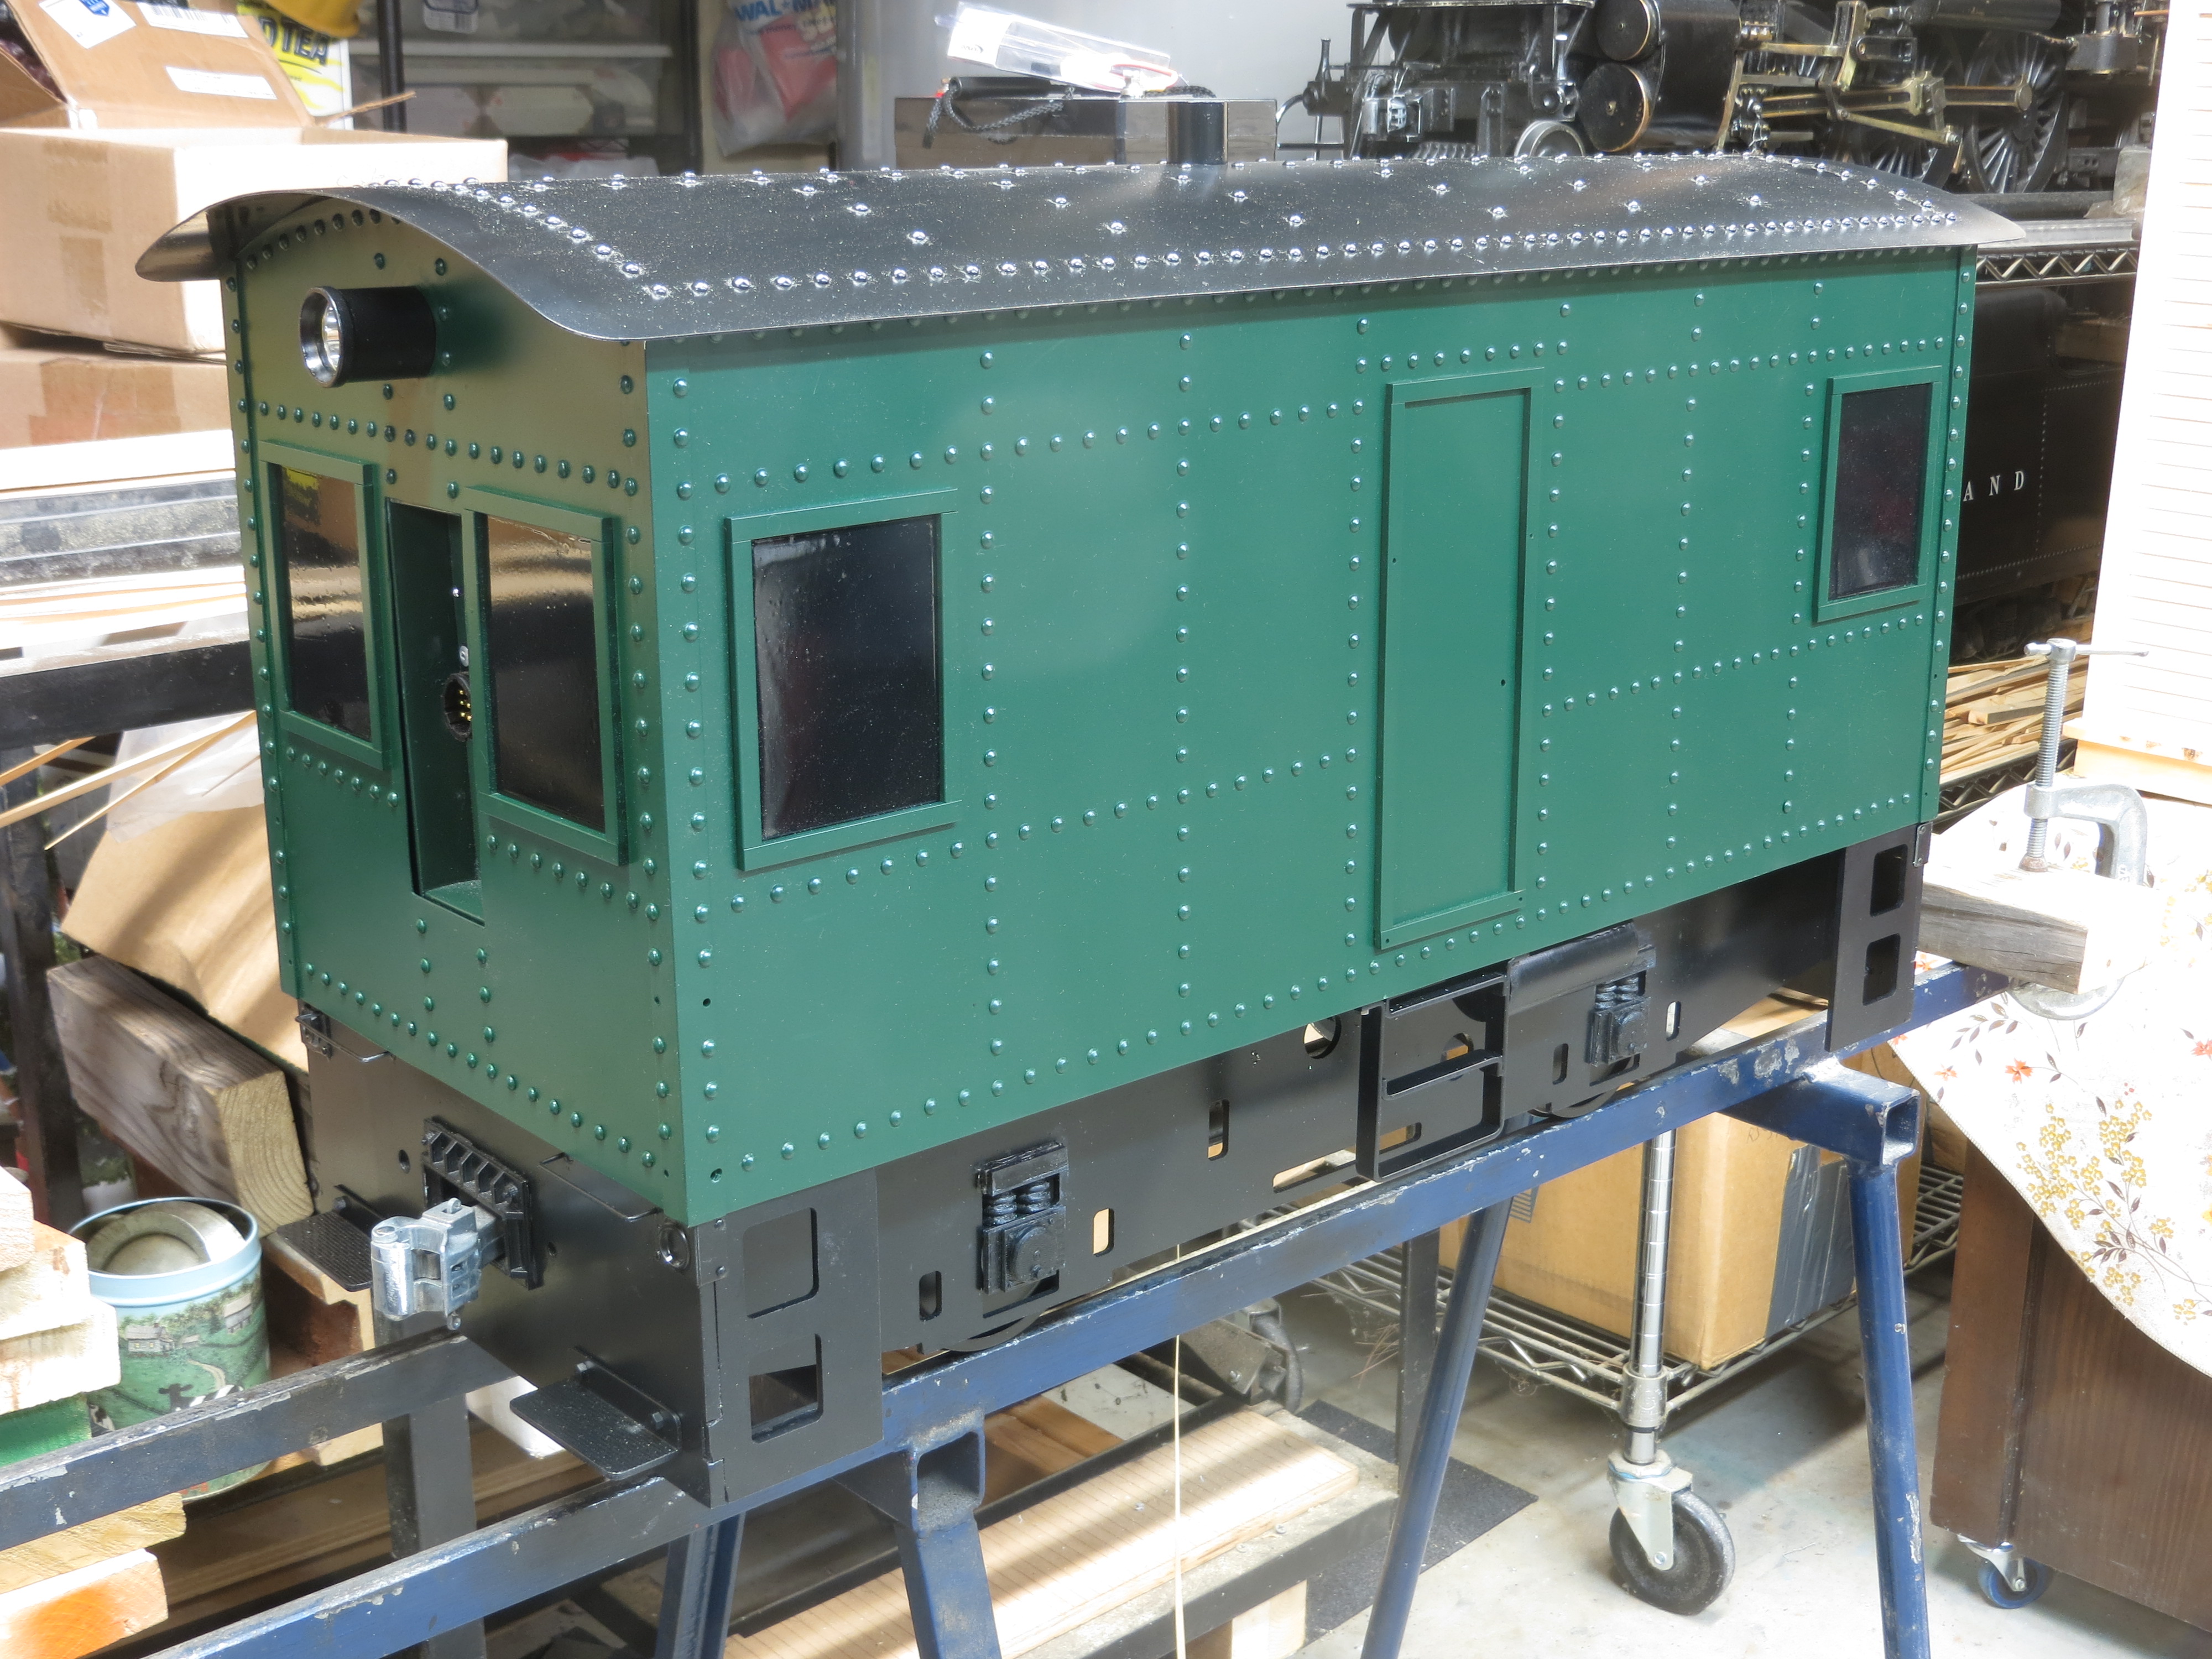
A BATTERY POWERED YARD SWTICHER
My chosen scale is 1” scale, where one inch equals one foot. My railroad is outdoors. During the
summer and fall I host operating sessions on the railroad. Usually a crew of three run the major
yard setting up and breaking down freight trains. They consist of a Yardmaster, a Hostler and a
Brakeman. Sometimes when there is no motiver power available for yard use, I have been know to provide
a stick so the hostler can push the freight cars by the couplers. So....some years ago I purchased
a four-wheel locomotive kit that had been made by a firm which had gone out of business. As such,
it was not a complete kit, but did have all the chassis and running gear included, as well as a
superstructure and some detail pieces. The engine would work as supplied but I decided to abandon
the superstructure and only use the chassis and running gear in the build. This winter plans for a
new superstructure were drawn up and materials gathered. No prototype was chosen for the model, just
something I thought plausible. Steel sheet was chosen as the material to be used. Here is a photo
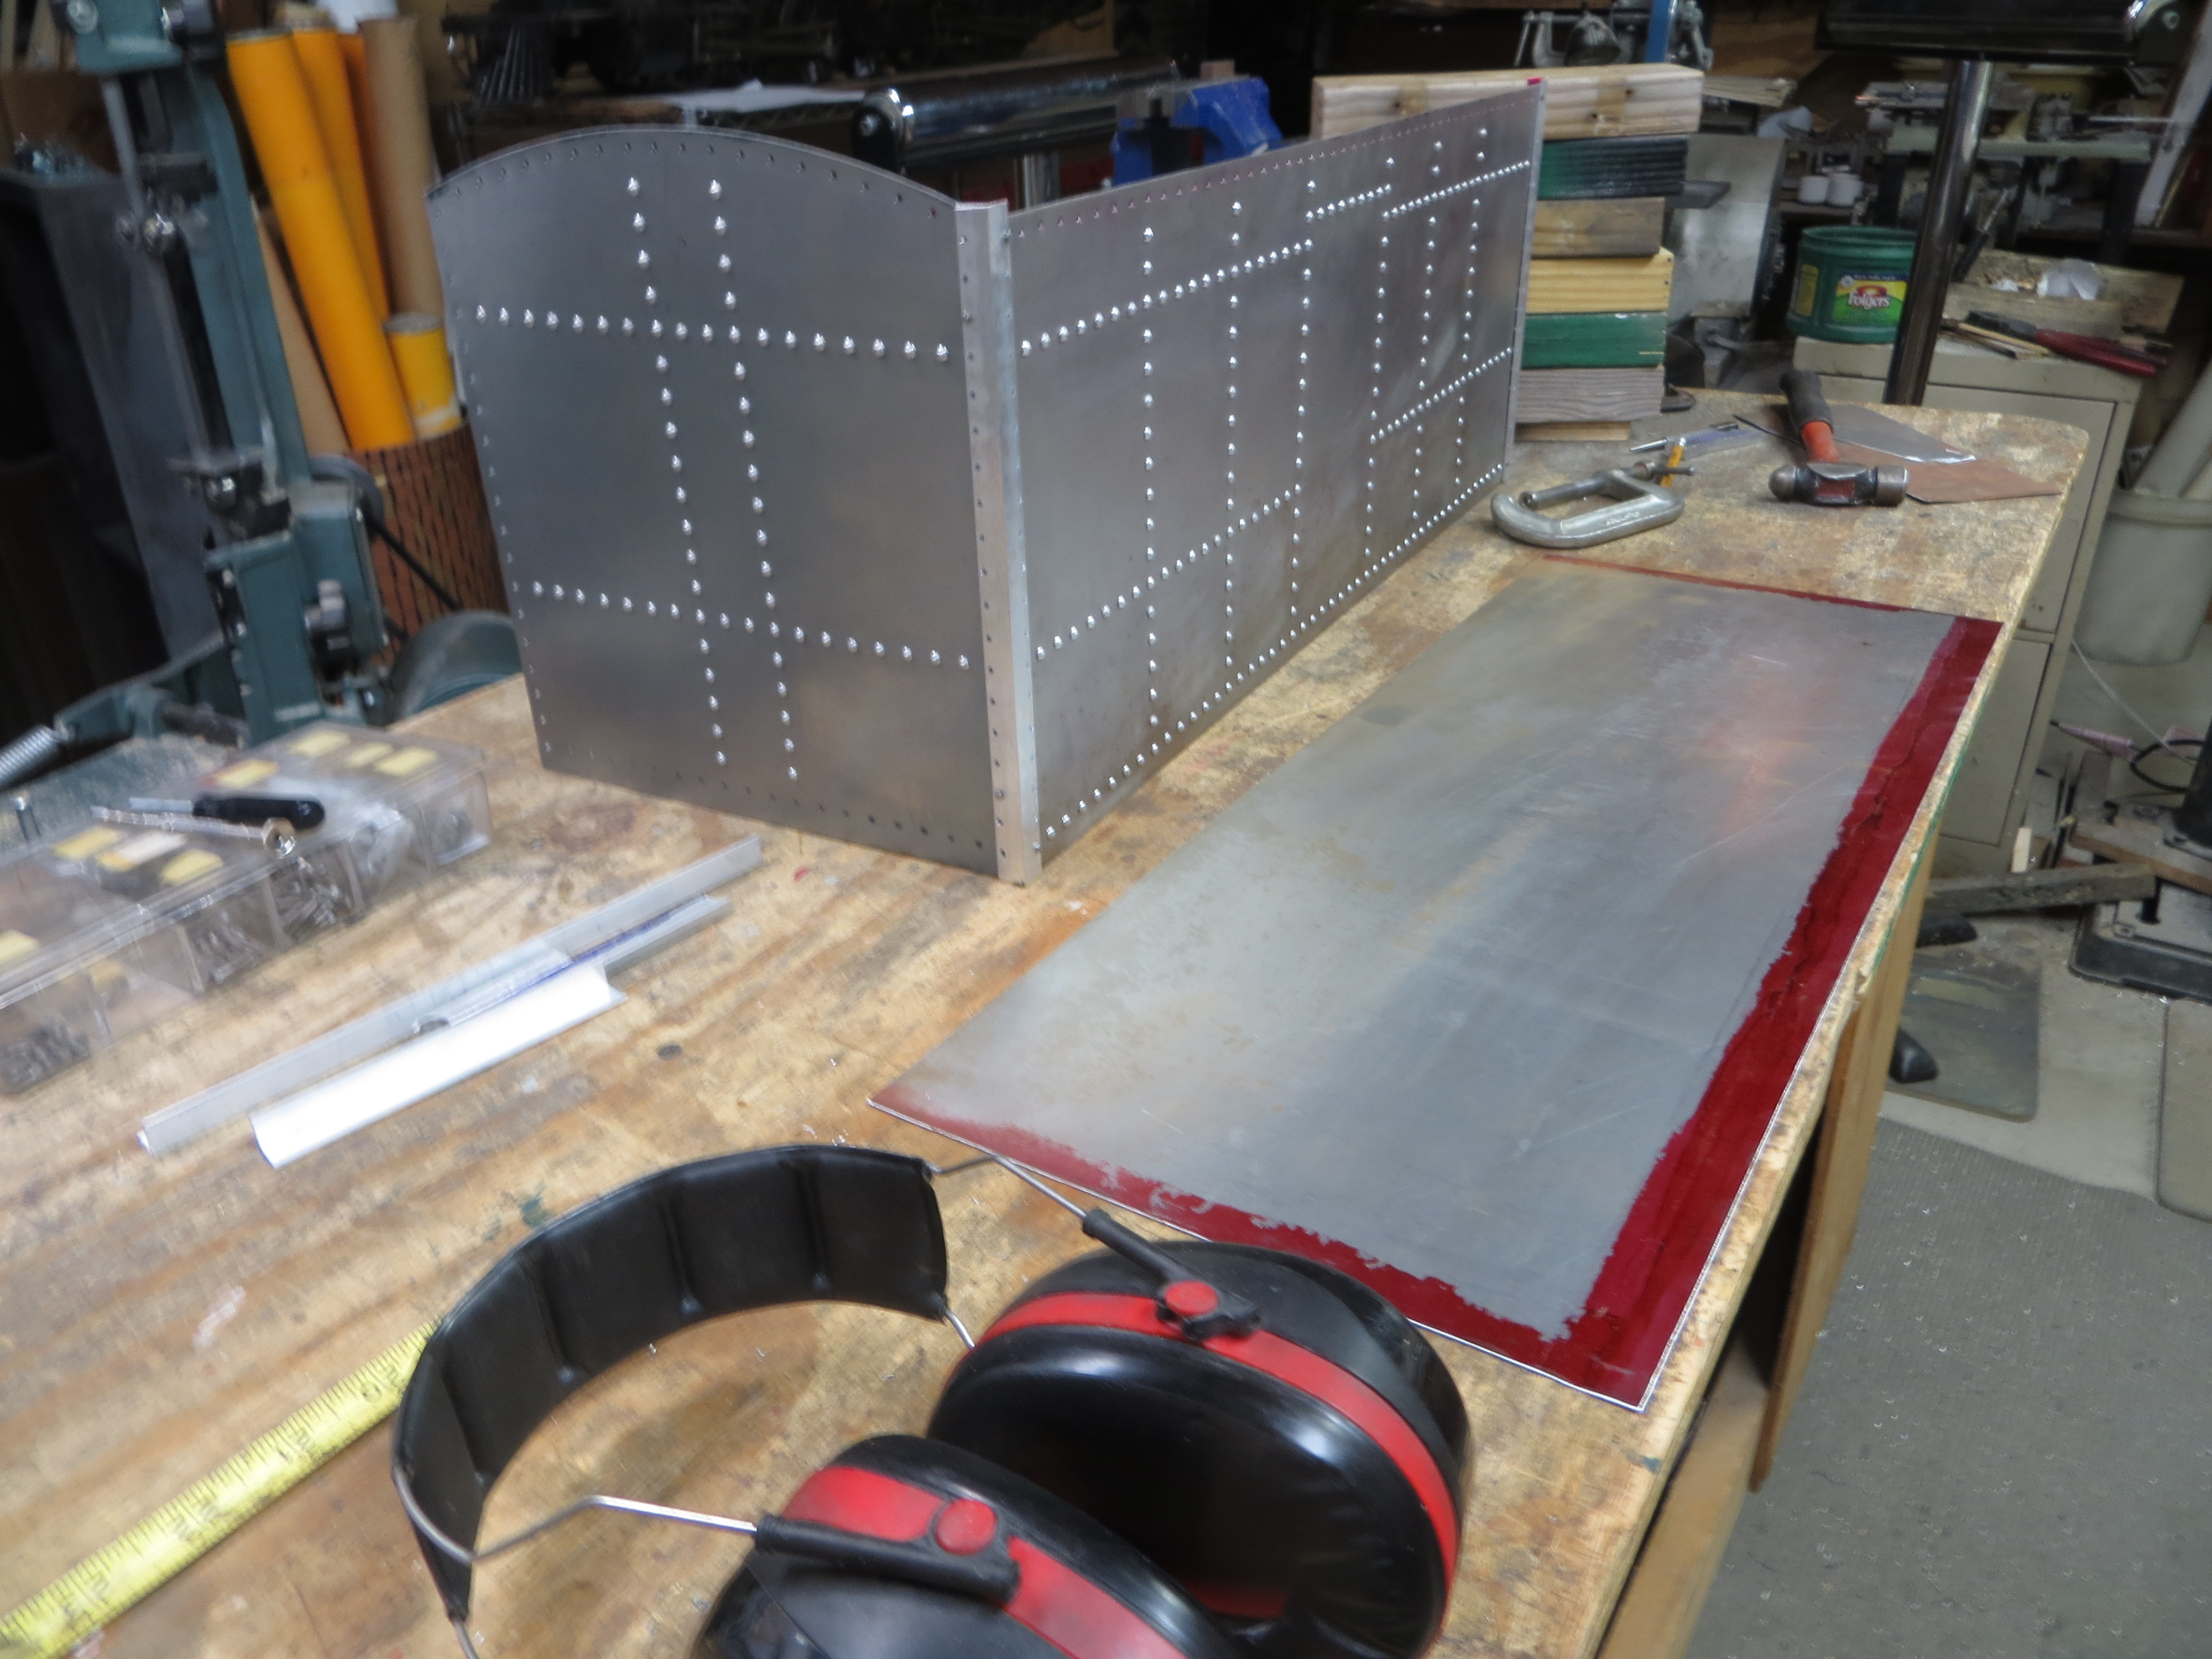
of many of the model pieces as supplied.
The supplied superstructure is simply sitting on the raw chassis here. The chassis and running gear
are well engineered and required no modifications other than some drilling and tapping to secure parts.
After the chassis and running gear were assembled and the unit running with the supplied tethered
control components, attention was turned to making a new superstructure. Here is a photo showing one
end and one side already fabricated and the second long side being marked for drilling.
The rivets along all the edges are functional. They hold pieces together. The rivets on the interior
of the sheets are decorative only.
The model kit is supplied with components and electronics for tethered control. I decided to add
radio control as an option that can be chosen by the hostler so a riding car would not be needed in
the yard. Tethered control can be selected if the engine is going to travel out on the main line at
other times where the engineer will accompany the unit and be sitting on a riding car coupled behind
it.
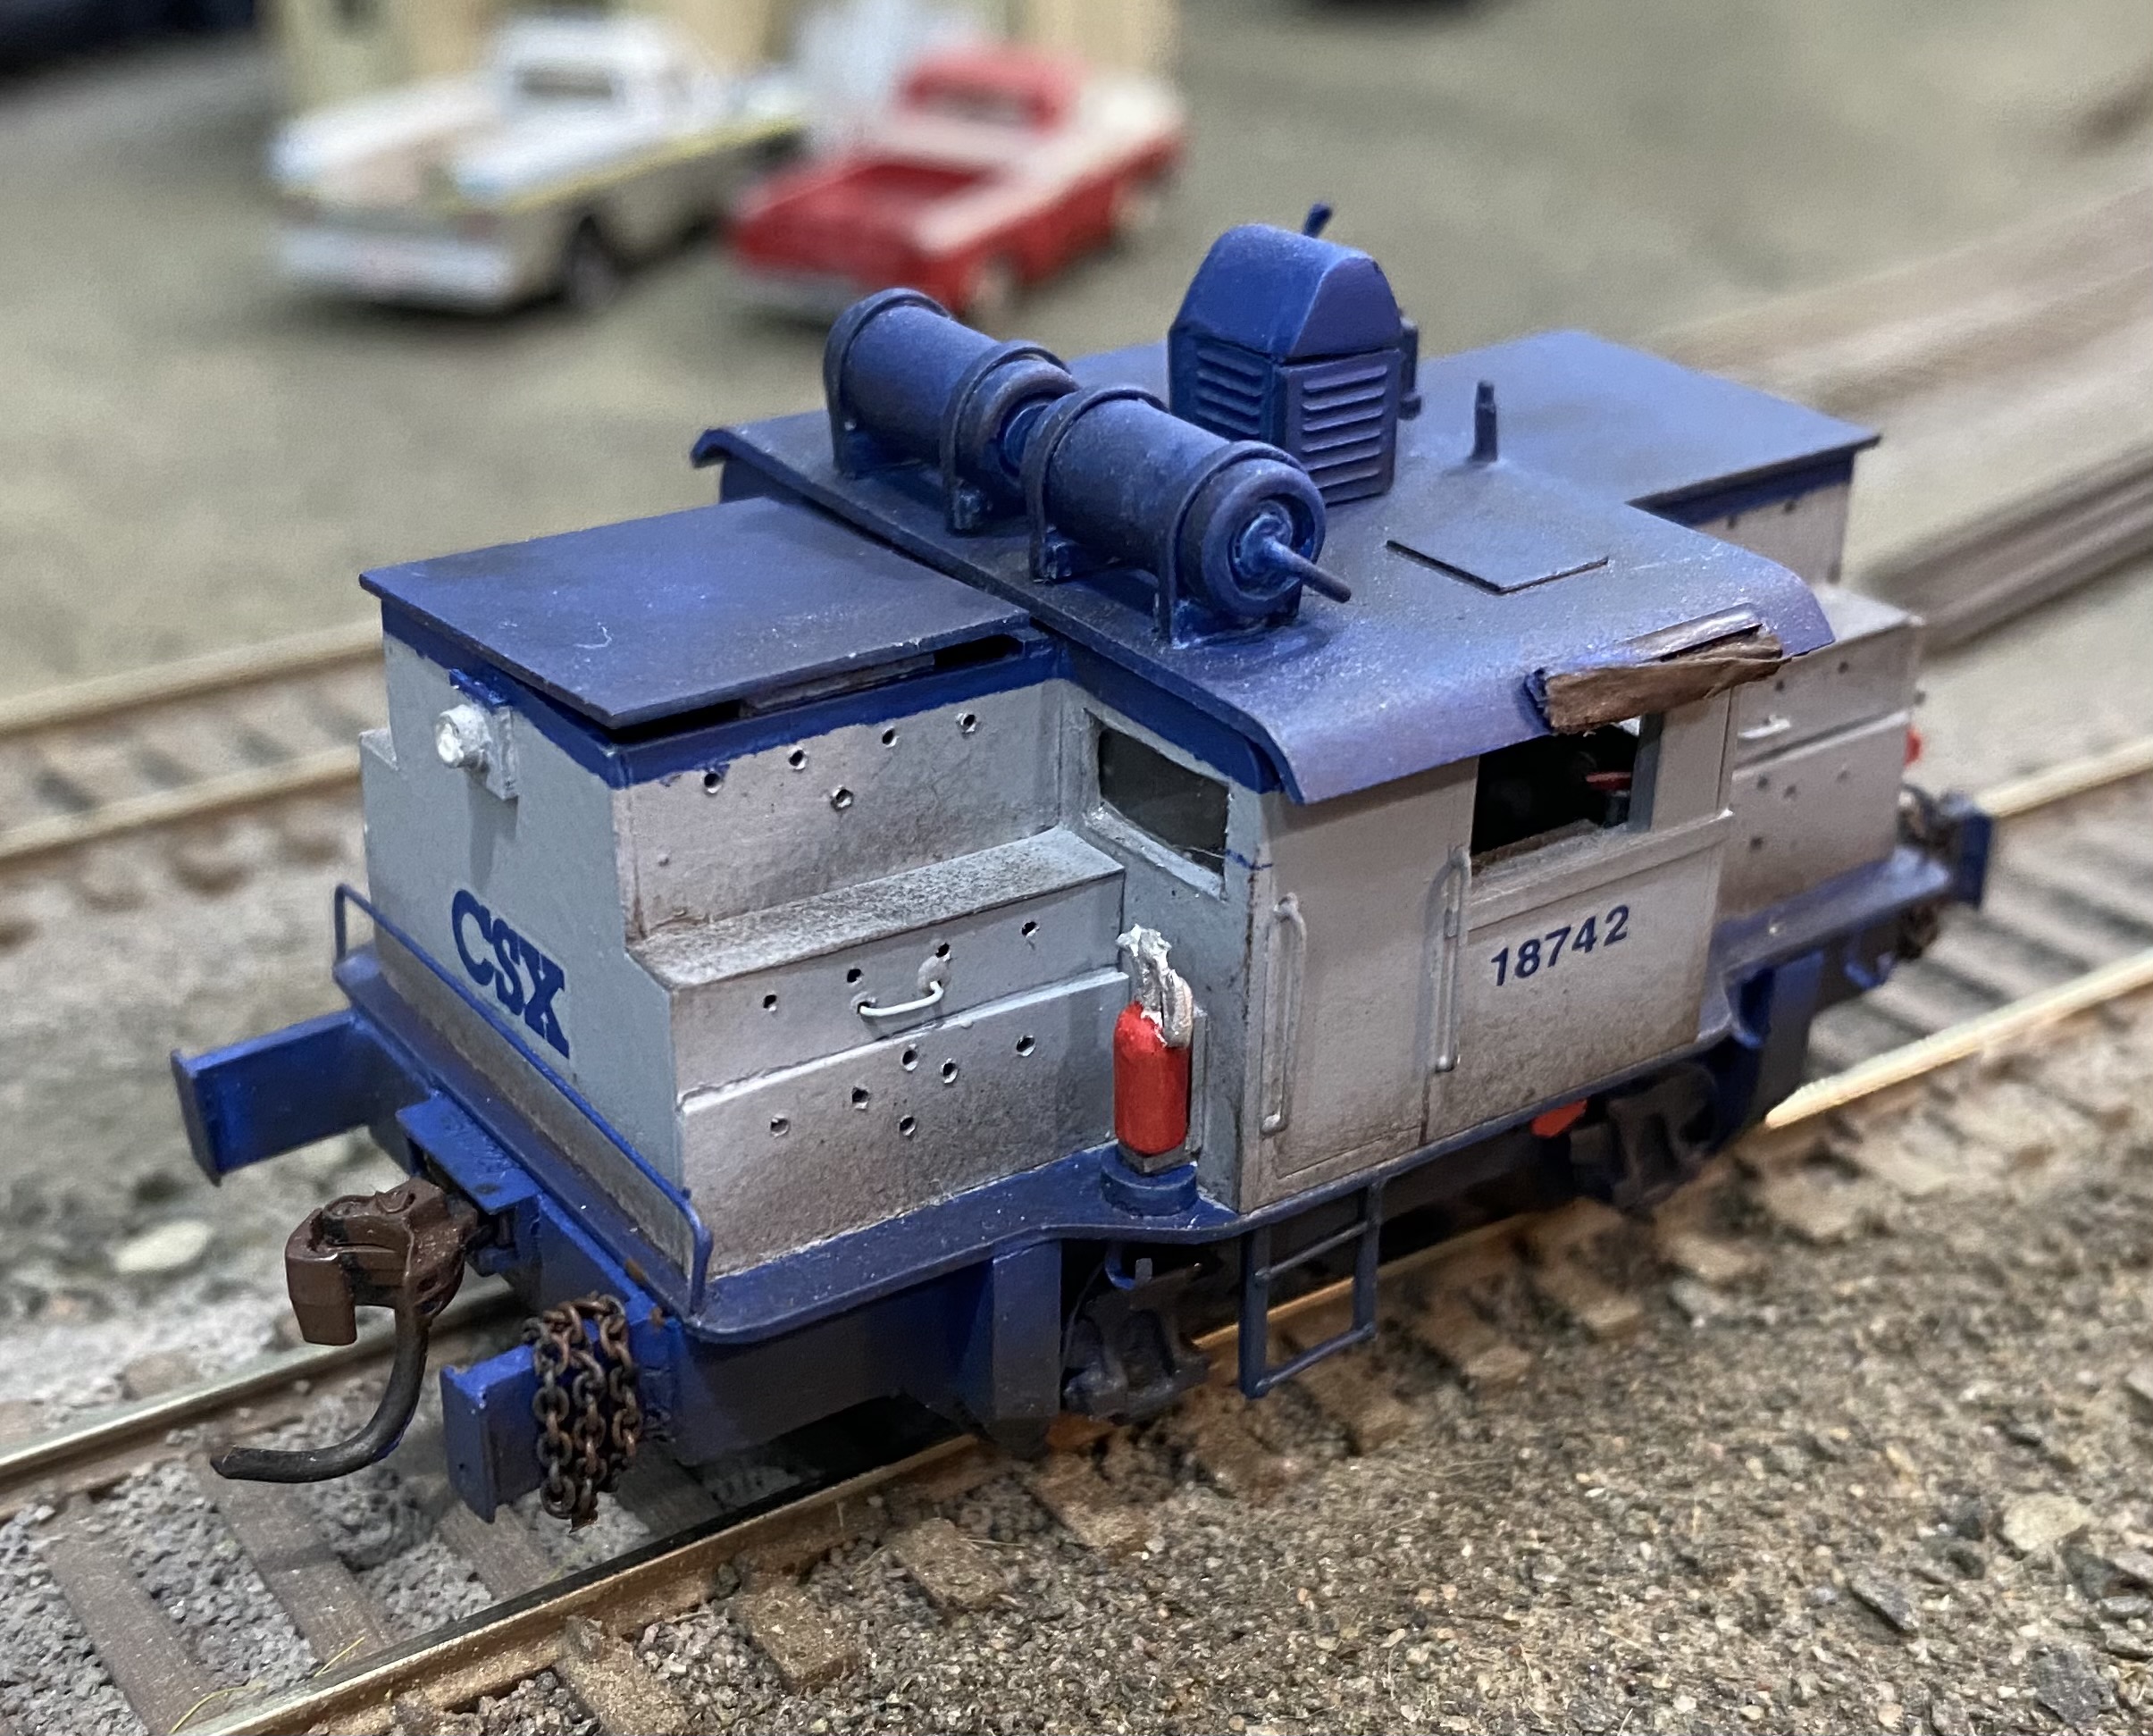
Jeff Hanke
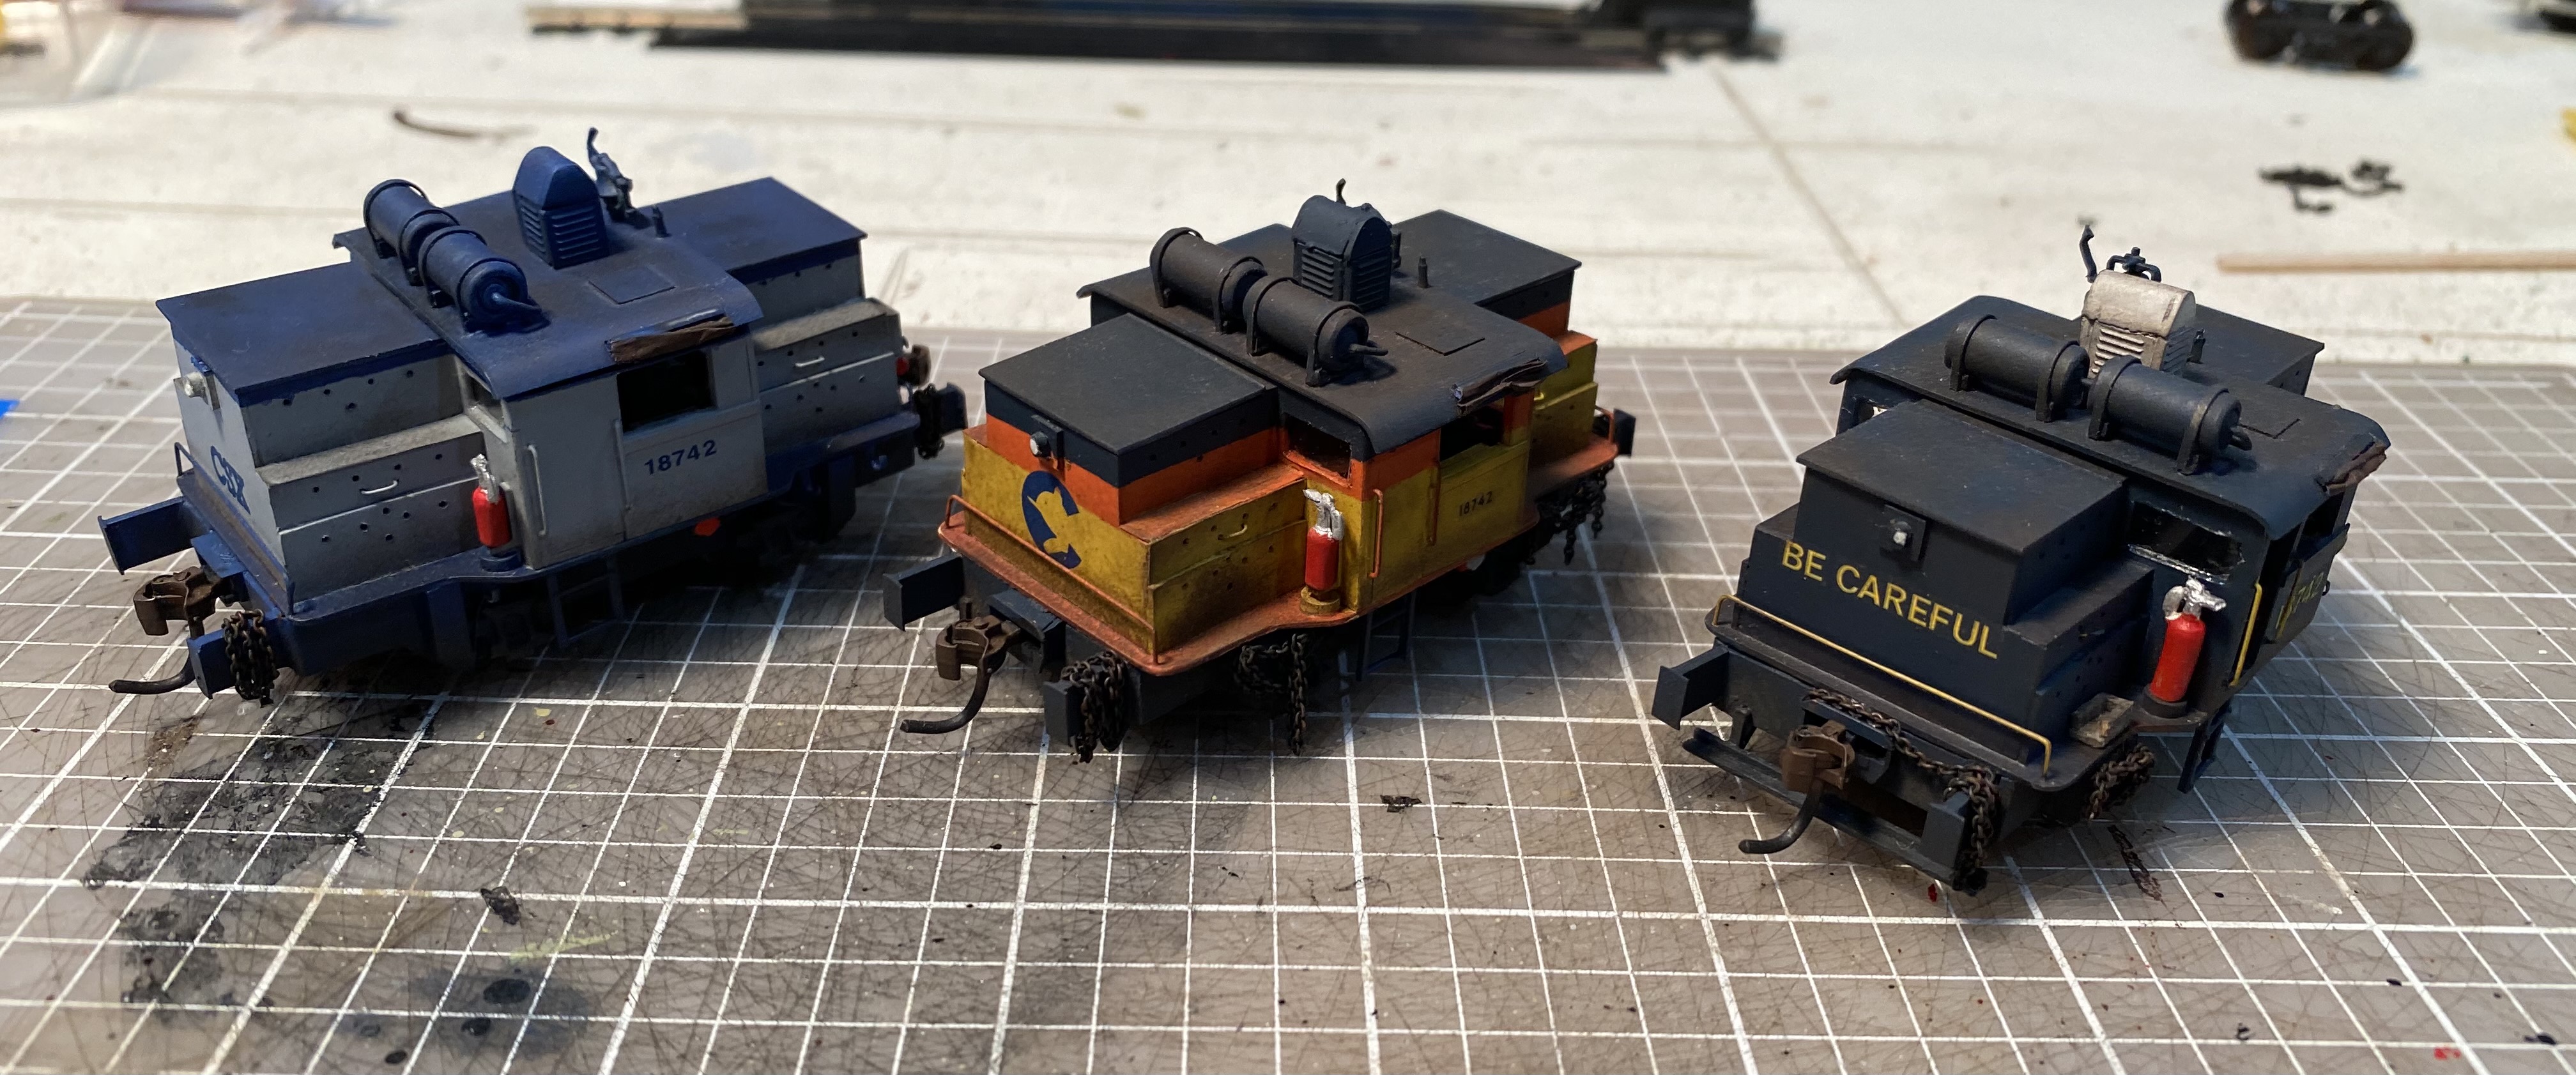
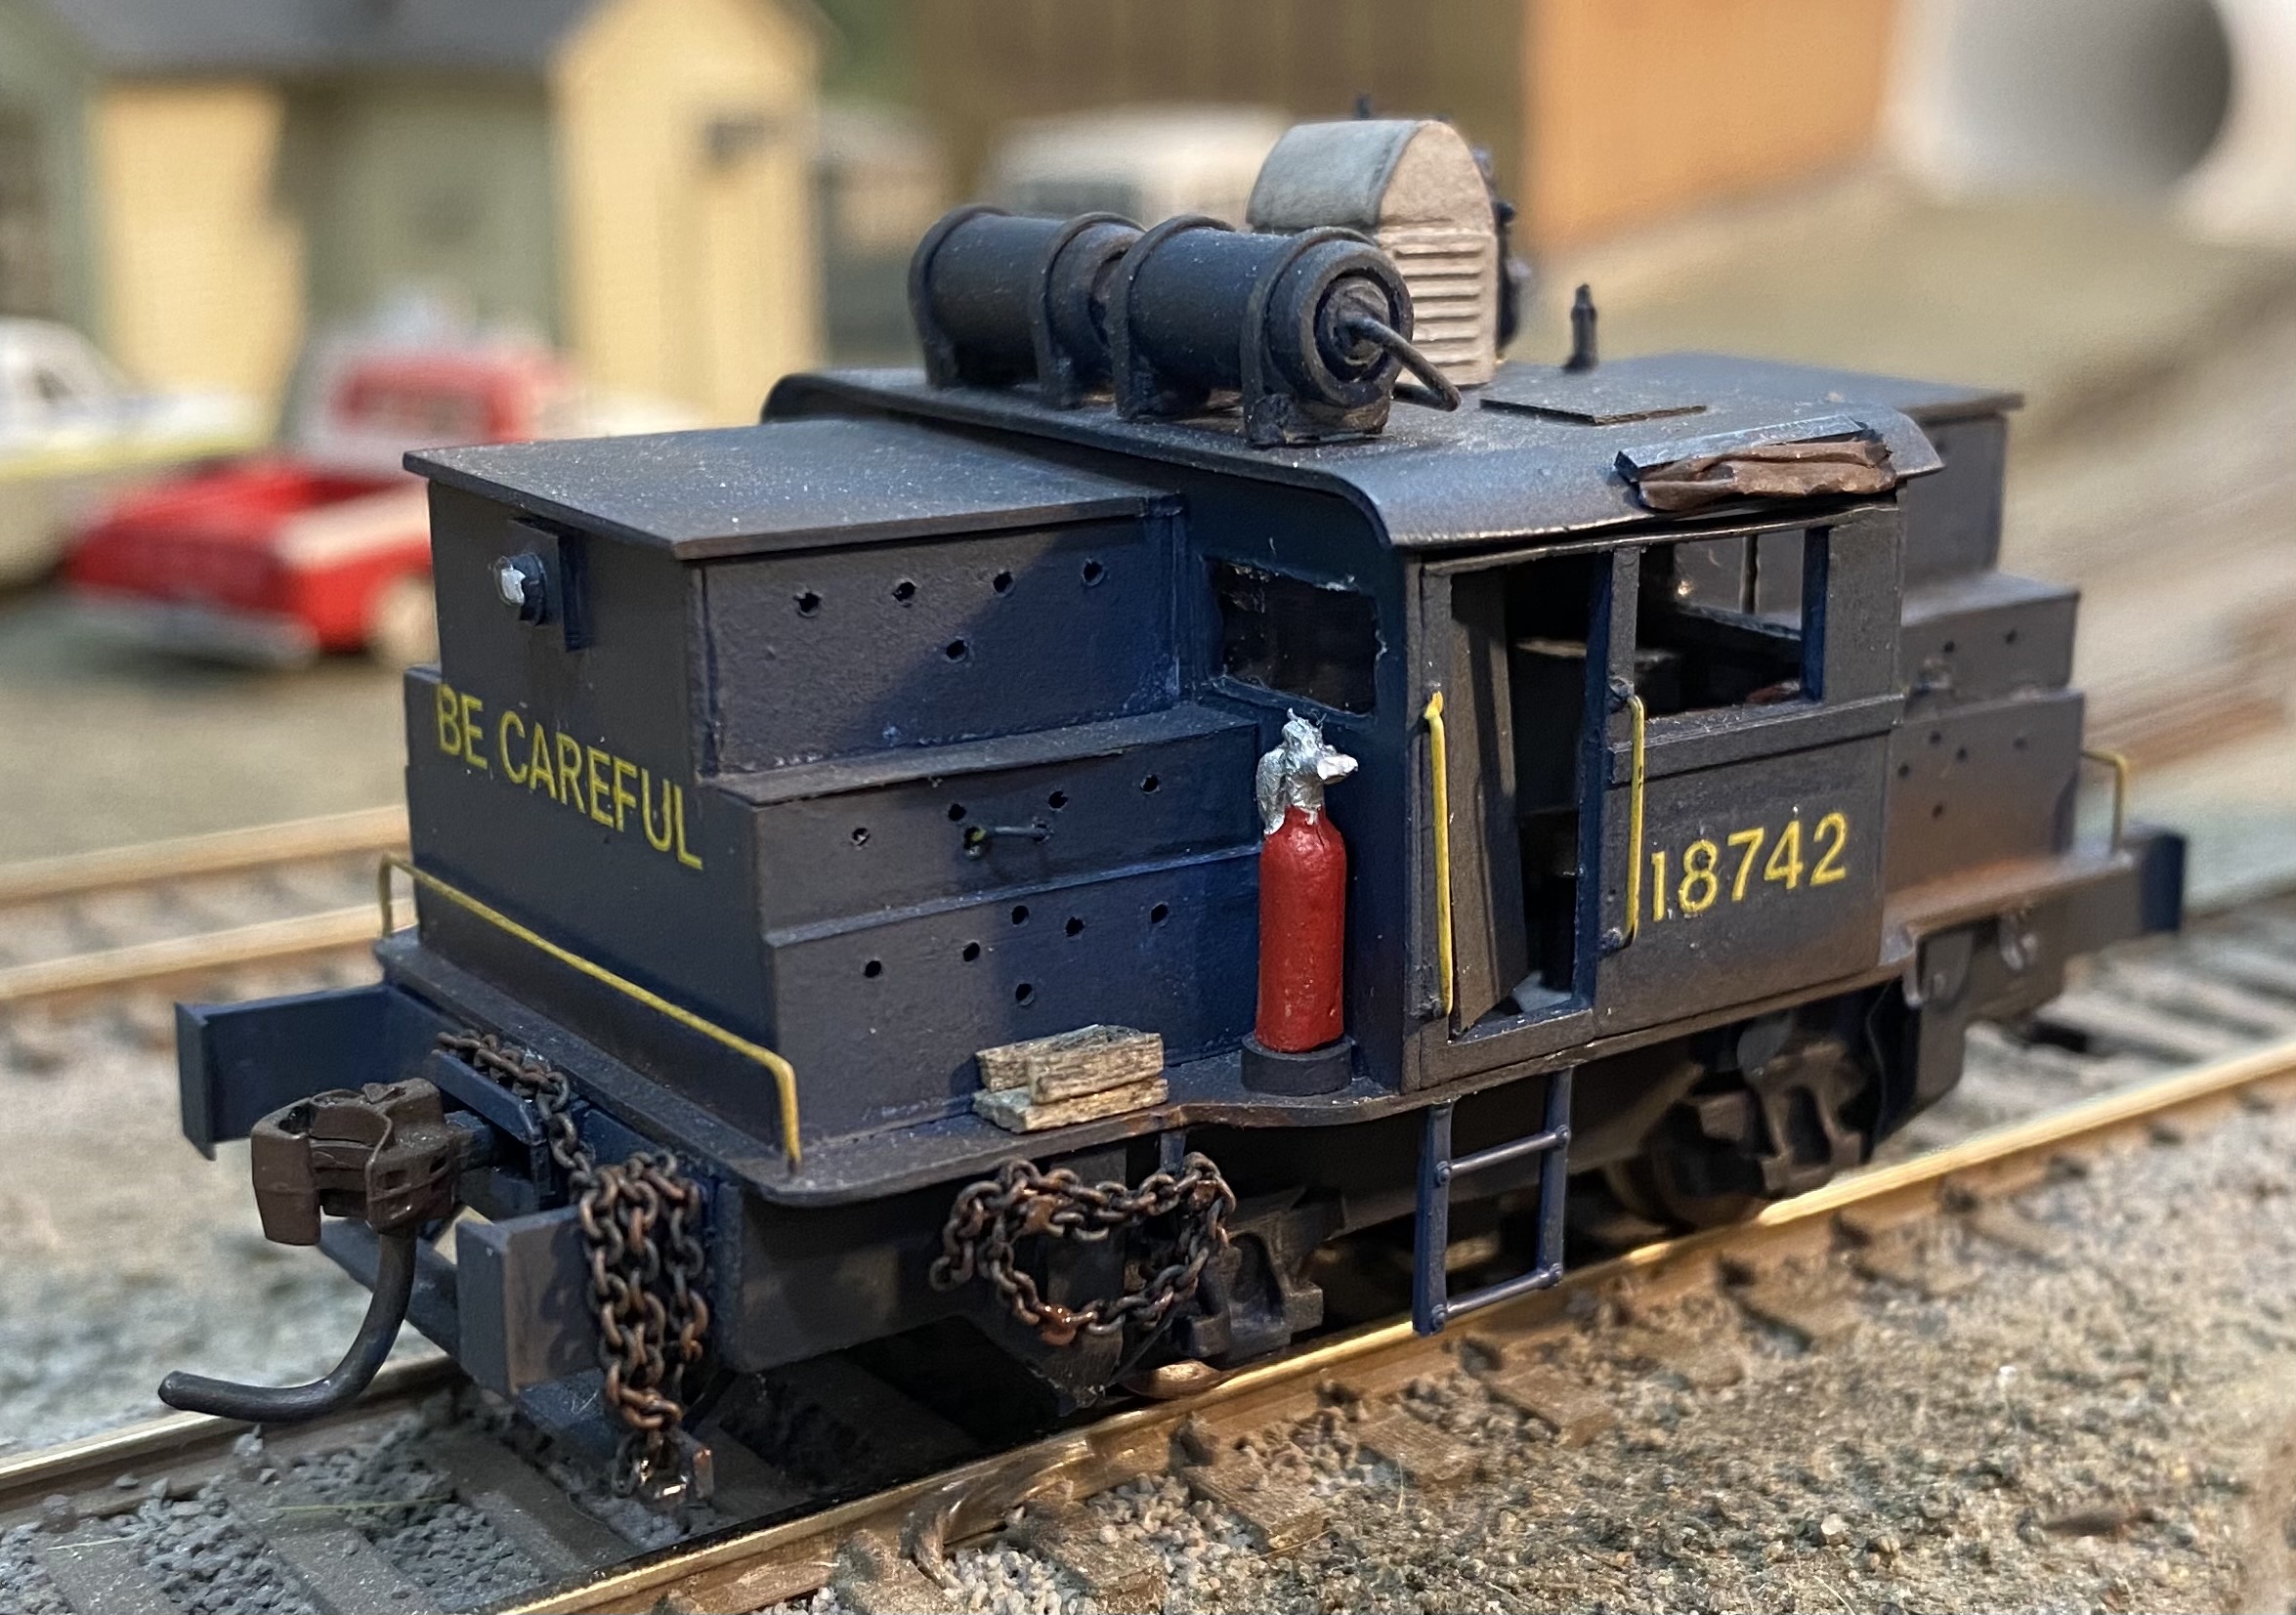
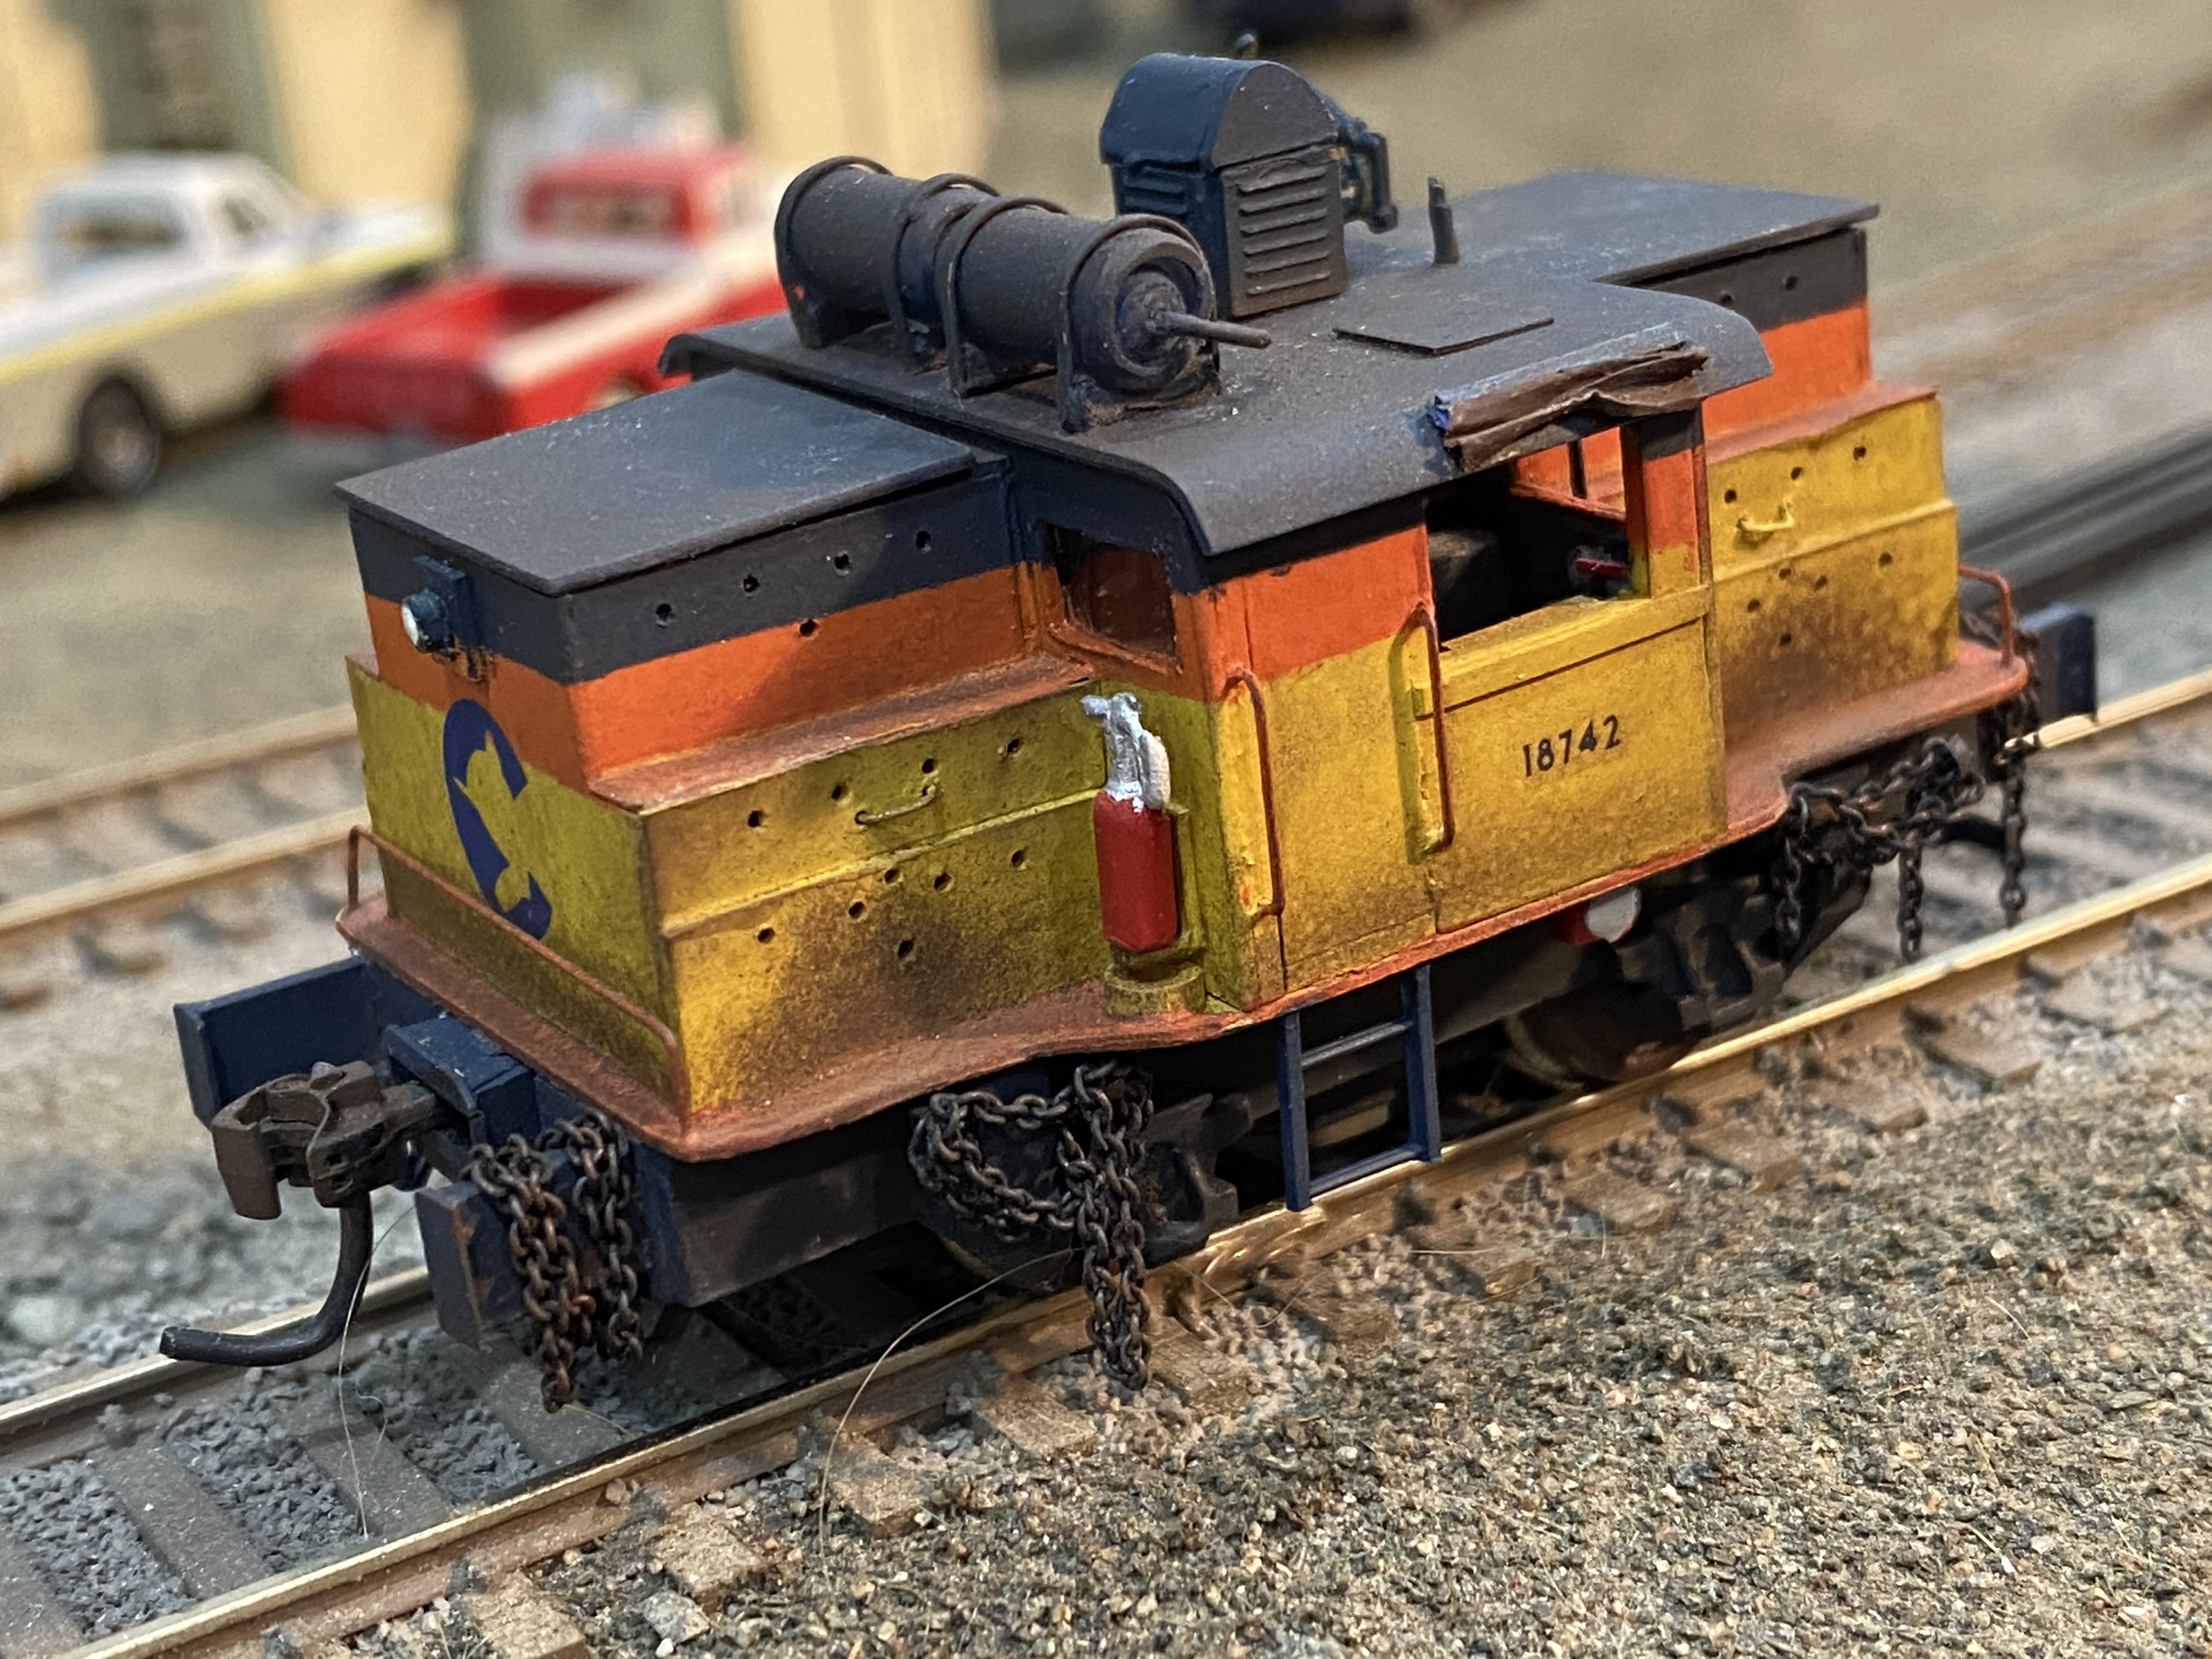
Attached are photos of my finished C&O 18742 "Dinky" models. The "Dinkies" were modeled for my
Motive Power Achievement certificate. All three are scratchbuilt. They show the three phases of
it's use (C&O, Chessie and CSX). I used NWSL Stanton drives to power them. This is a one of a kind
locomotive and is preserved at the B&O Railroad Museum in Baltimore. It is not only the oldest
locomotive on the Chessie System roster (built in 1917), but it is the only one with a five digit
road number. It's also the only Chessie locomotive to have the "Ches-C" logo on both ends, instead
of just the front.
Ed O'Rourke, MMR
I have been working on a lot of stuff since March. One of the things I did was add scenery to the Plainville, CT section of my layout. The station and brick water tower are scratch built, everything else is kit-bashed. The RDCs are Proto 1000. All HO scale.
I’ve also been working on the “Cars” AP, and scratch built the Converted Troop Sleeper and Wood Baggage car. The two EP-1s are Custom Brass models I painted and lettered, and the coach is an ancient Walthers kit.
And I built this NERX Refrigerator from a Ambroid kit for a CP wood refrigerator car.
Russ Norris, MMR
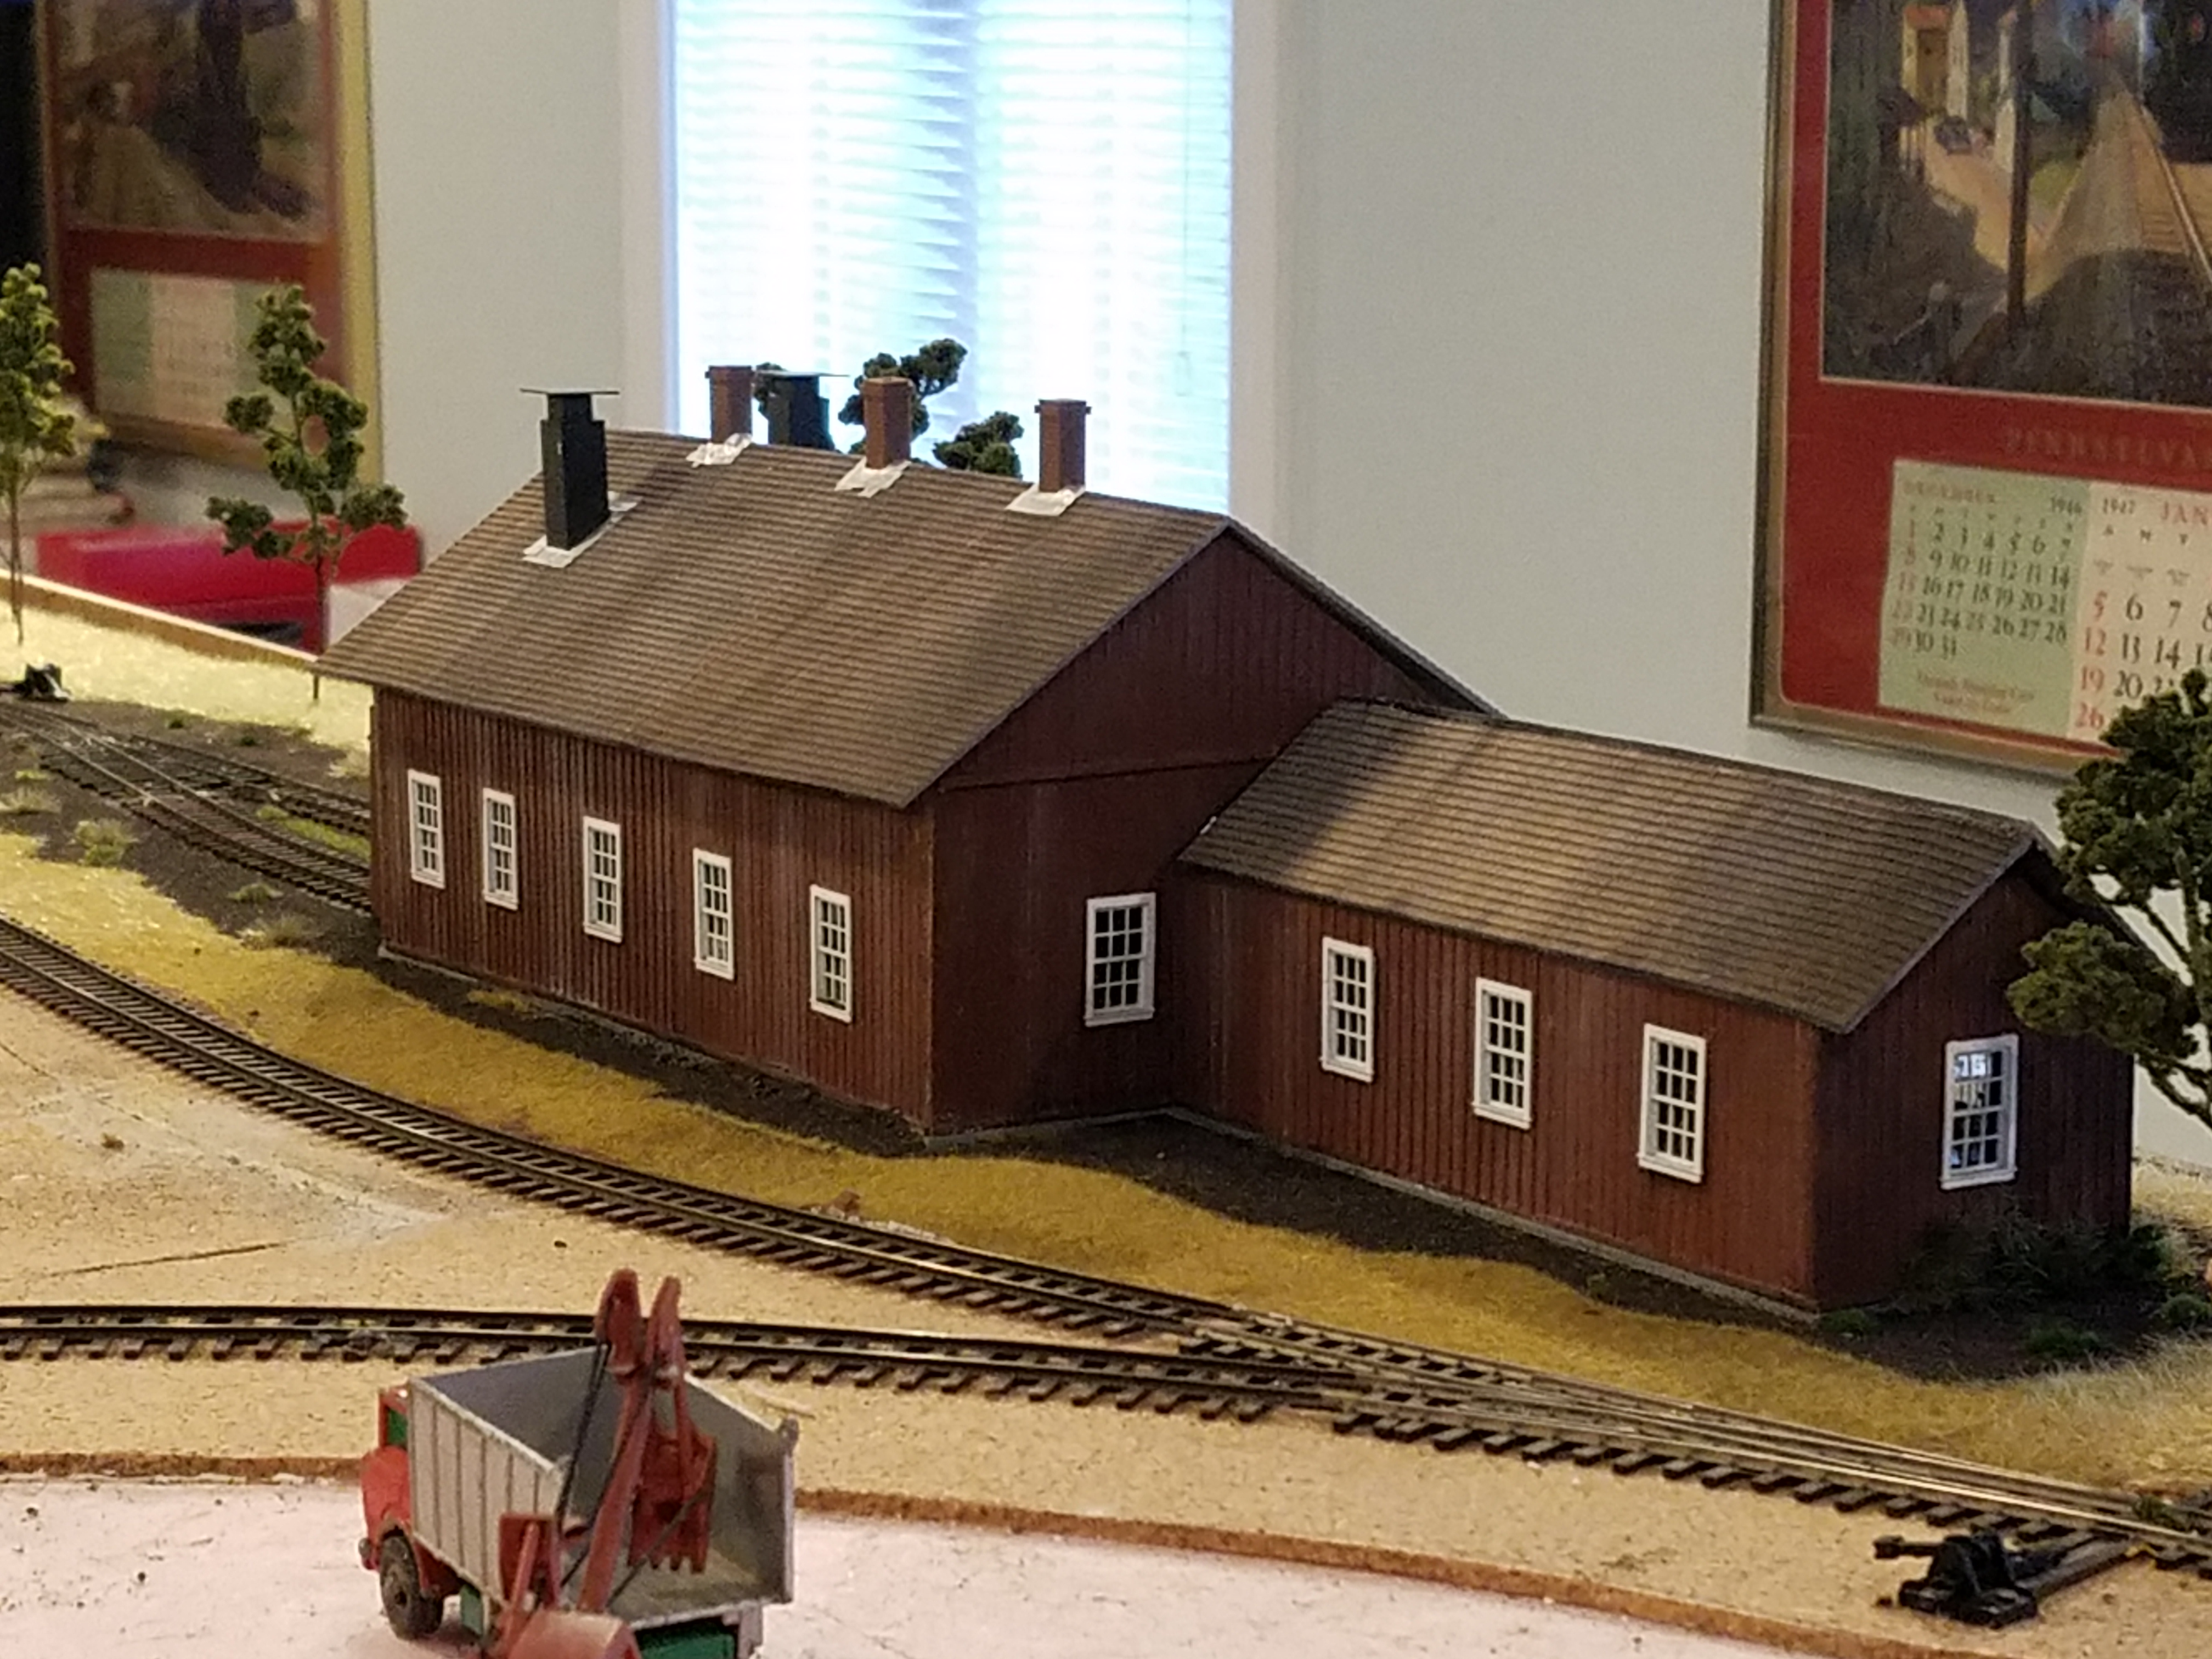
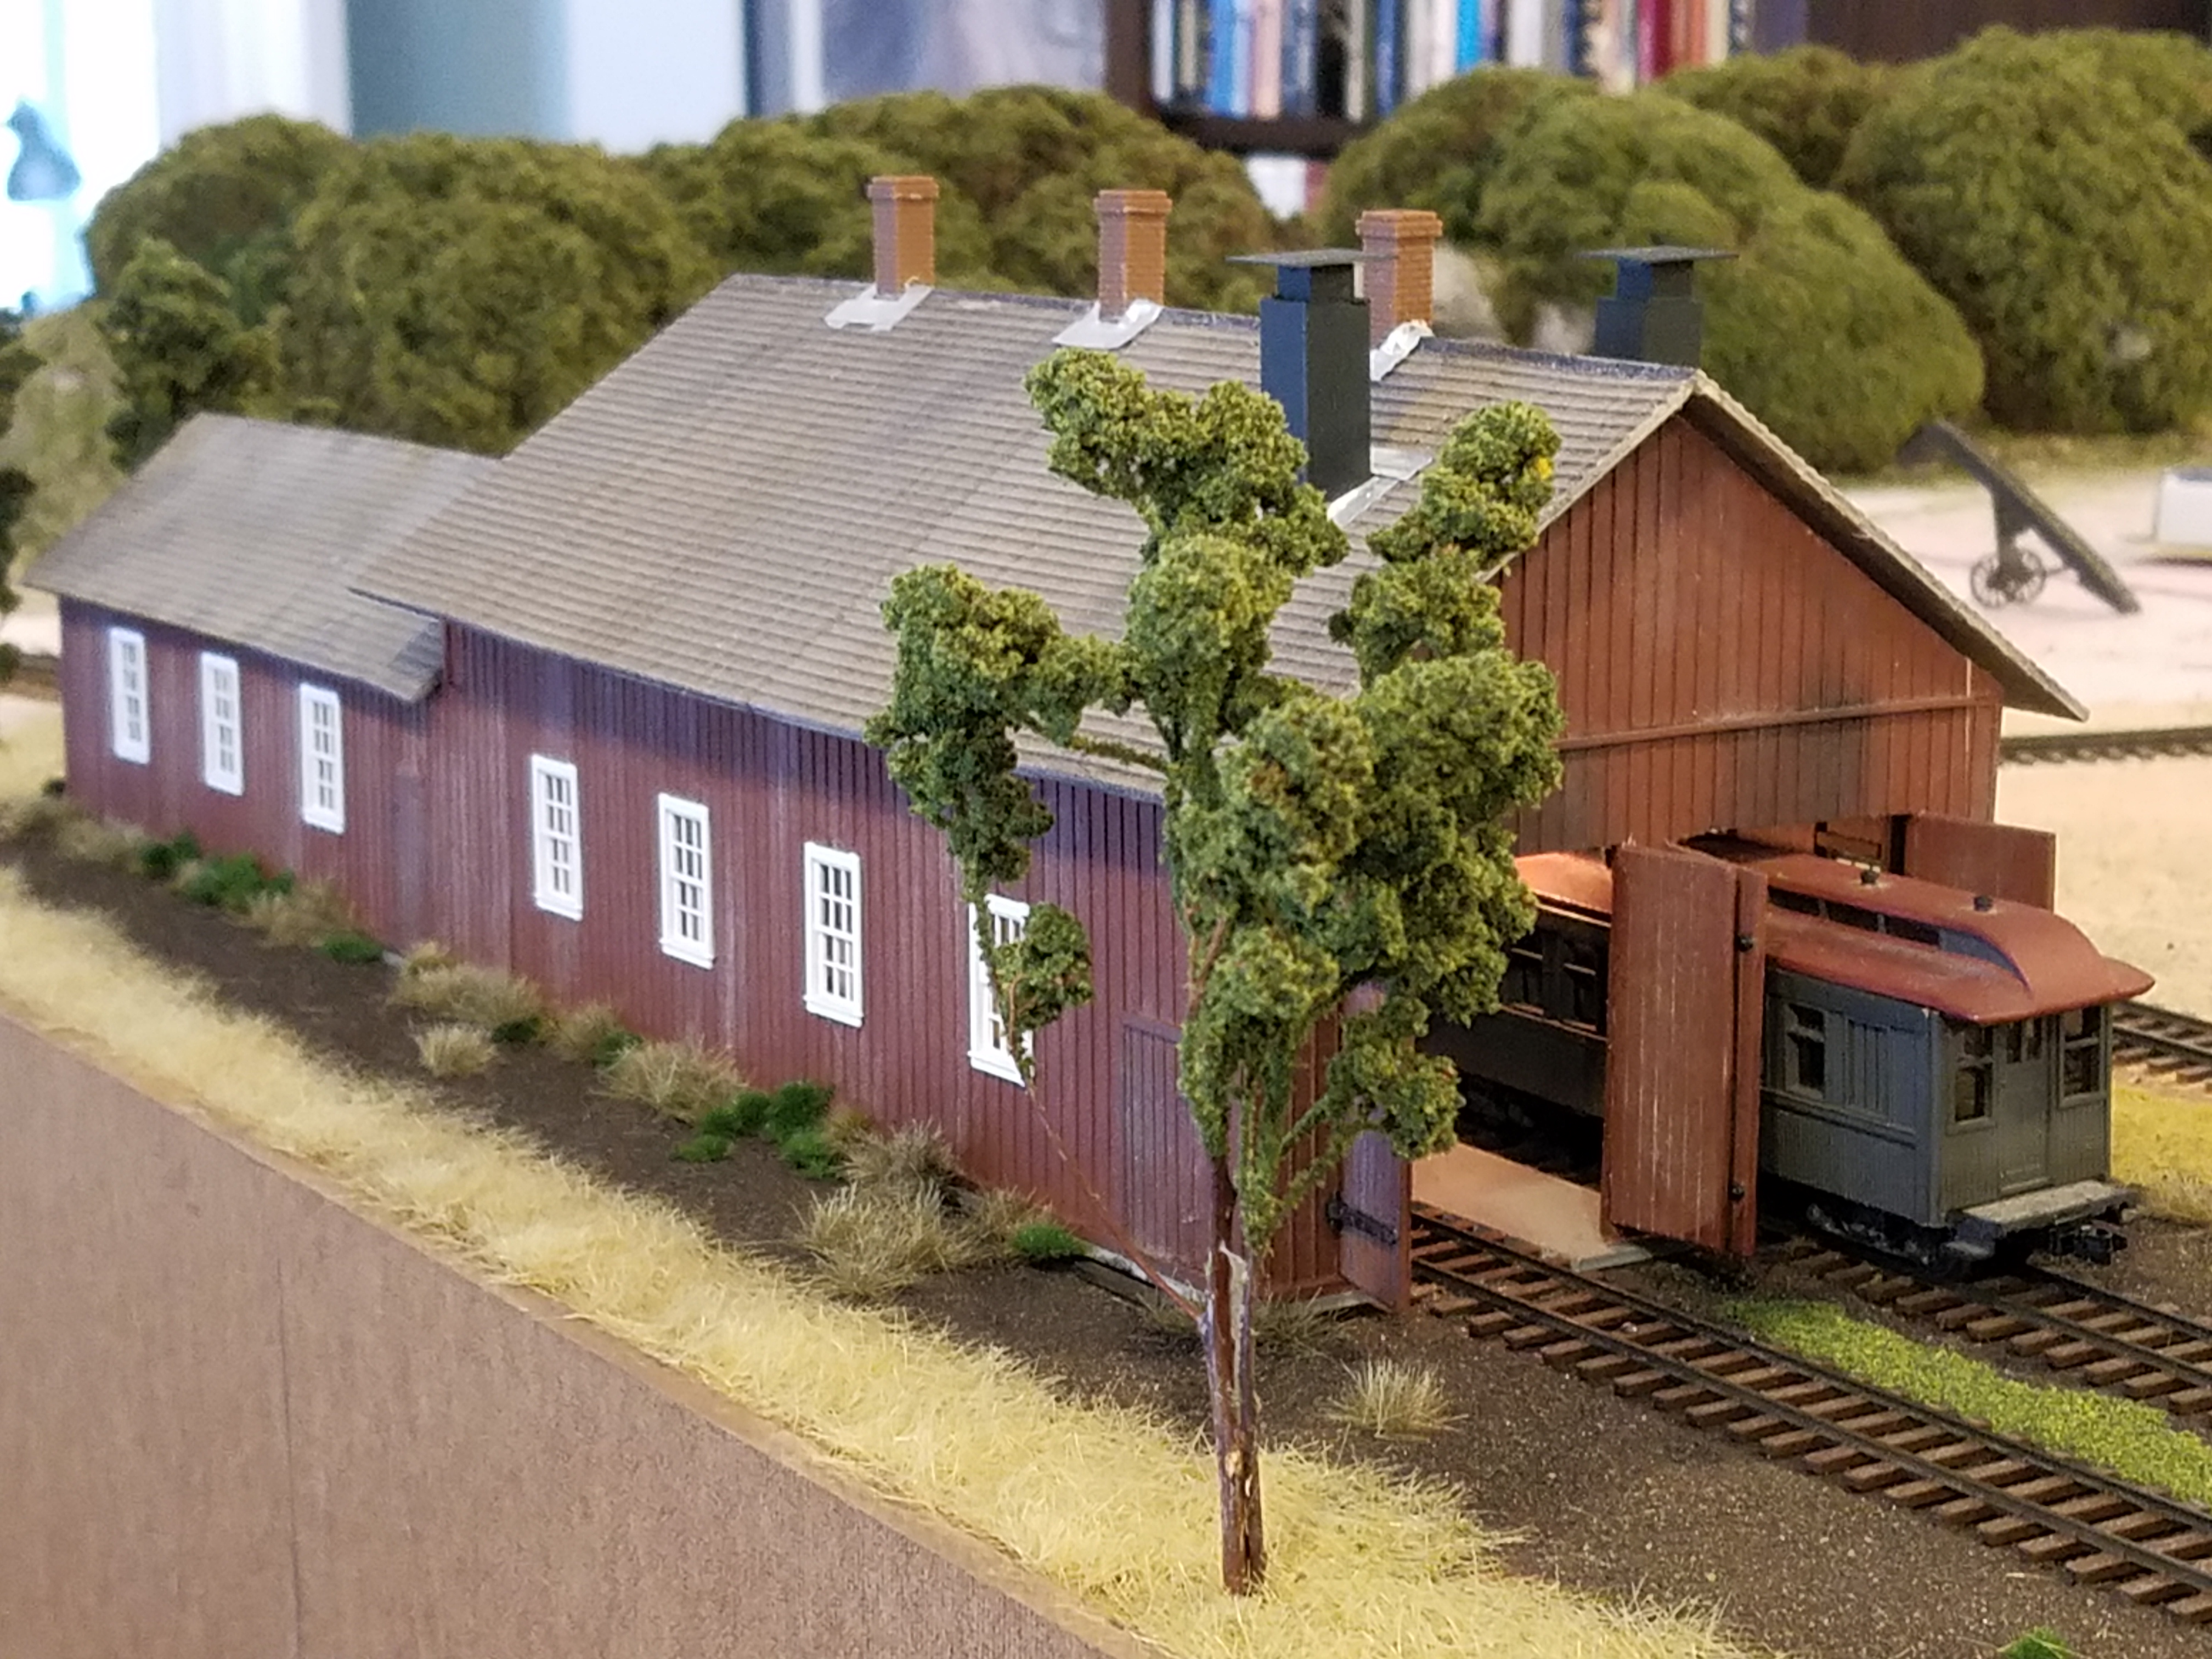
I just finished a scratch built model of the East Broad Top engine house in Robertsdale, Pennsylvania, at the southern end of the line on Broad Top Mountain, where the coal mines were located. The model is made of scribed board and batten basswood with laser cut shake shingles on the roof from B.E.S.T. models and windows from Tichy. The engine house itself was demolished decades ago, but the Friends of the EBT Company Store had a complete set of plans from field notes made in 1973 when it was still in use. It is a two stall structure, with one track extending back into an extension at the rear. The engine house is lit with 12 volt miniatronic lights suspended from the roof trusses, and is 60 feet long in HO scale; the extension is another 40 feet, most of which is a fully equipped backwoods locomotive repair shop. The track gauge is HOn3. I enjoy working with wood, which has certain advantages over styrene, especially with painting and weathering.
Bob Cochran
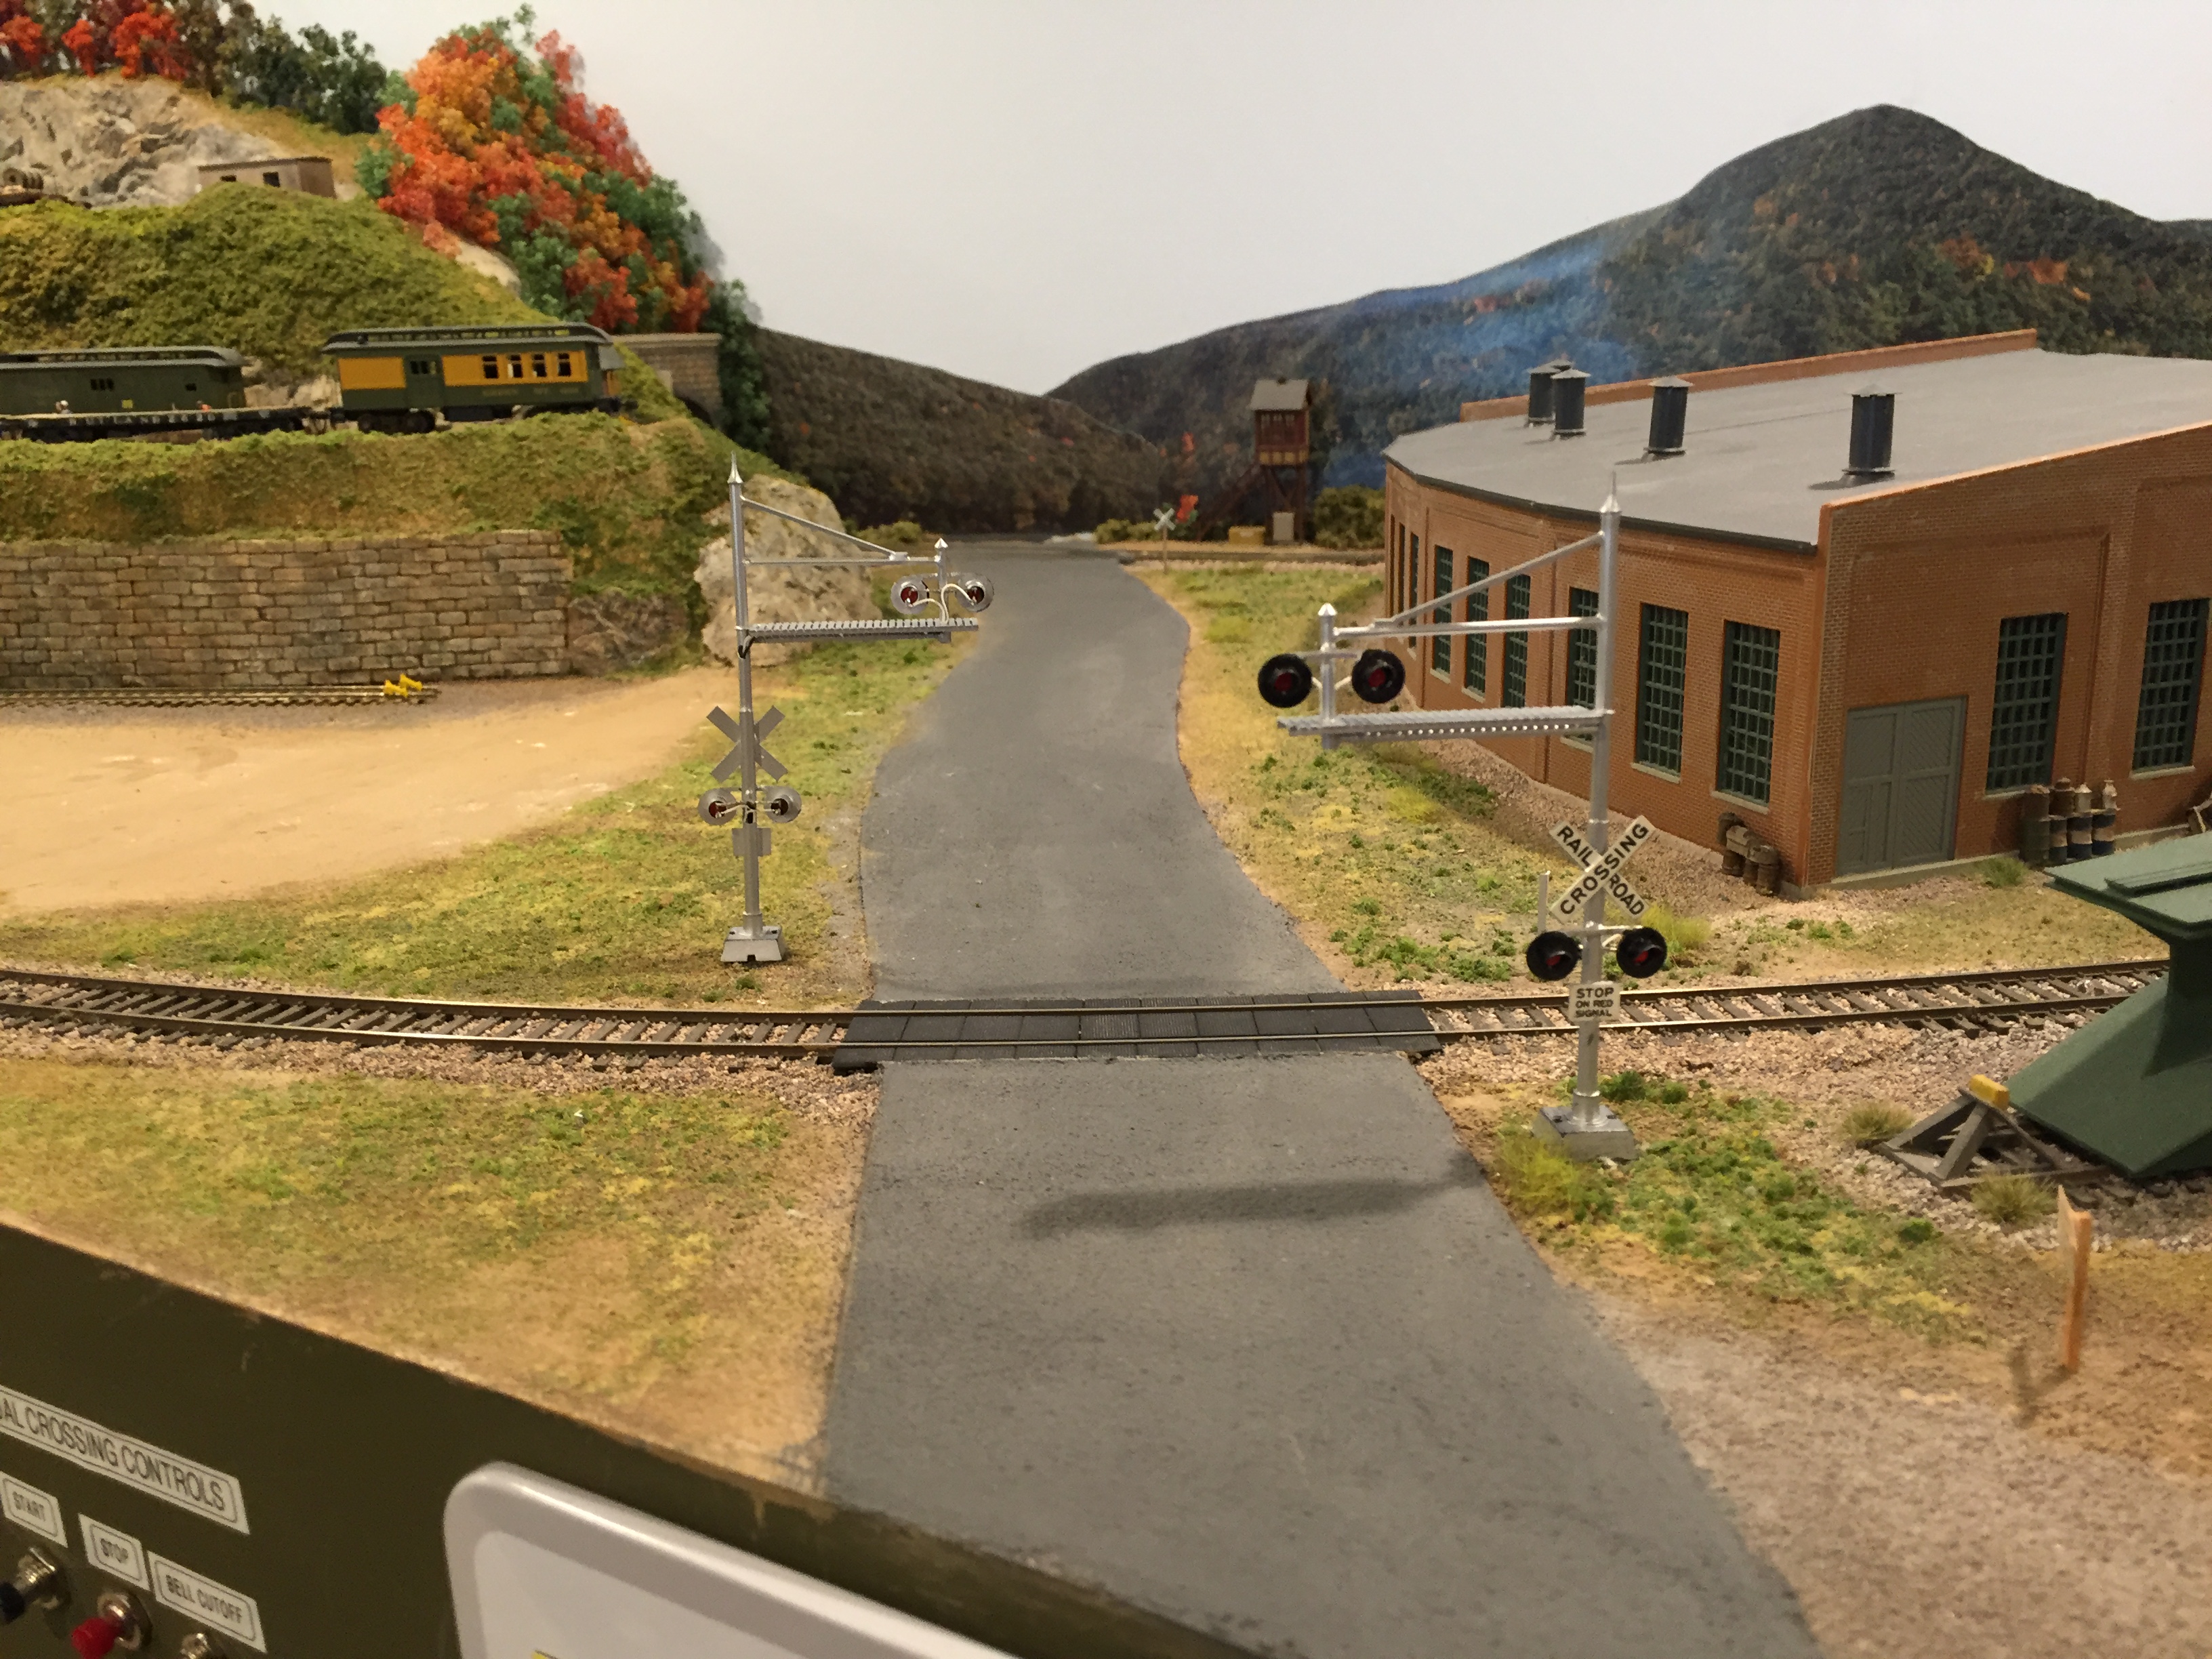
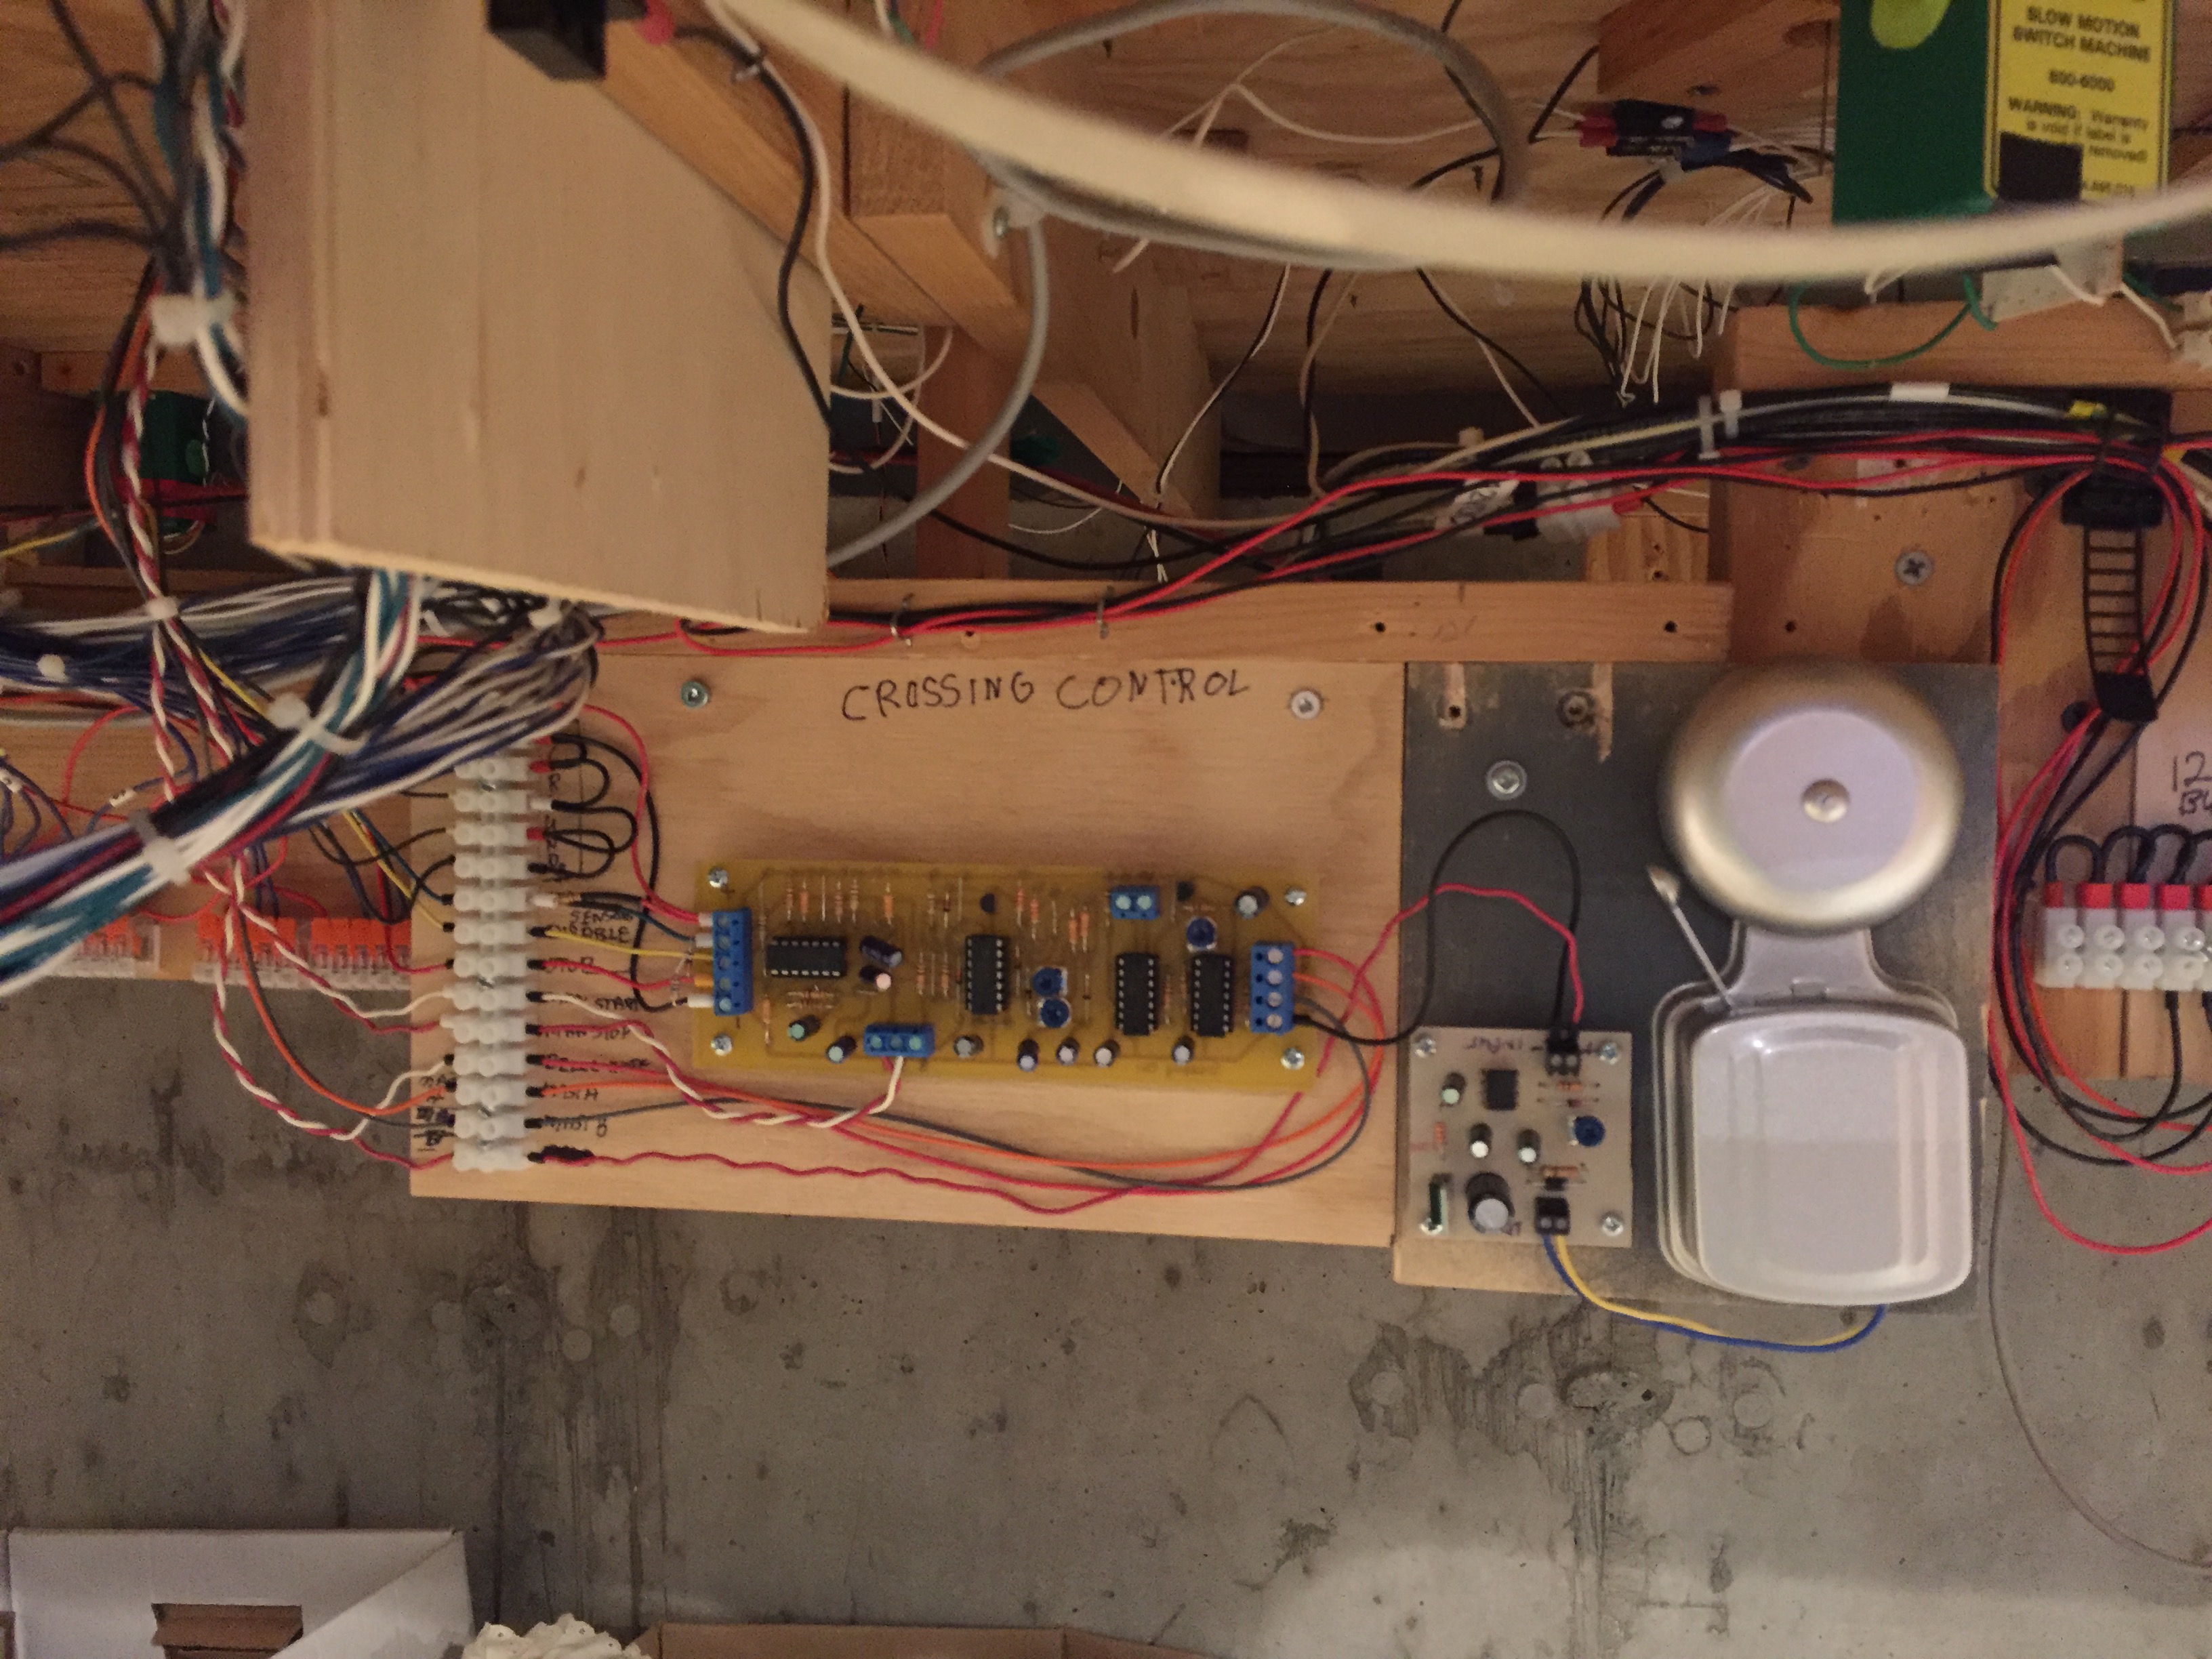
Finished installing the last Grade Crossing Signal. I repainted the signal mast silver as it was black and replaced bulbs with LED’s.
Circuit controls design are from Rob Paisley. The circuit uses photo transistors for detection. The bell I got from a hardware store.
The bell has been adjusted so it is not to loud. This is the third one I have install. They work really great.
Malcolm Houck
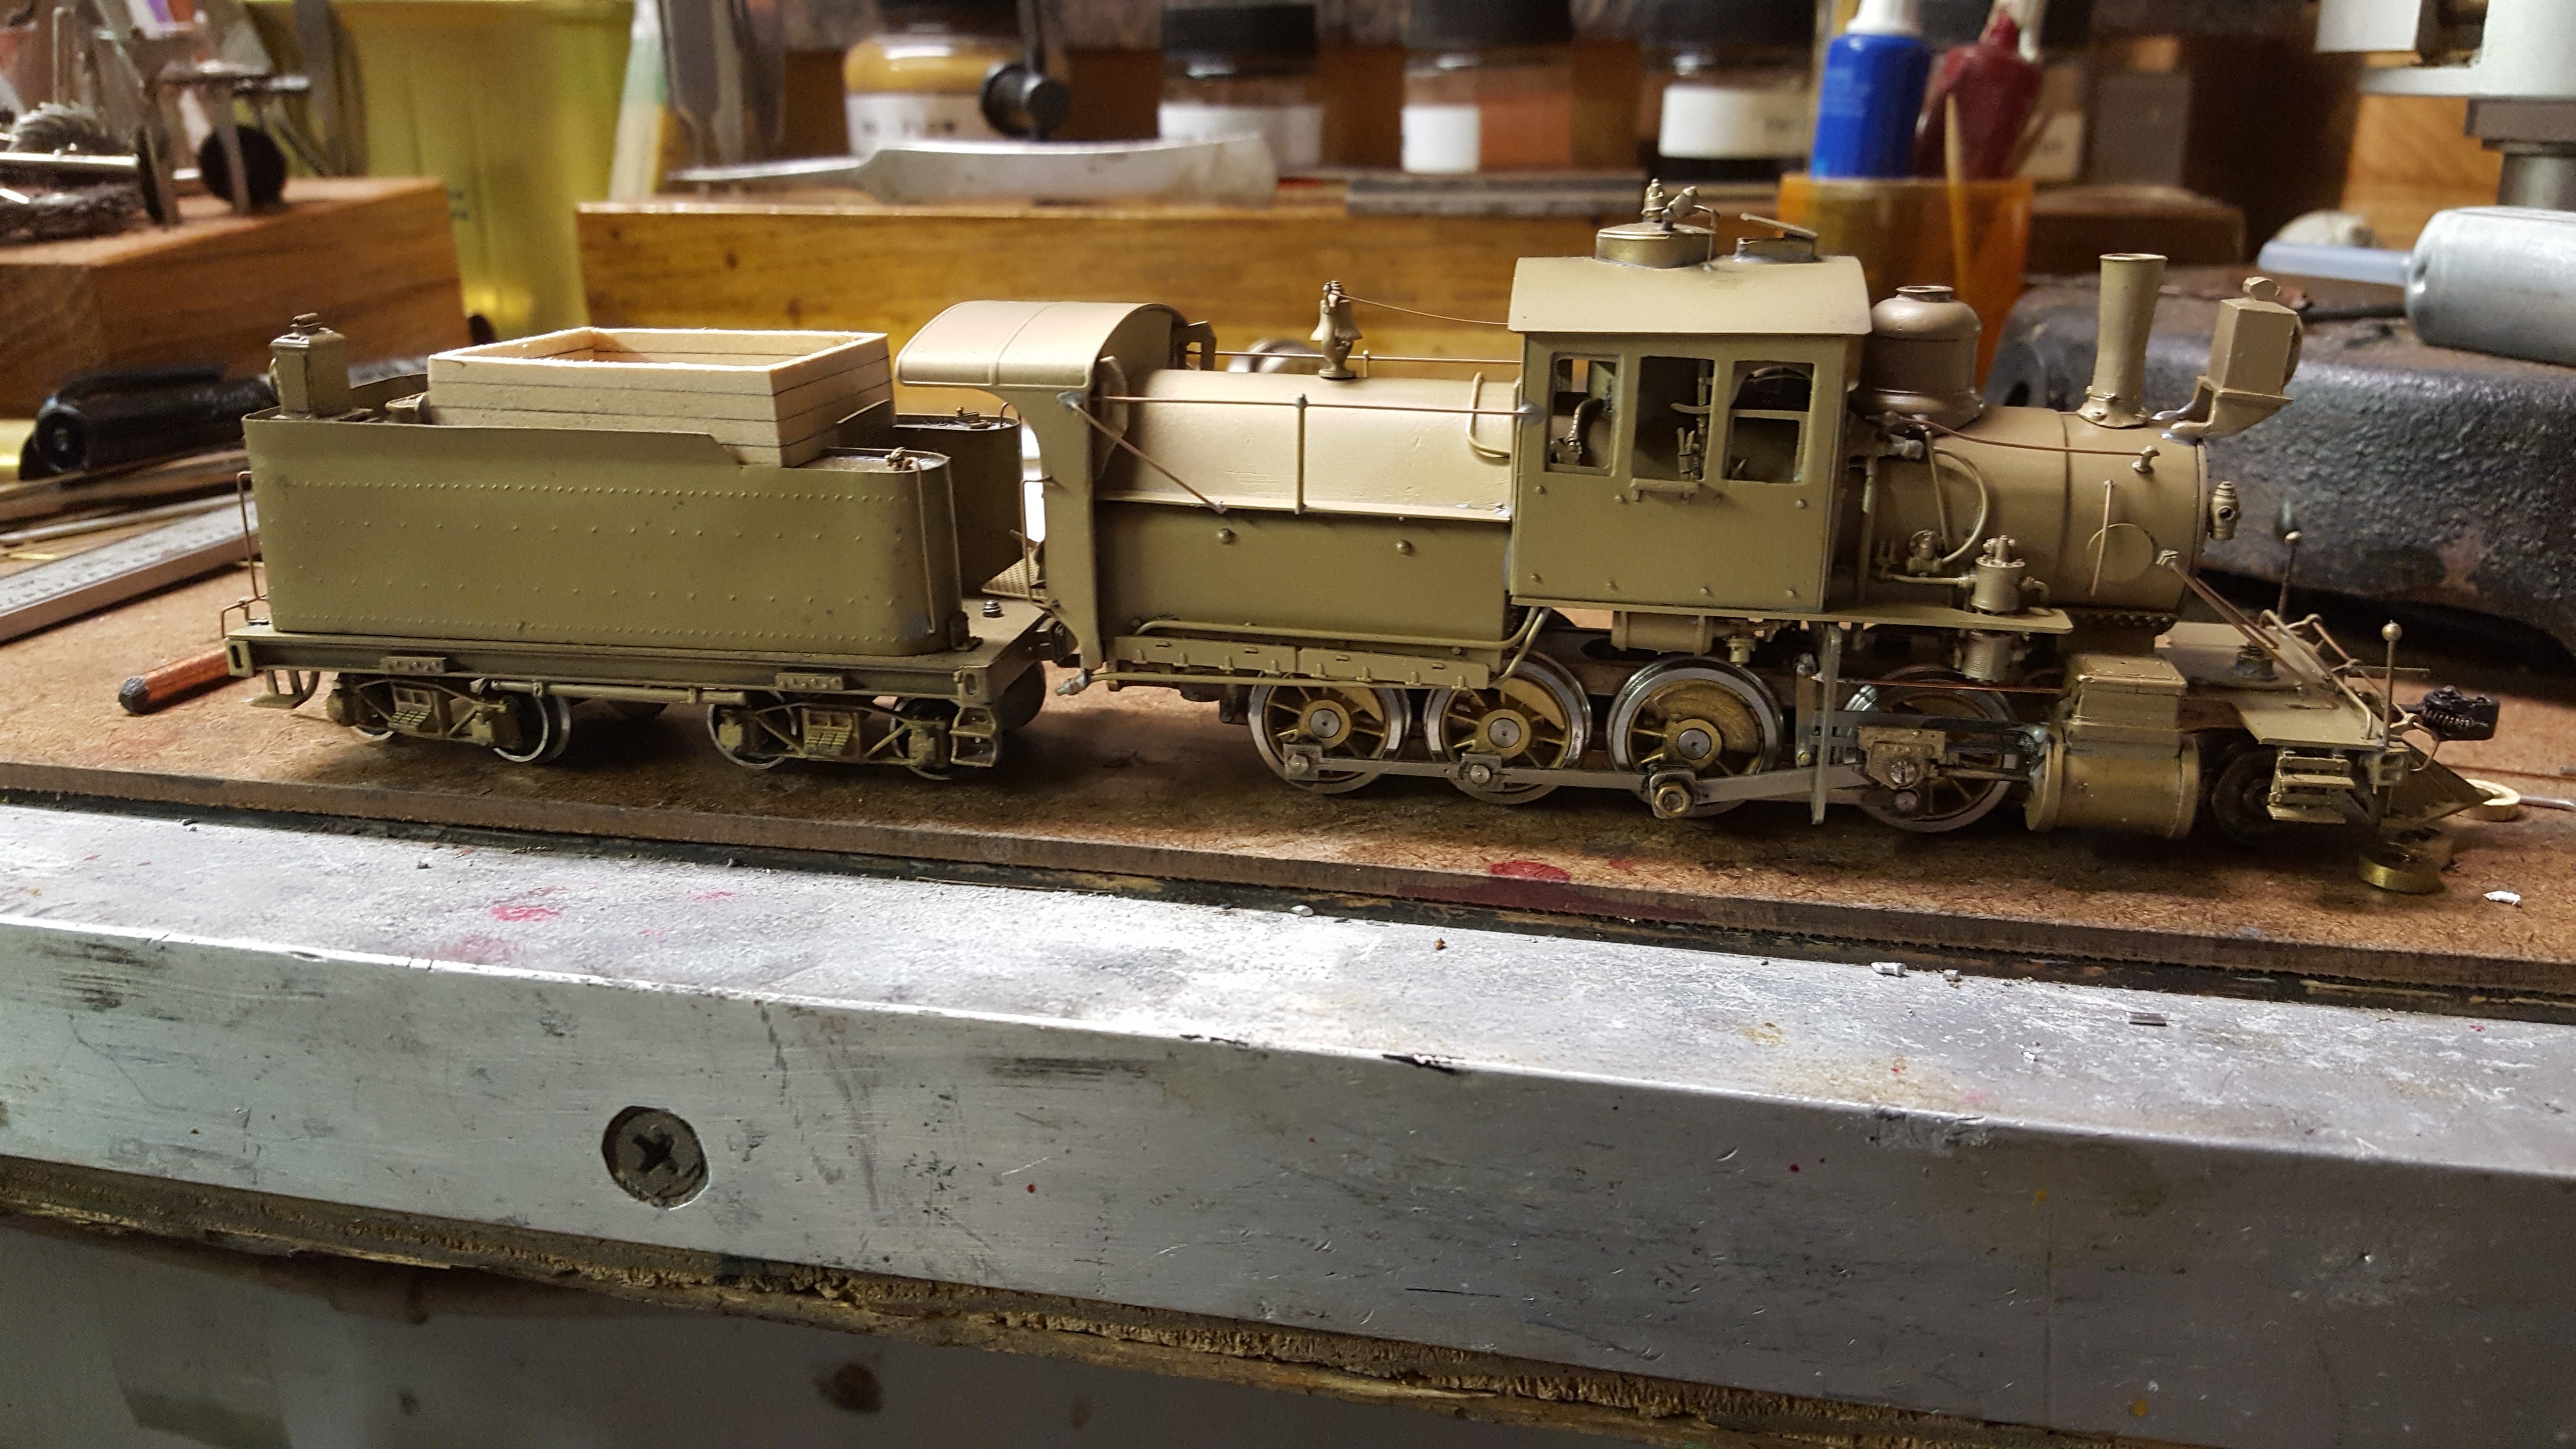
I have been doing that which I do..........attached are two scratchbuilt HO Scale locomotives.
One is a so-called 'short boiler' NYO&W Class S 2-8-0 Double Cab built for the road by the Dickson Machine
Company of Scranton, PA in August 1890 and then serving the New York Ontario & Western Ry. until retired and
sold for scrap in October 1925.
The NYO&W Class S was the most numerous Class of locomotives ........42 engines of two very similar designs,
and serving as the main freight locomotive, until displaced by more modern design superheated engines.
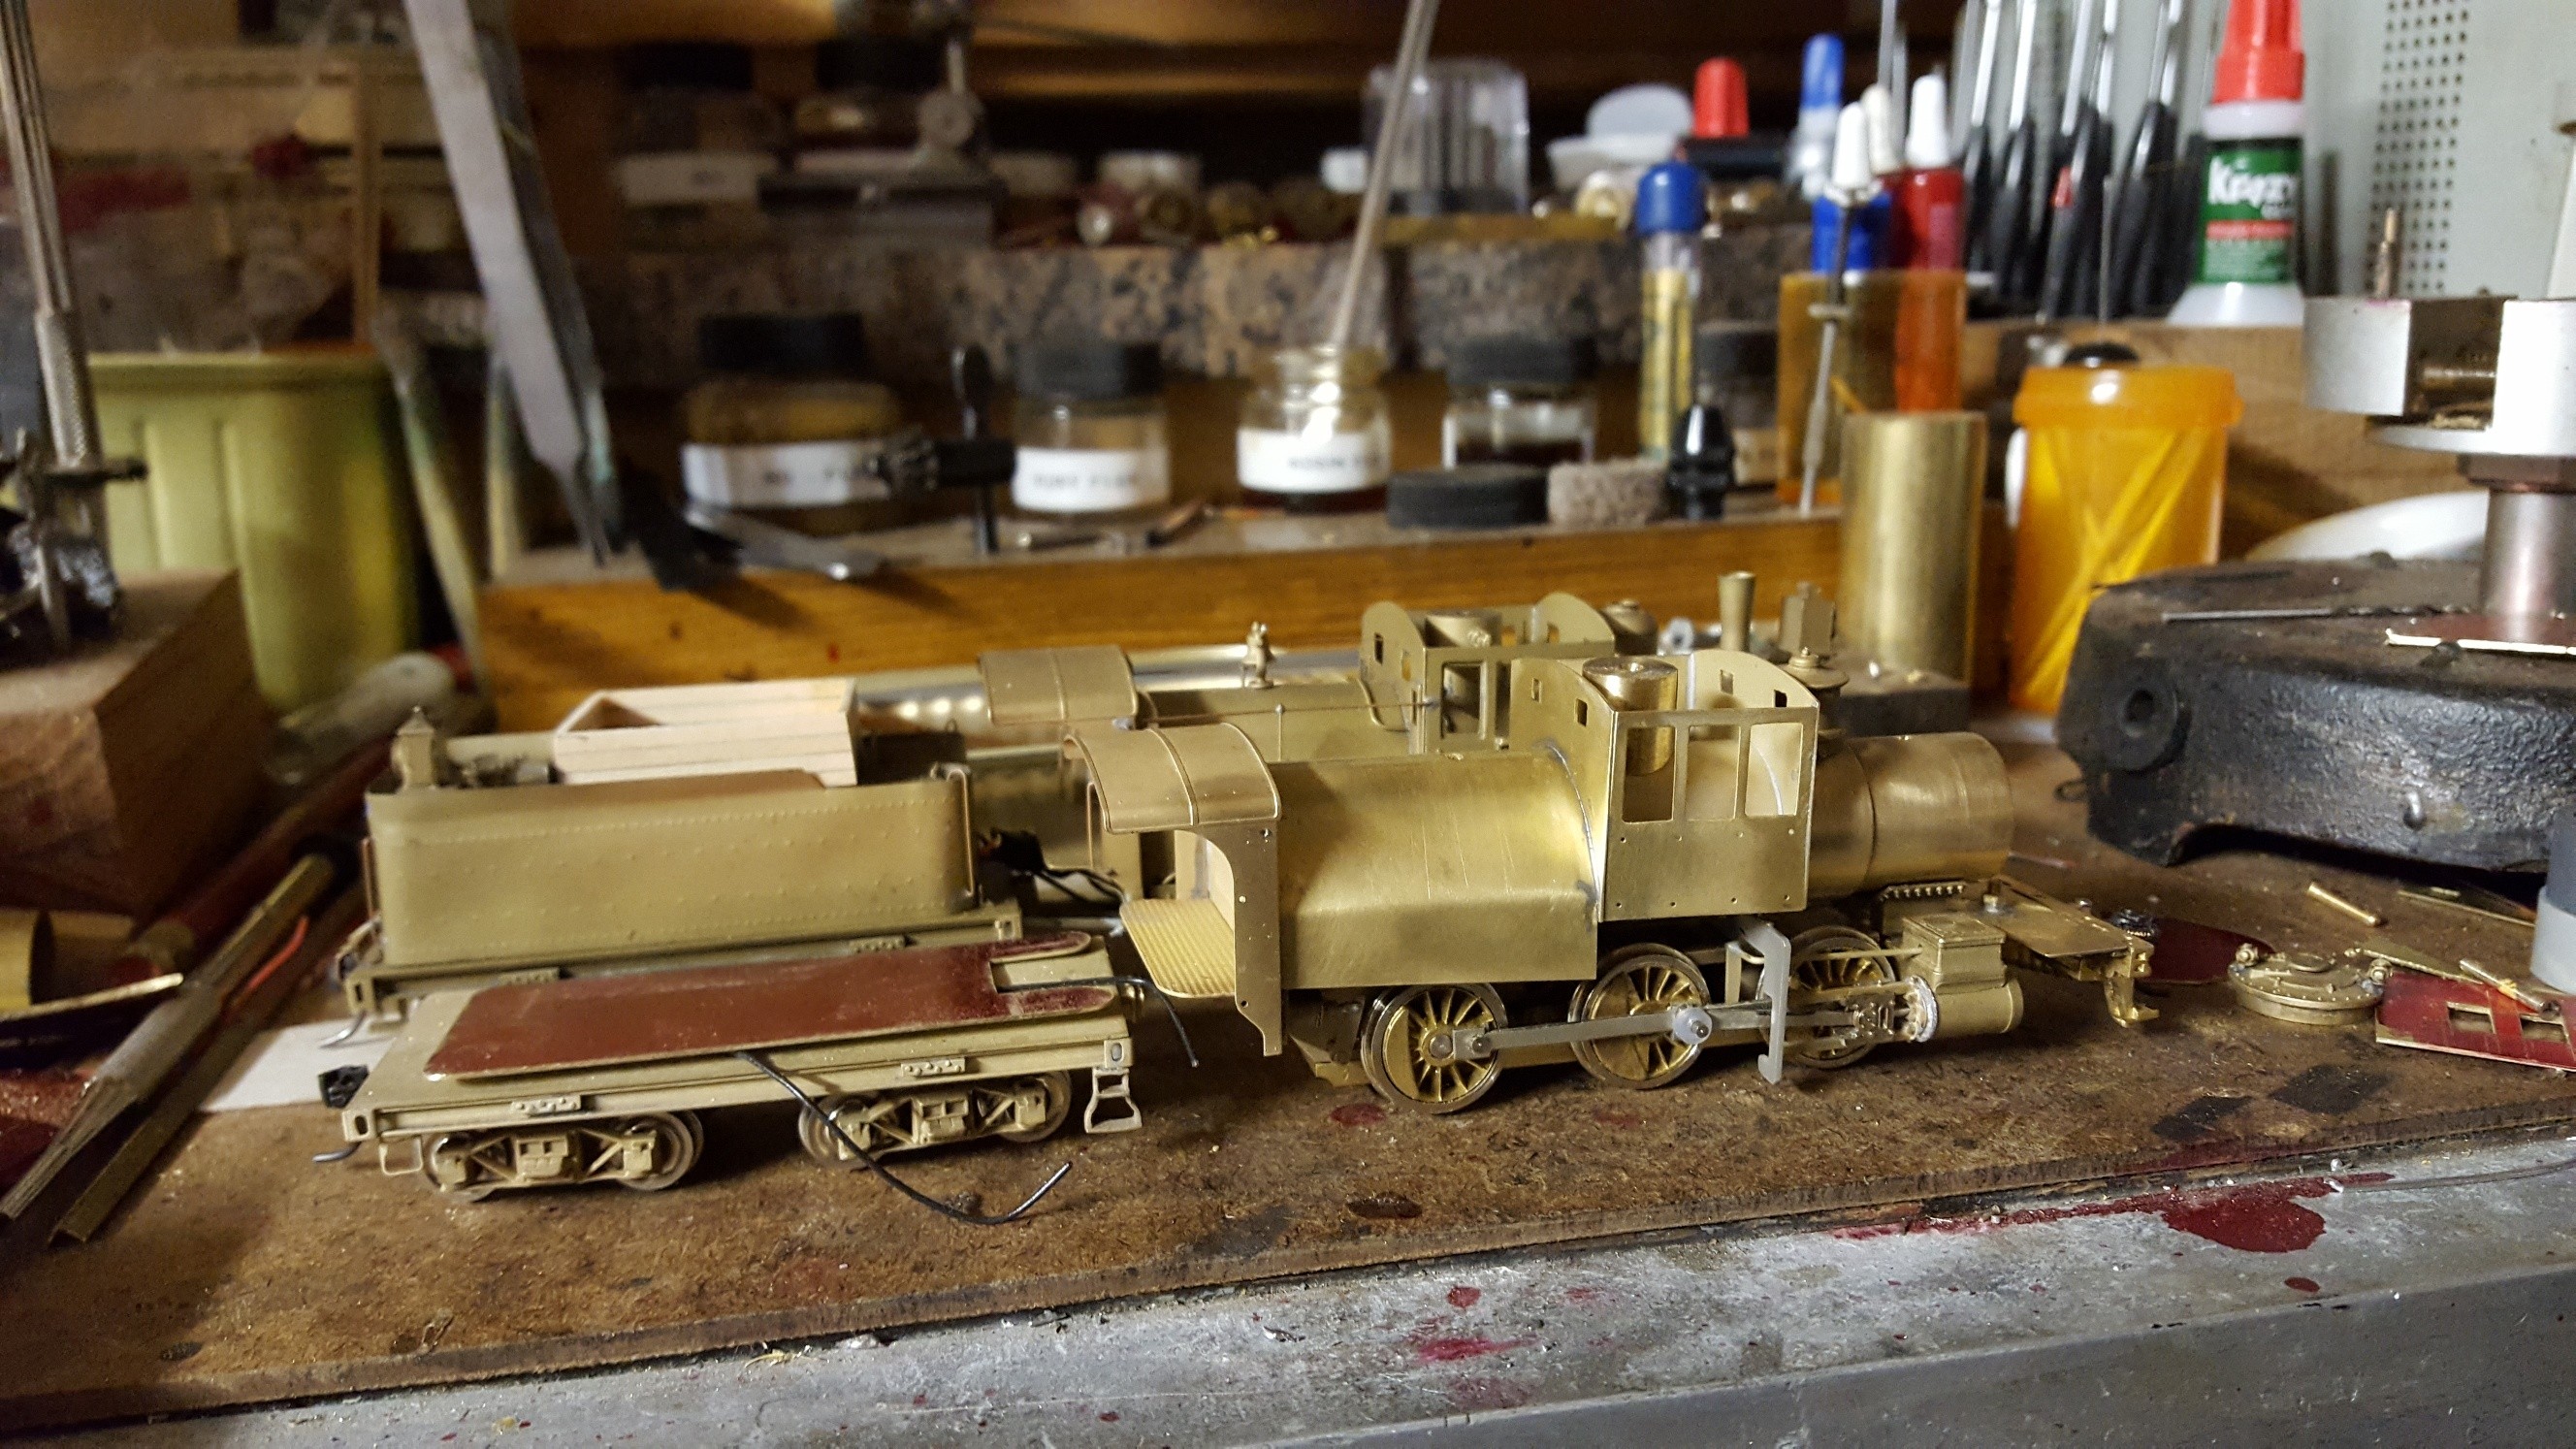
The second is a Class J 2-6-0 Double Cab......rebuilt by Dickson from a "conventional" single cab engine
originally from Rome Locomotive Works (a/k/a New York Locomitve Works) and two copies from Cooke Locomotive
Works of Paterson NJ.
The Class J engines complemented the O&W enthusiasm for and use of cheap anthracite 'culm' available on-line
on its Scranton Branch. However these engines were also soon displaced by superheated steam locomitves........serving
only less than 20 years after the rebuild conversion(s).
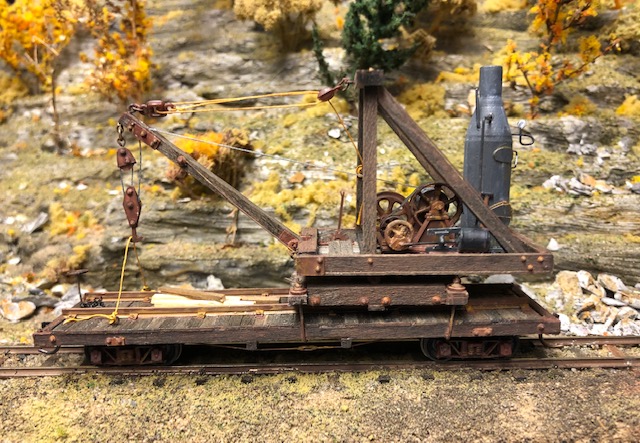
Jim Rothe
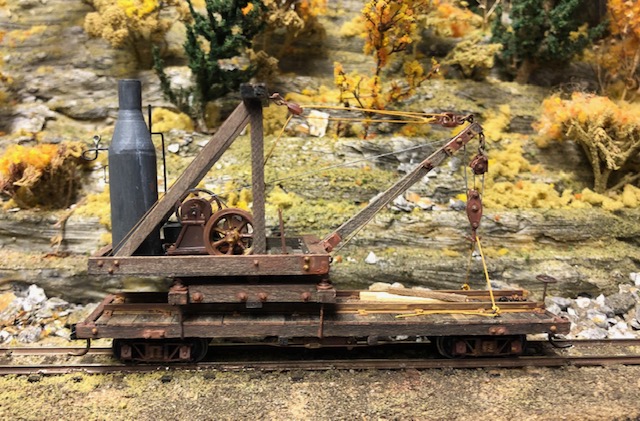
When I saw the Robert Stearns drawing of the home built D&RG 5ton Derrick built in the 1880's in the July/August 2020 Issue of the Narrow Gauge and Short line Gazette I just knew I need one for my narrow gauge railroad.
Scaling the drawing I found I had most of the scale size wood I needed. The few sizes I didn’t have I used closest had. I pre stained all the wood using India ink thinned with alcohol (non-drinking kind although I did use some of that too) I used wood glue and ACC depending on what materials were being attached.
I started with the flat car, the trucks were some I had, truss rods are nylon fishing line, nut/bolt/washer castings are from different sources, the steel plates are plastic. The biggest issue I had was in order to get the flat car deck the correct height the top of the Kadee couplers would have been into the deck so the car is slightly high. The deck rails are code 70, I couldn’t find the smaller rail I had.
Next I built the trolley, the wheels are off a old Revell hand car from my junk box. The hold down brackets are bent wire. For the rotating wheels I used a wood dowel cut in 1/8” lengths. The wheels are located 30 degrees apart. To locate them I drew a circle the outside diameter of the wheel assembly, marked every 30 degrees on the outside of the circle, cut out the circle and put the template on the trolley, glued the wheels to the trolley as close to the cut out circle as I could. There is not enough space between the two parts to see what I did.
The only part left was the crowded boiler/host/derrick top platform. For sections of this I drew scale drawings to help make it all fit. I started with the modified “A” frame. Simple except for the angled ends of the beams and their length.
The vertical boiler is a wood dowel turned on my vertical lathe (drill press). I added oval shaped cardboard shapes for the door and top inspection port. I used a “U” shaped wire for the water level gauge, bent a loop in a wire for pressure gauge, added a wire for pressure relief valve and added a wire fire box door handle and hinge.
For the hoist I raided my parts box, the steam cylinder was a tank, the hoist drum was part of a “S” scale air pump, the flywheel is a Mack truck wheel, the cylinder is attached to a steering wheel, the drum pulley is a left over pulley of unknown source. I built the bearing housings and stands from plastic strips. All is mounted on a plastic plate and then attached to the top platform.
Since the cable that raises the boom is tied to a cleat on the side of the frame I assume it was rope. I found some ship pulleys that I used for this part and brown color rope. I couldn’t find any pulleys or a hook so I had to make them from plastic. I used a small hole punch to make the sides of the pulleys and with a spacer in between. Wire rope existed back then so the hoist is a wire color. I used a wash of box car red paint to make it look like it had been painted at one time. I added some wood blocking And tools on the deck to clutter it up
The finished product
Jim Gore, MMR
Branchline coaling station. ATSF prototype from Newton, KS. Drawings taken from an old (early 1960's) RMC.
This was to have been one of our Modeling With The Masters projects for Santa Clara.
It will return at the St Louis meeting with MMR instructors Peter Youngblood, Jim Gore, Clark Kooning, and Al Charulla.
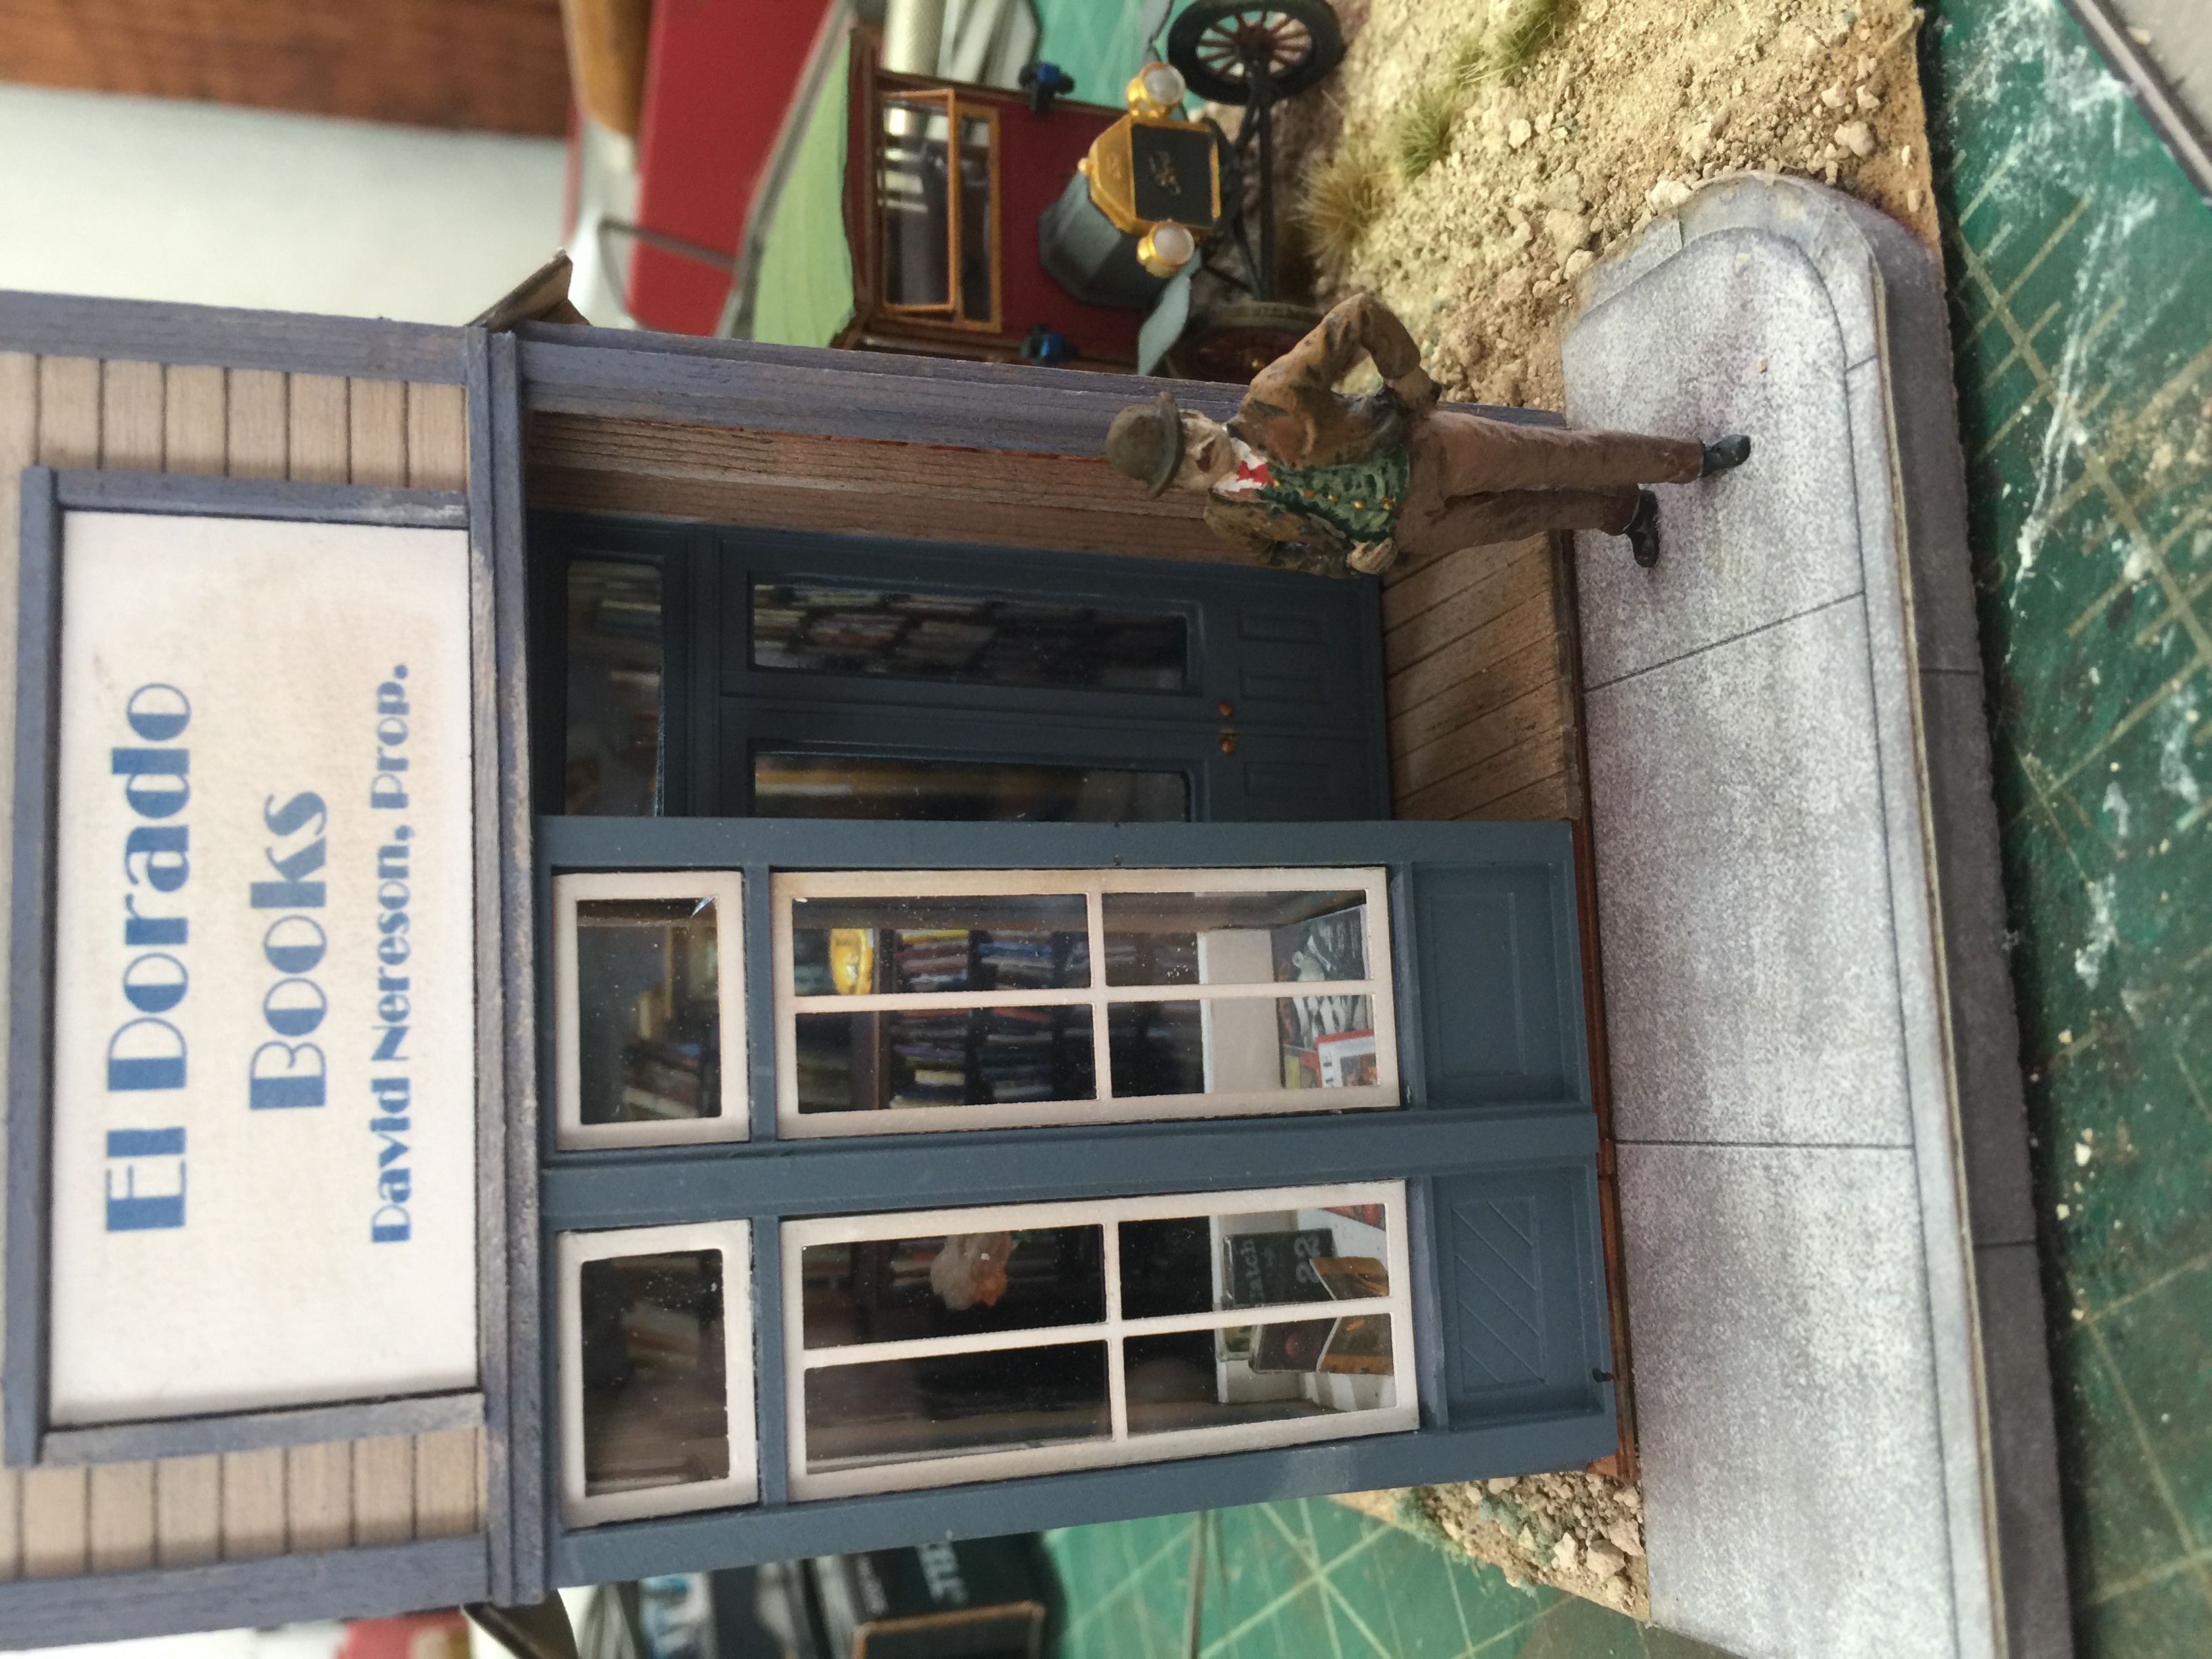
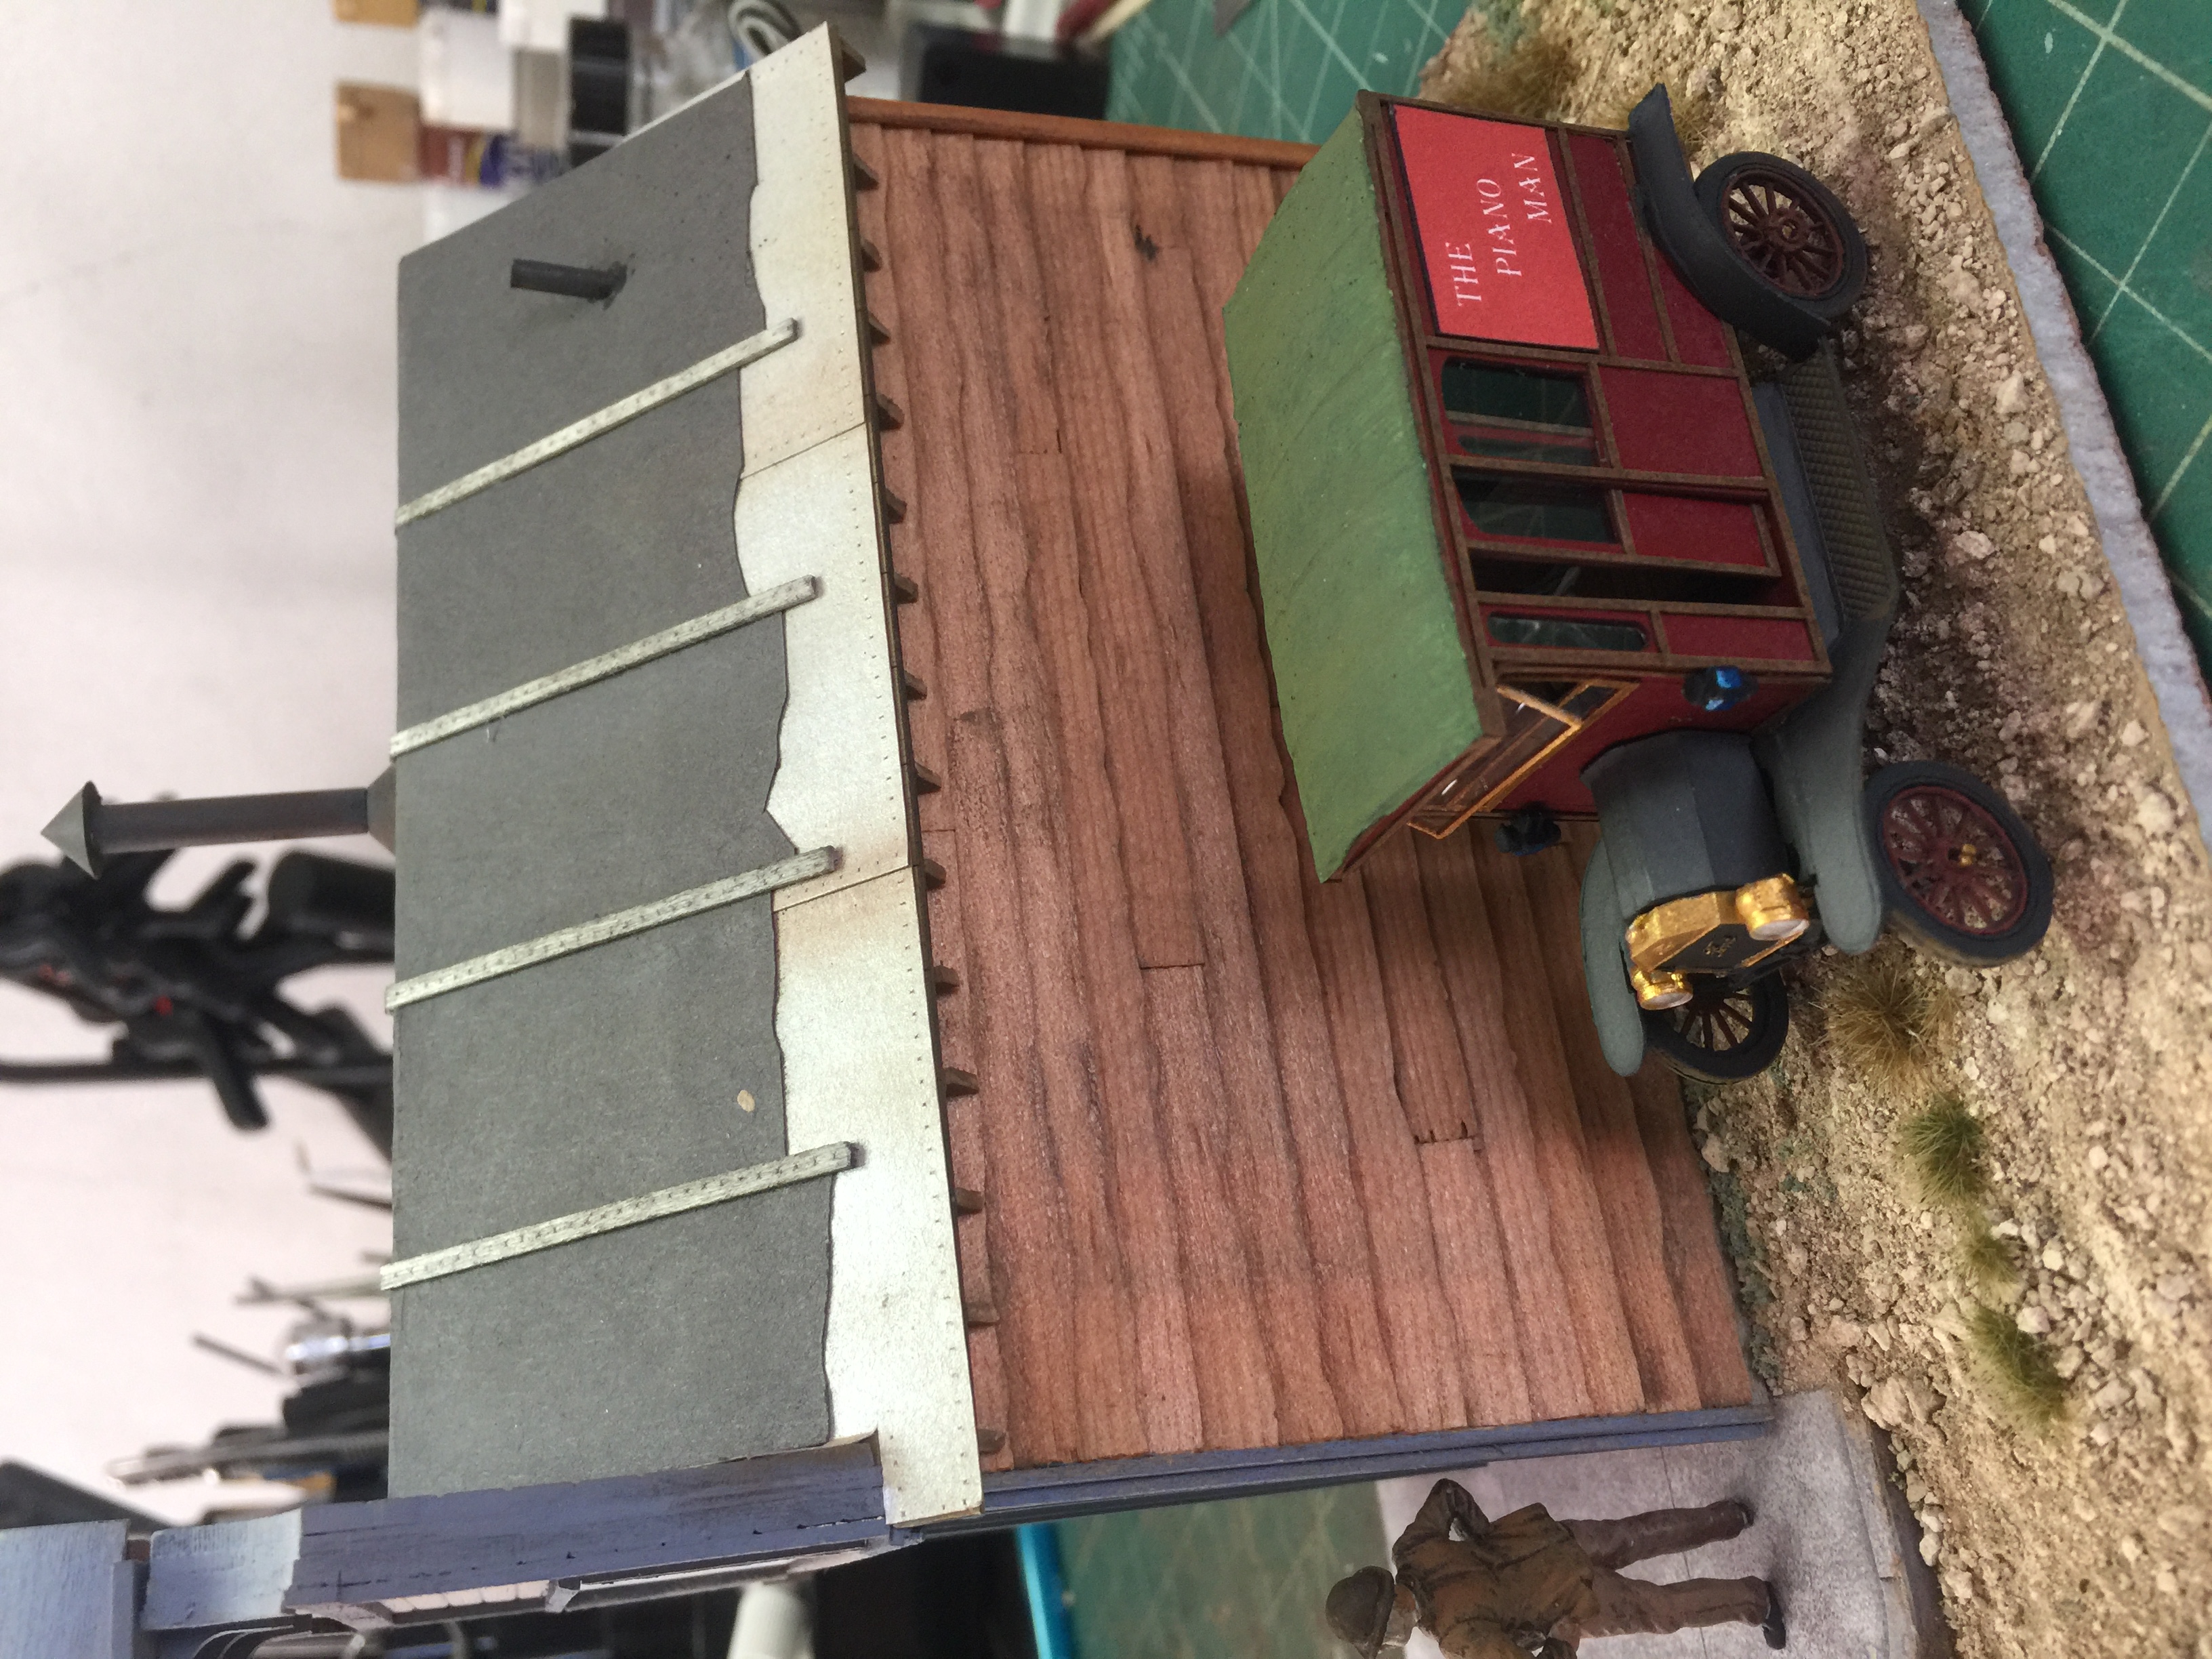
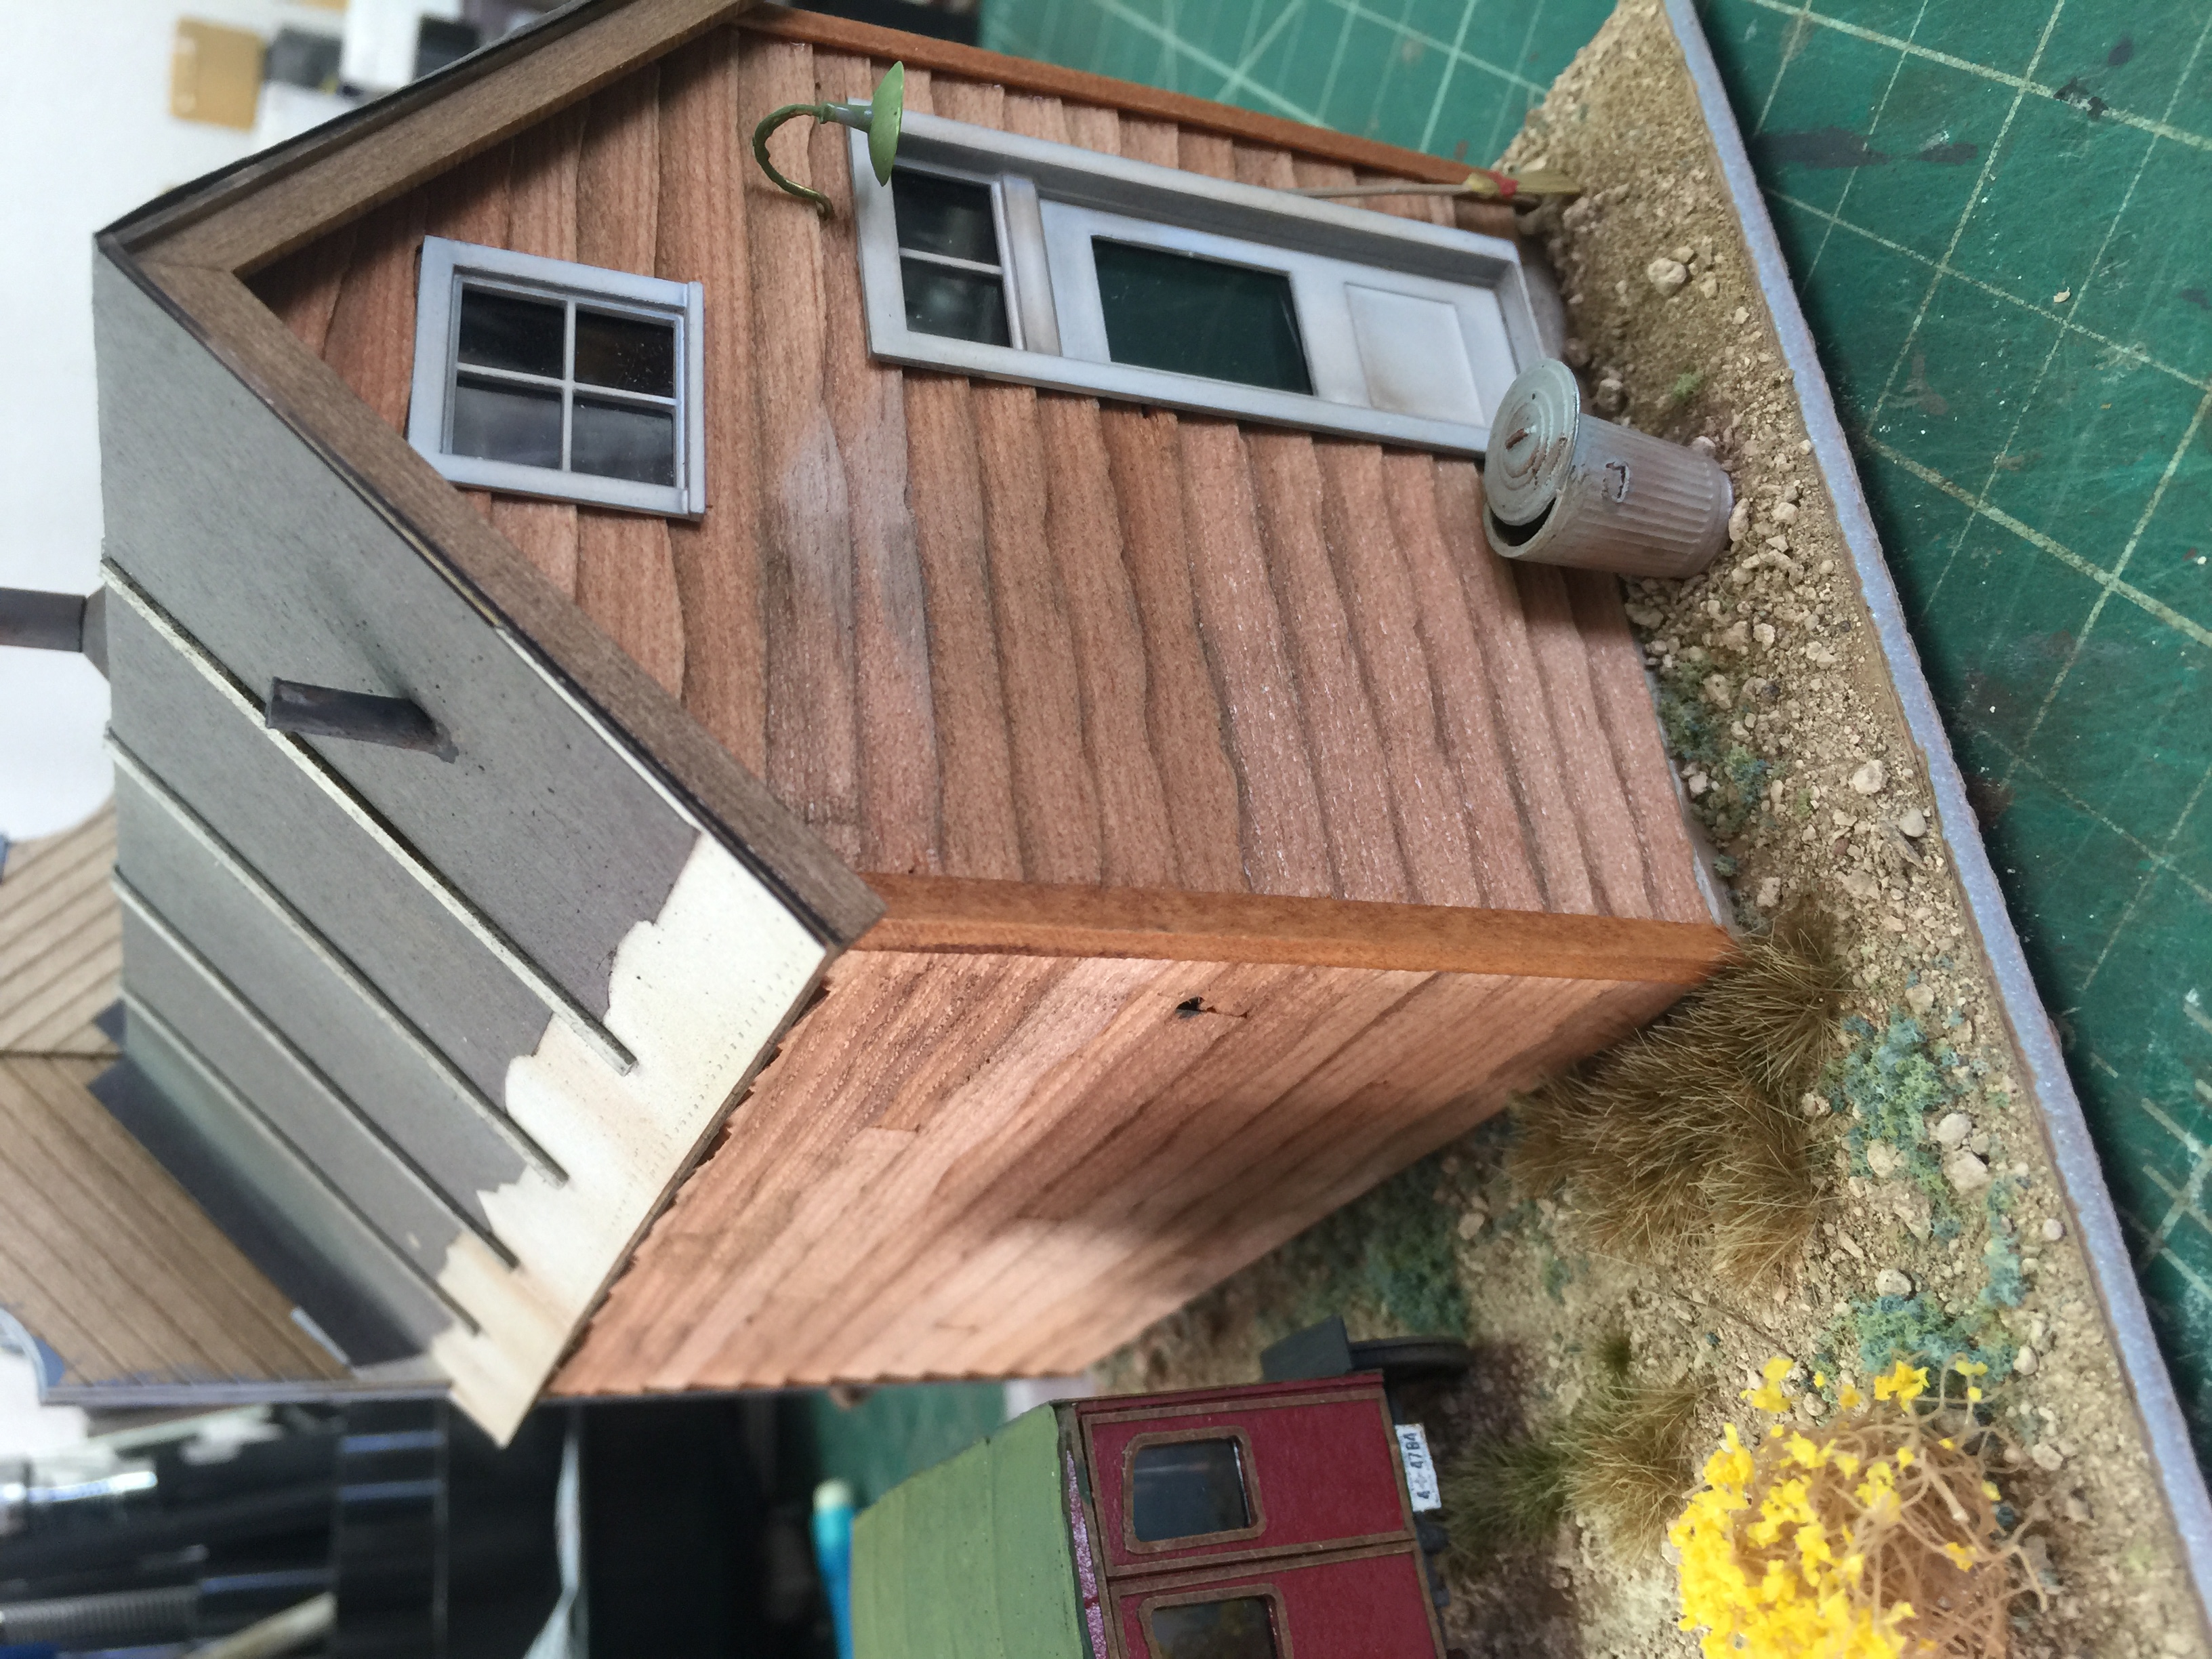
El Dorado Books store to be installed in the town of Pajarito, NM, on my abuilding layout.
It is an homage to my first model railroading buddy (some 60 years ago), who is a retired
concert pianist and piano repairman. It is a slightly modified Stoney Creek structure, with
a lighted cardstock interior, and card and resin model T.
Bill Brown, MMR
Some of the readers out there may know that I am a member of The Central New York Modelers (www.CNYMOD.org), an HO modular club from Syracuse NY. The club layout has been a very popular display in the Stroh Building at the annual Springfield MA train show for several years. I have built a half dozen or so modules for the club and decided during this Covid lock-down to dig into the deep supplies of kits on the shelves of my railroad storage closet and build two new modules. I have always been fascinated by street running of trains and this was time to do something our club had not done on any of our 30 or so modules. With any luck things will loosen up enough for the Syracuse Fairgrounds Train Show to return this November and that will probably be the first public unveiling.
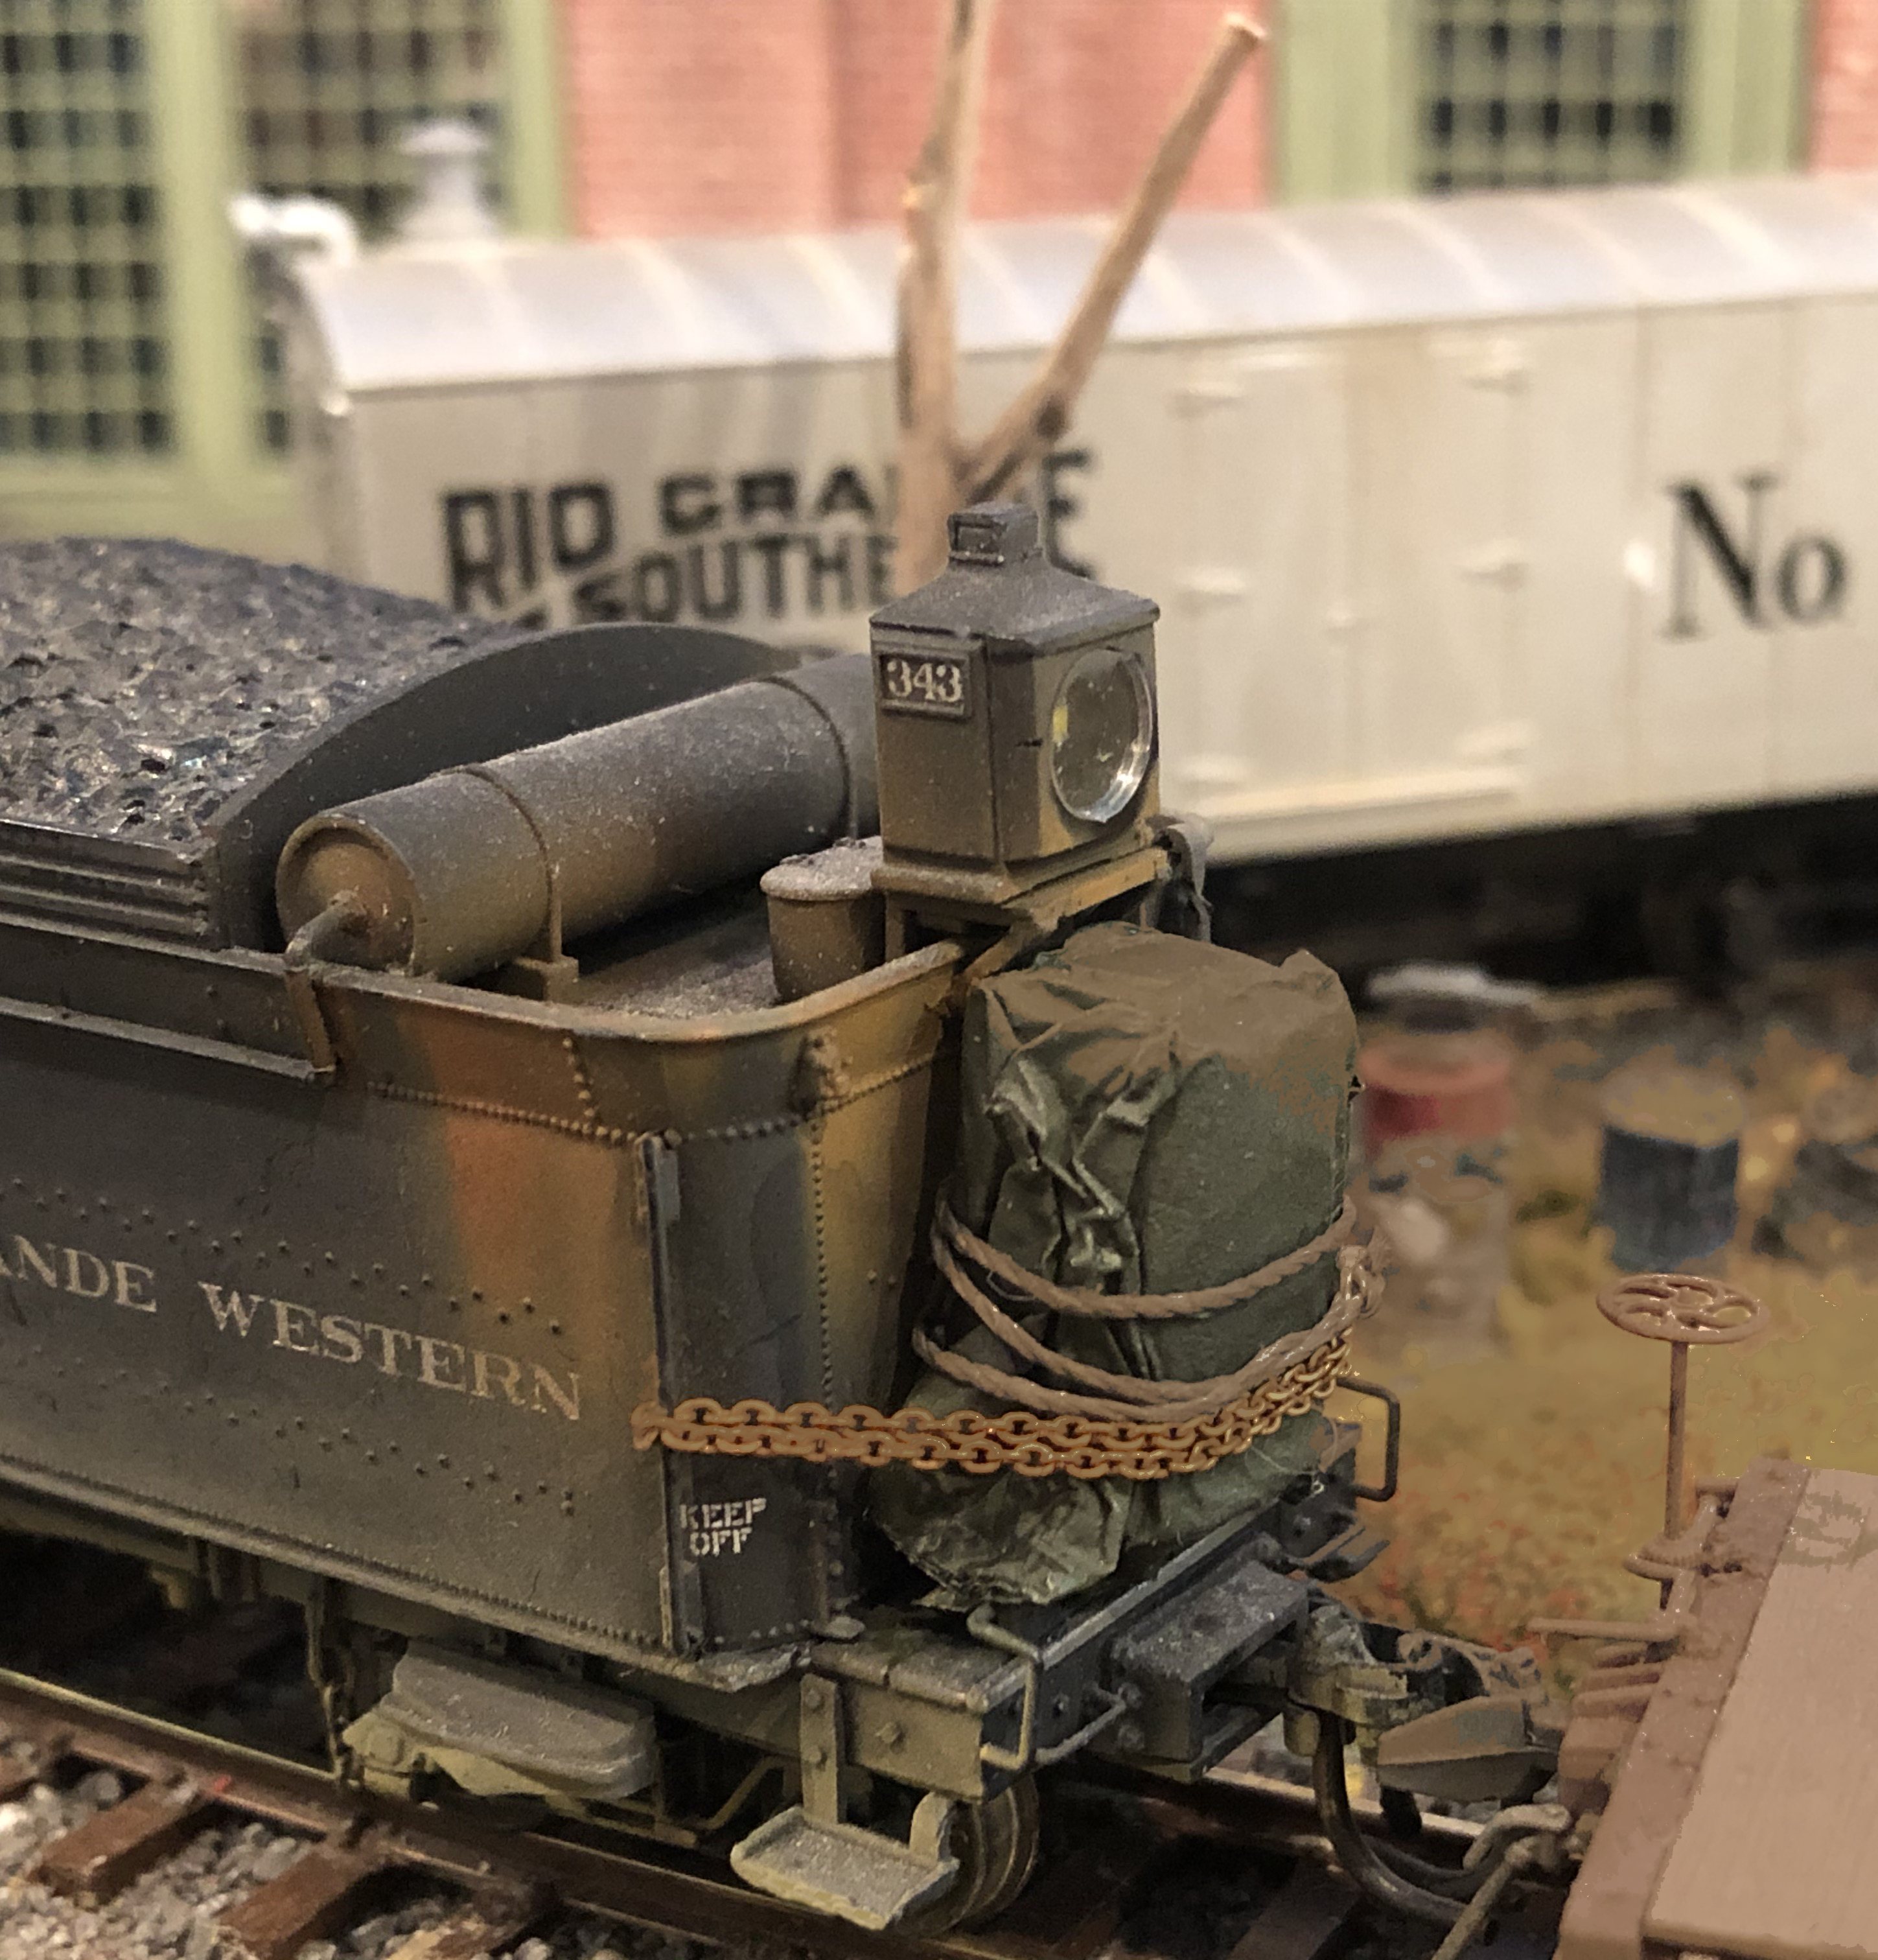
For some time I have wanted to install a component in my HOn3 Blackstone C-19 locomotives to give
continuous power when they hit dirty track in order to enhance smooth operation. I ordered the smallest
ones I could find on the market...a Keep Alive from Train Control Systems. I proceeded to remove the
tender shell which was the logical installation site. NOPE. Not enough room even for these tiny
components. Darn it...I was determined to find a way to install this somewhere on that darn loco.
So...I took the Keep Alive, wrapped it in a tarp made from aluminum foil, painted it black, wrapped
it in rope, and chained it on to the rear platform of the tender, as some sort of load being carried
there. I thought this would be a bit cheesy but good enough for me. I later found out from several
knowledgeable friends that strapping loads to the back platform of locos was a common practice...especially
during prohibition when valuable "packages" were often smuggled around. These Keep Alives only store
power for 3 seconds...a far cry from the 15 seconds of the larger Current Keeper made by Digitrax.
I have found 3 seconds is plenty of time to give me the exceptionally smooth operations I was after.
David MacLeod
I have a Lionel O-gauge layout that is fairly unique. Due to lack of space it’s mounted on a 4’x 7’
table on wheels with locking brakes. To add on to the 1st level, I had to go up 2 levels and went down
1 sub level, for a total of 4 levels. The top level (3) theme is Lehigh Valley trains hauling coal
from Pennsylvania to upstate New York. Level 2 is a steam engine hauling livestock to a small city.
Level 1 is a Boston & Maine diesel train hauling supplies to the Fore River shipyard thru the city
(later Bethlehem Steel and then General Dynamics) where my Dad worked as a shipping clerk in Quincy,Massachusetts.
The last level is a sub level features my 58 year old Lionel Scout train I got as a kid, traveling thru
an old industrial town,picking up products and delivering supplies.
Richard Newmiller
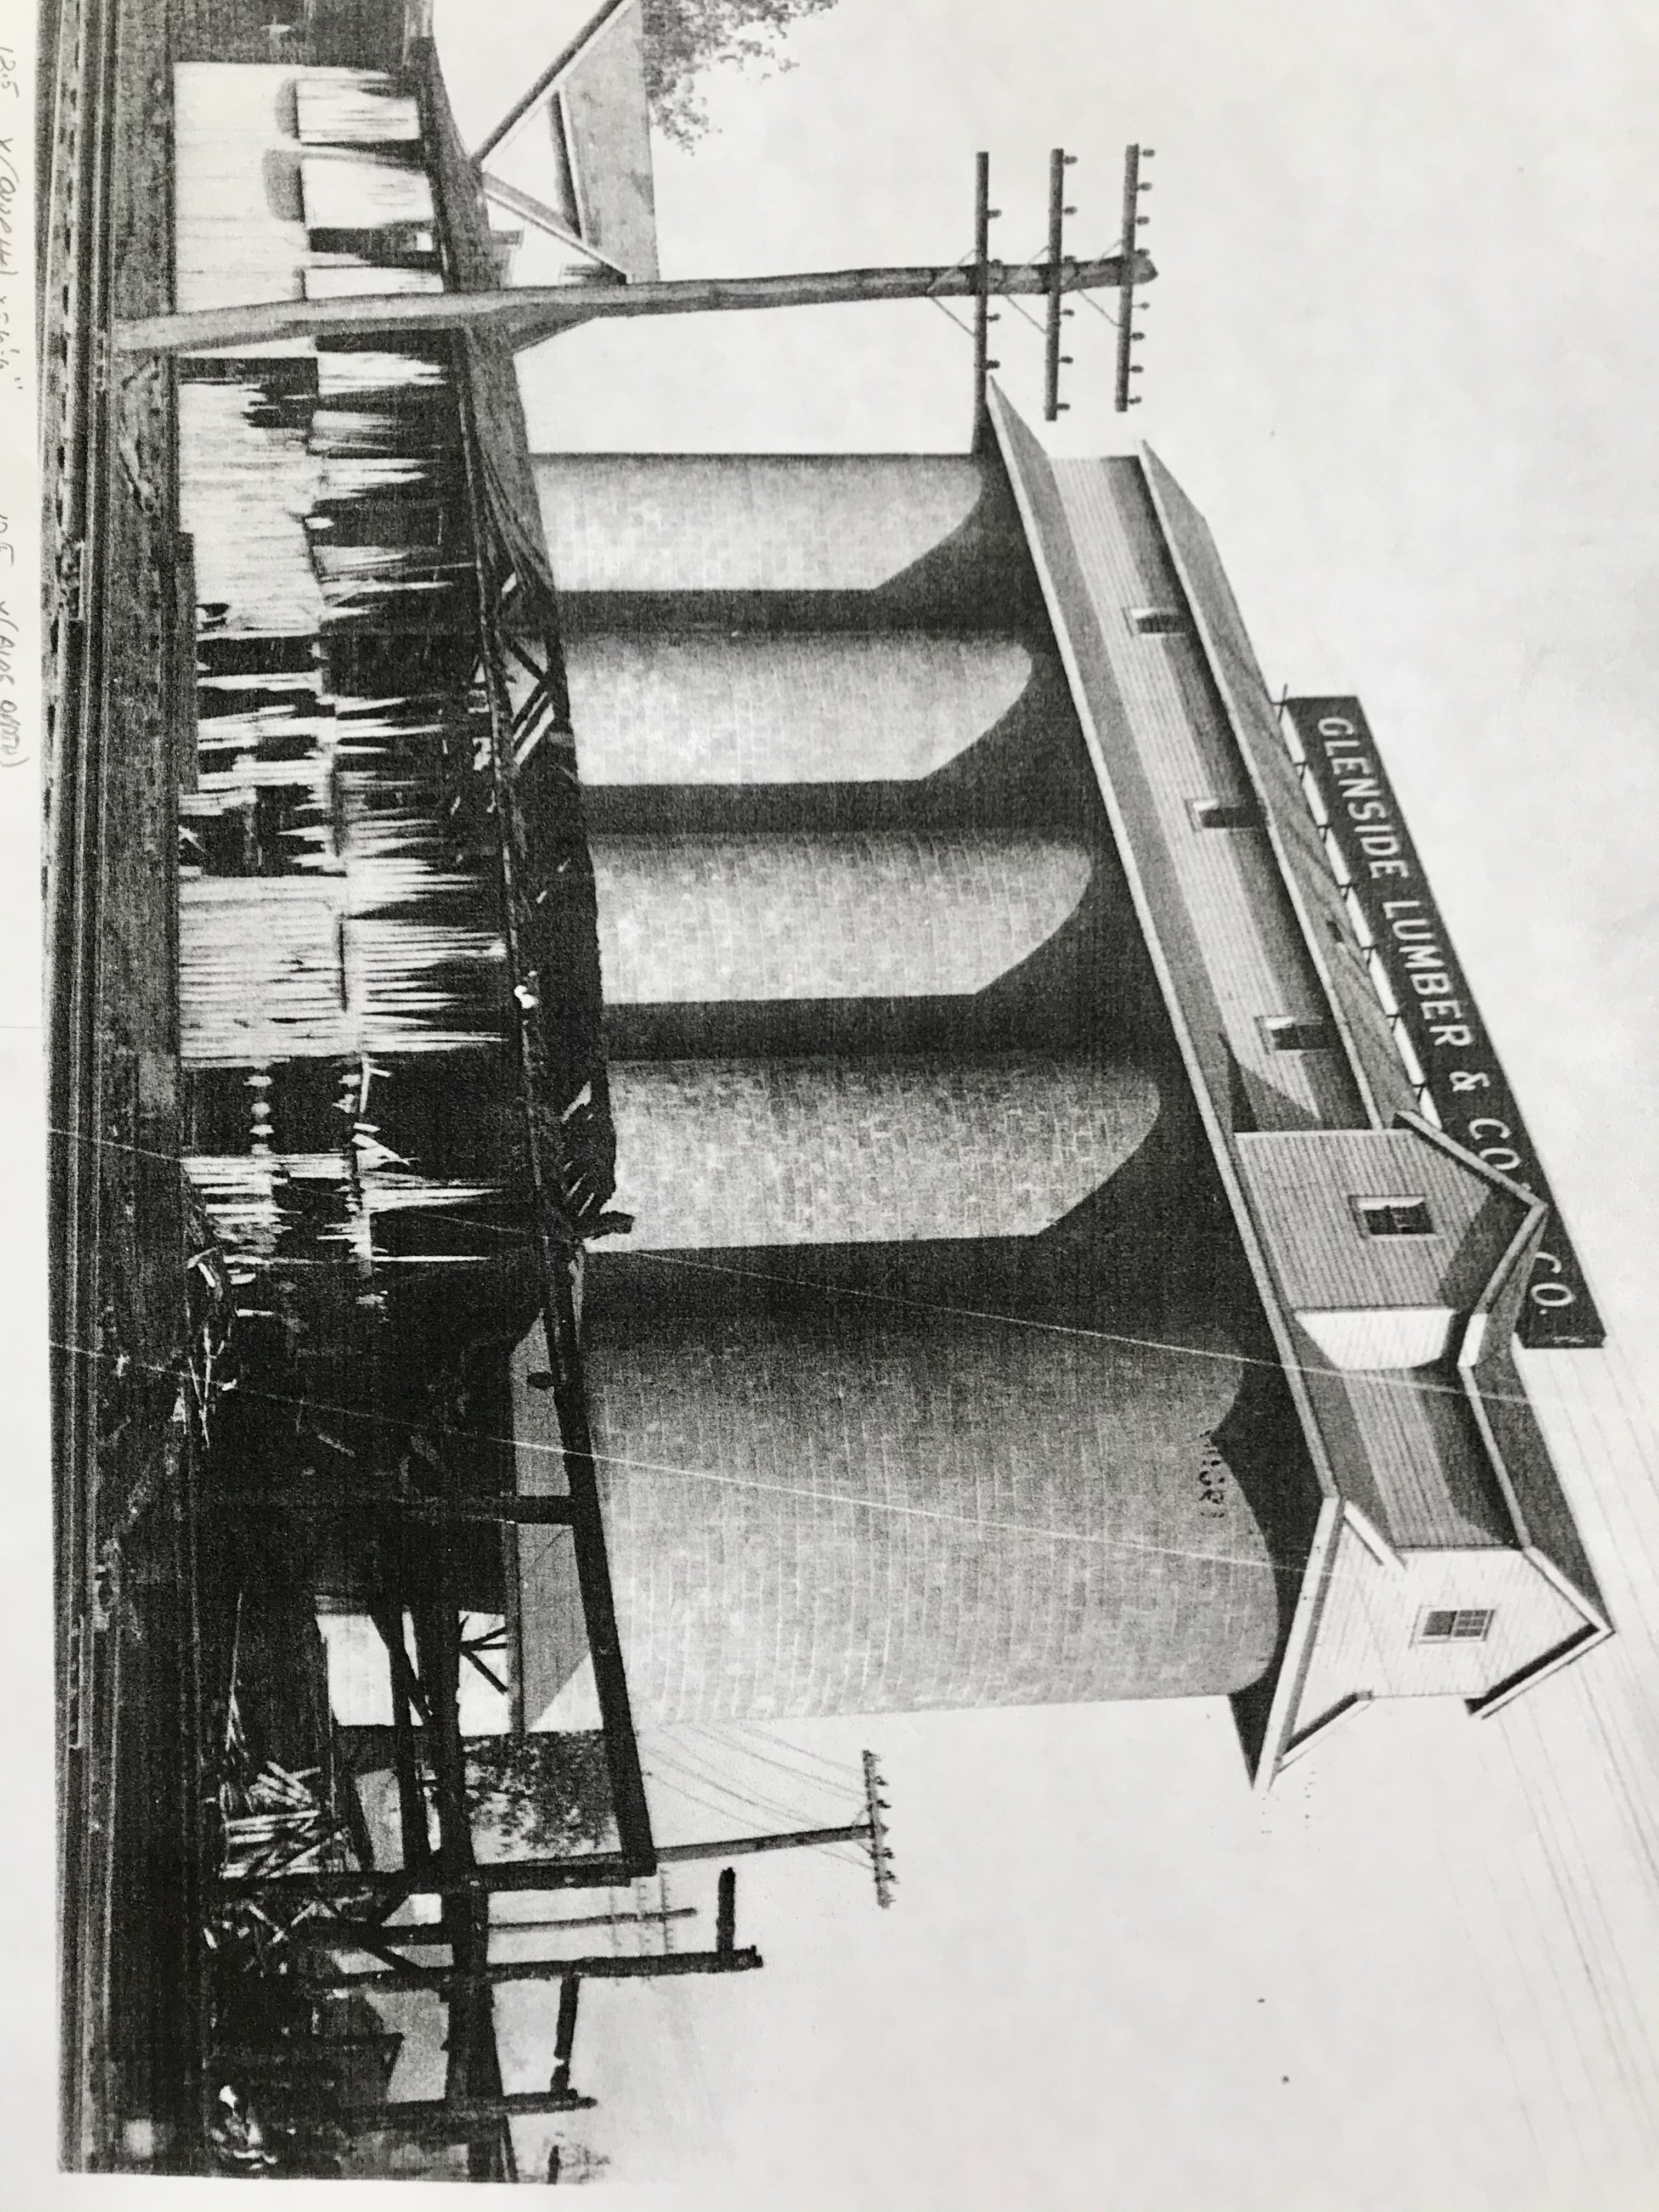
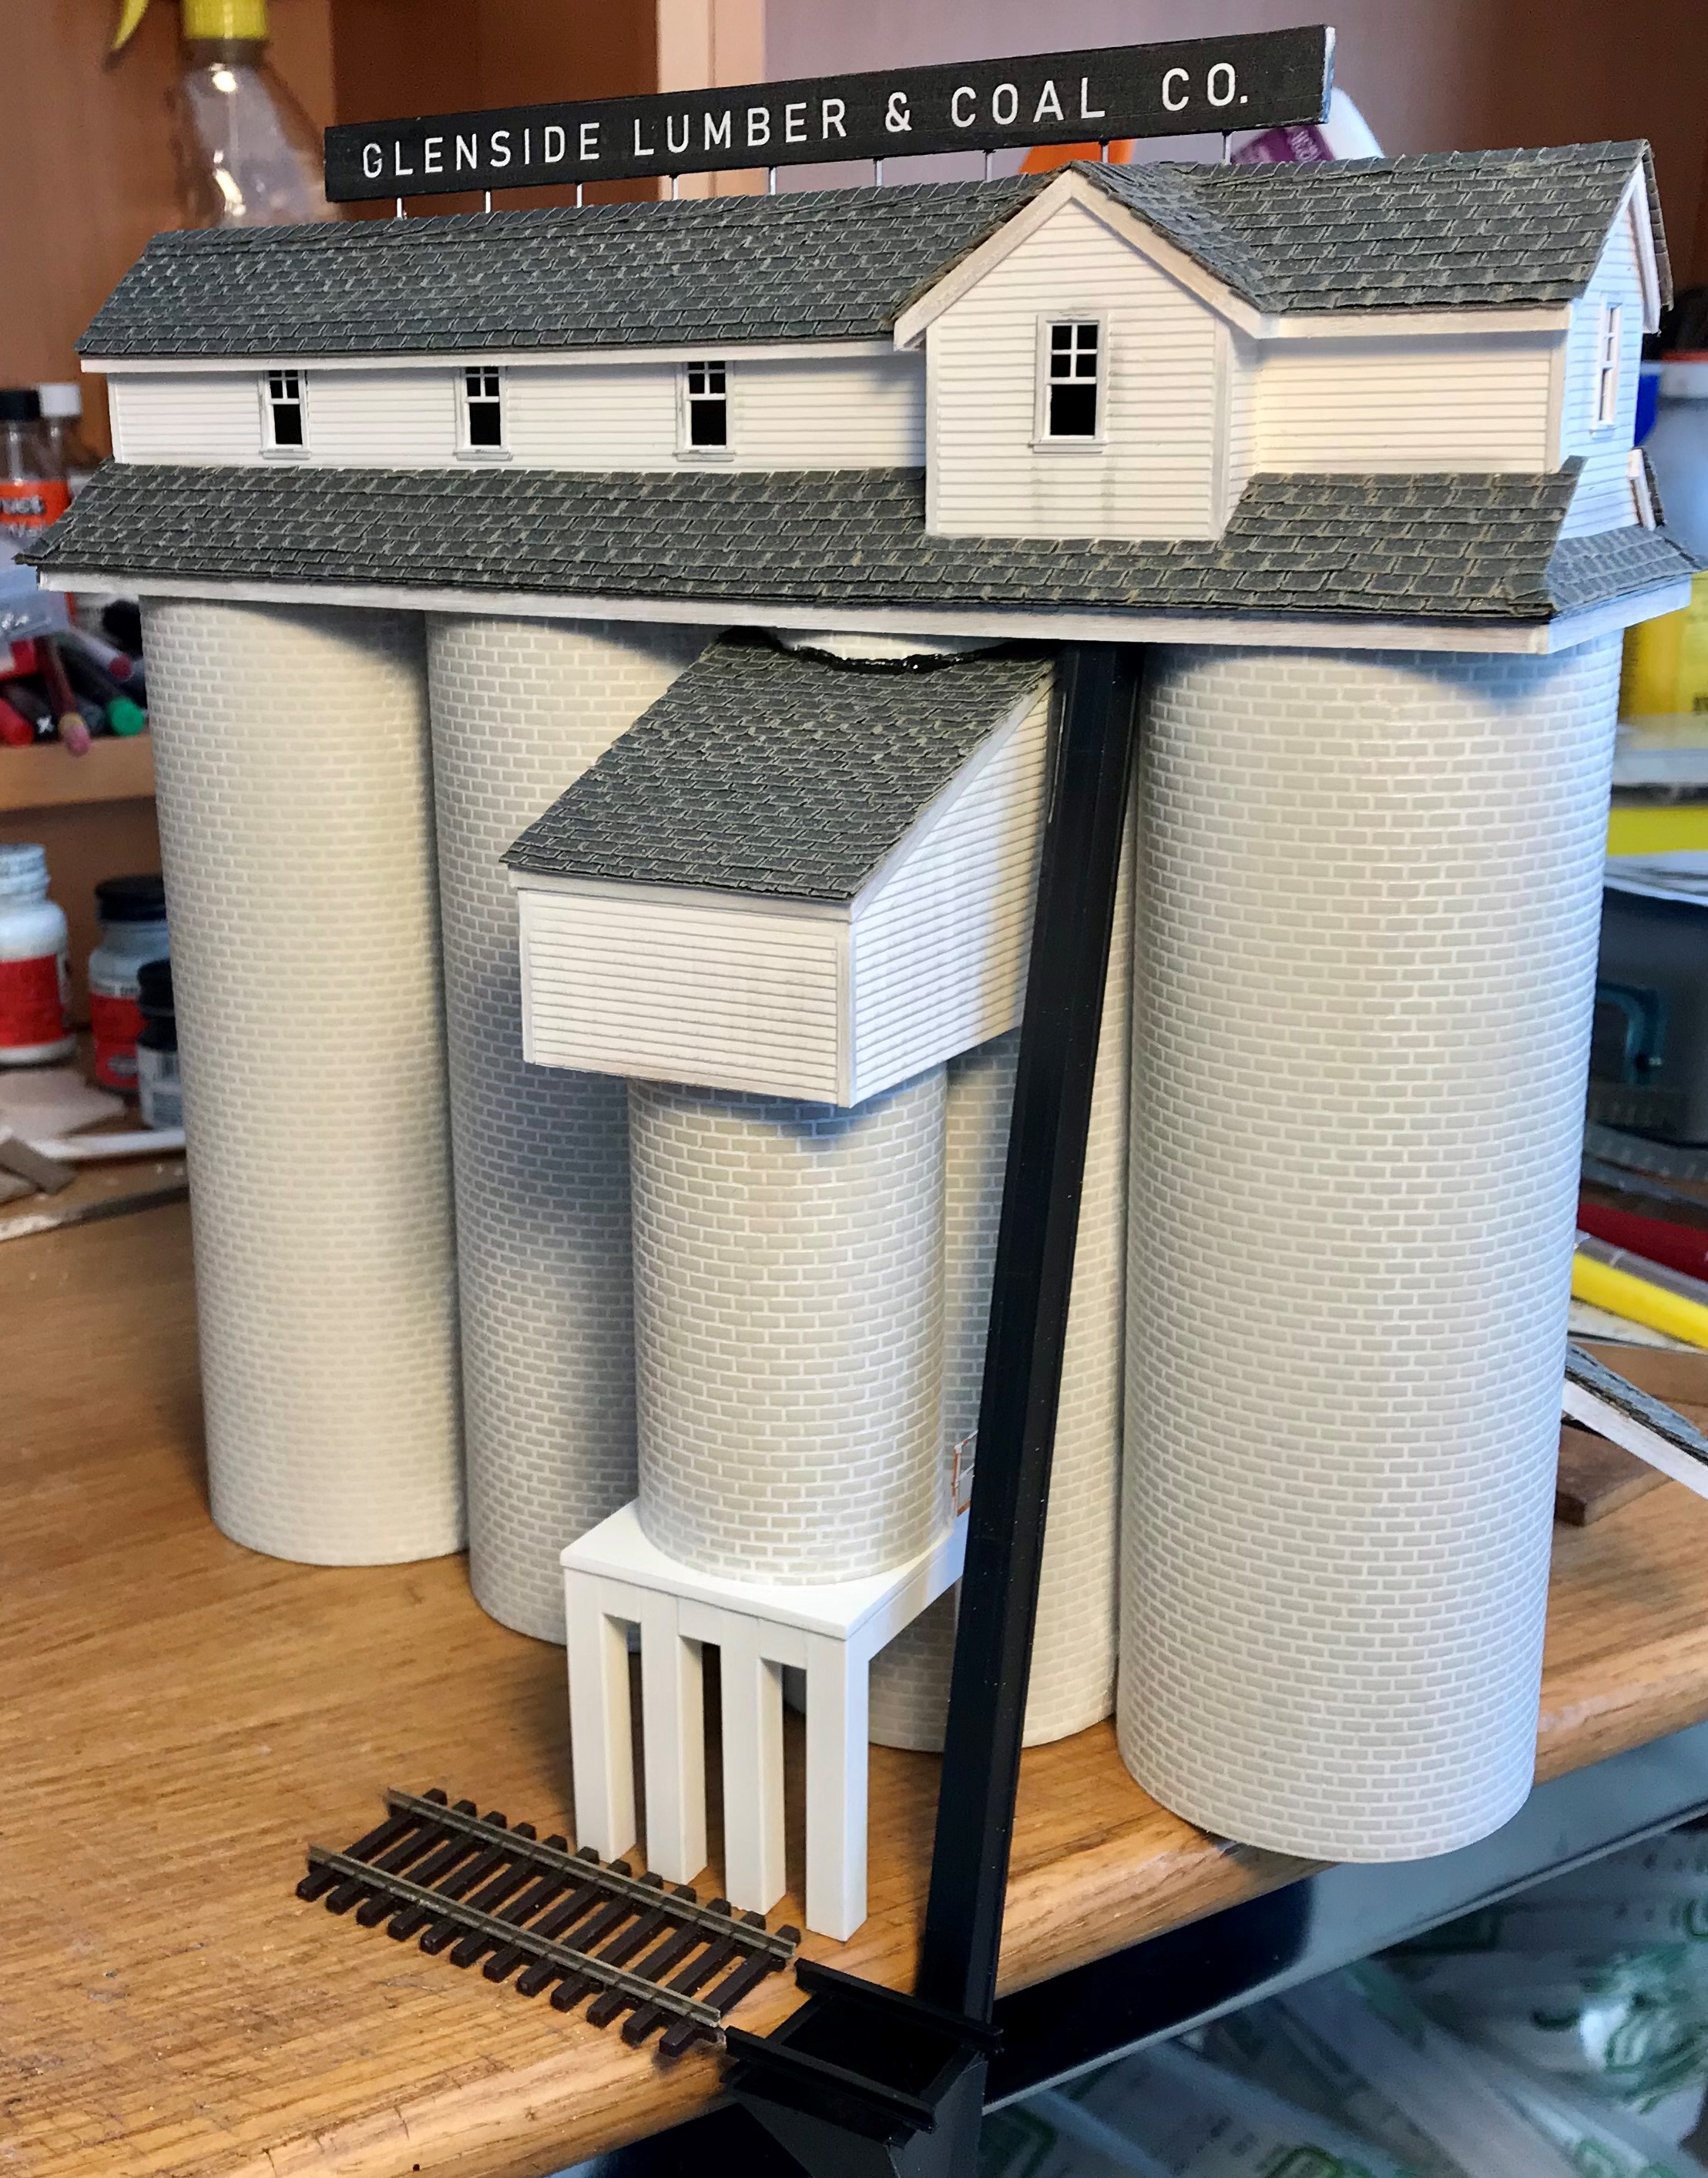
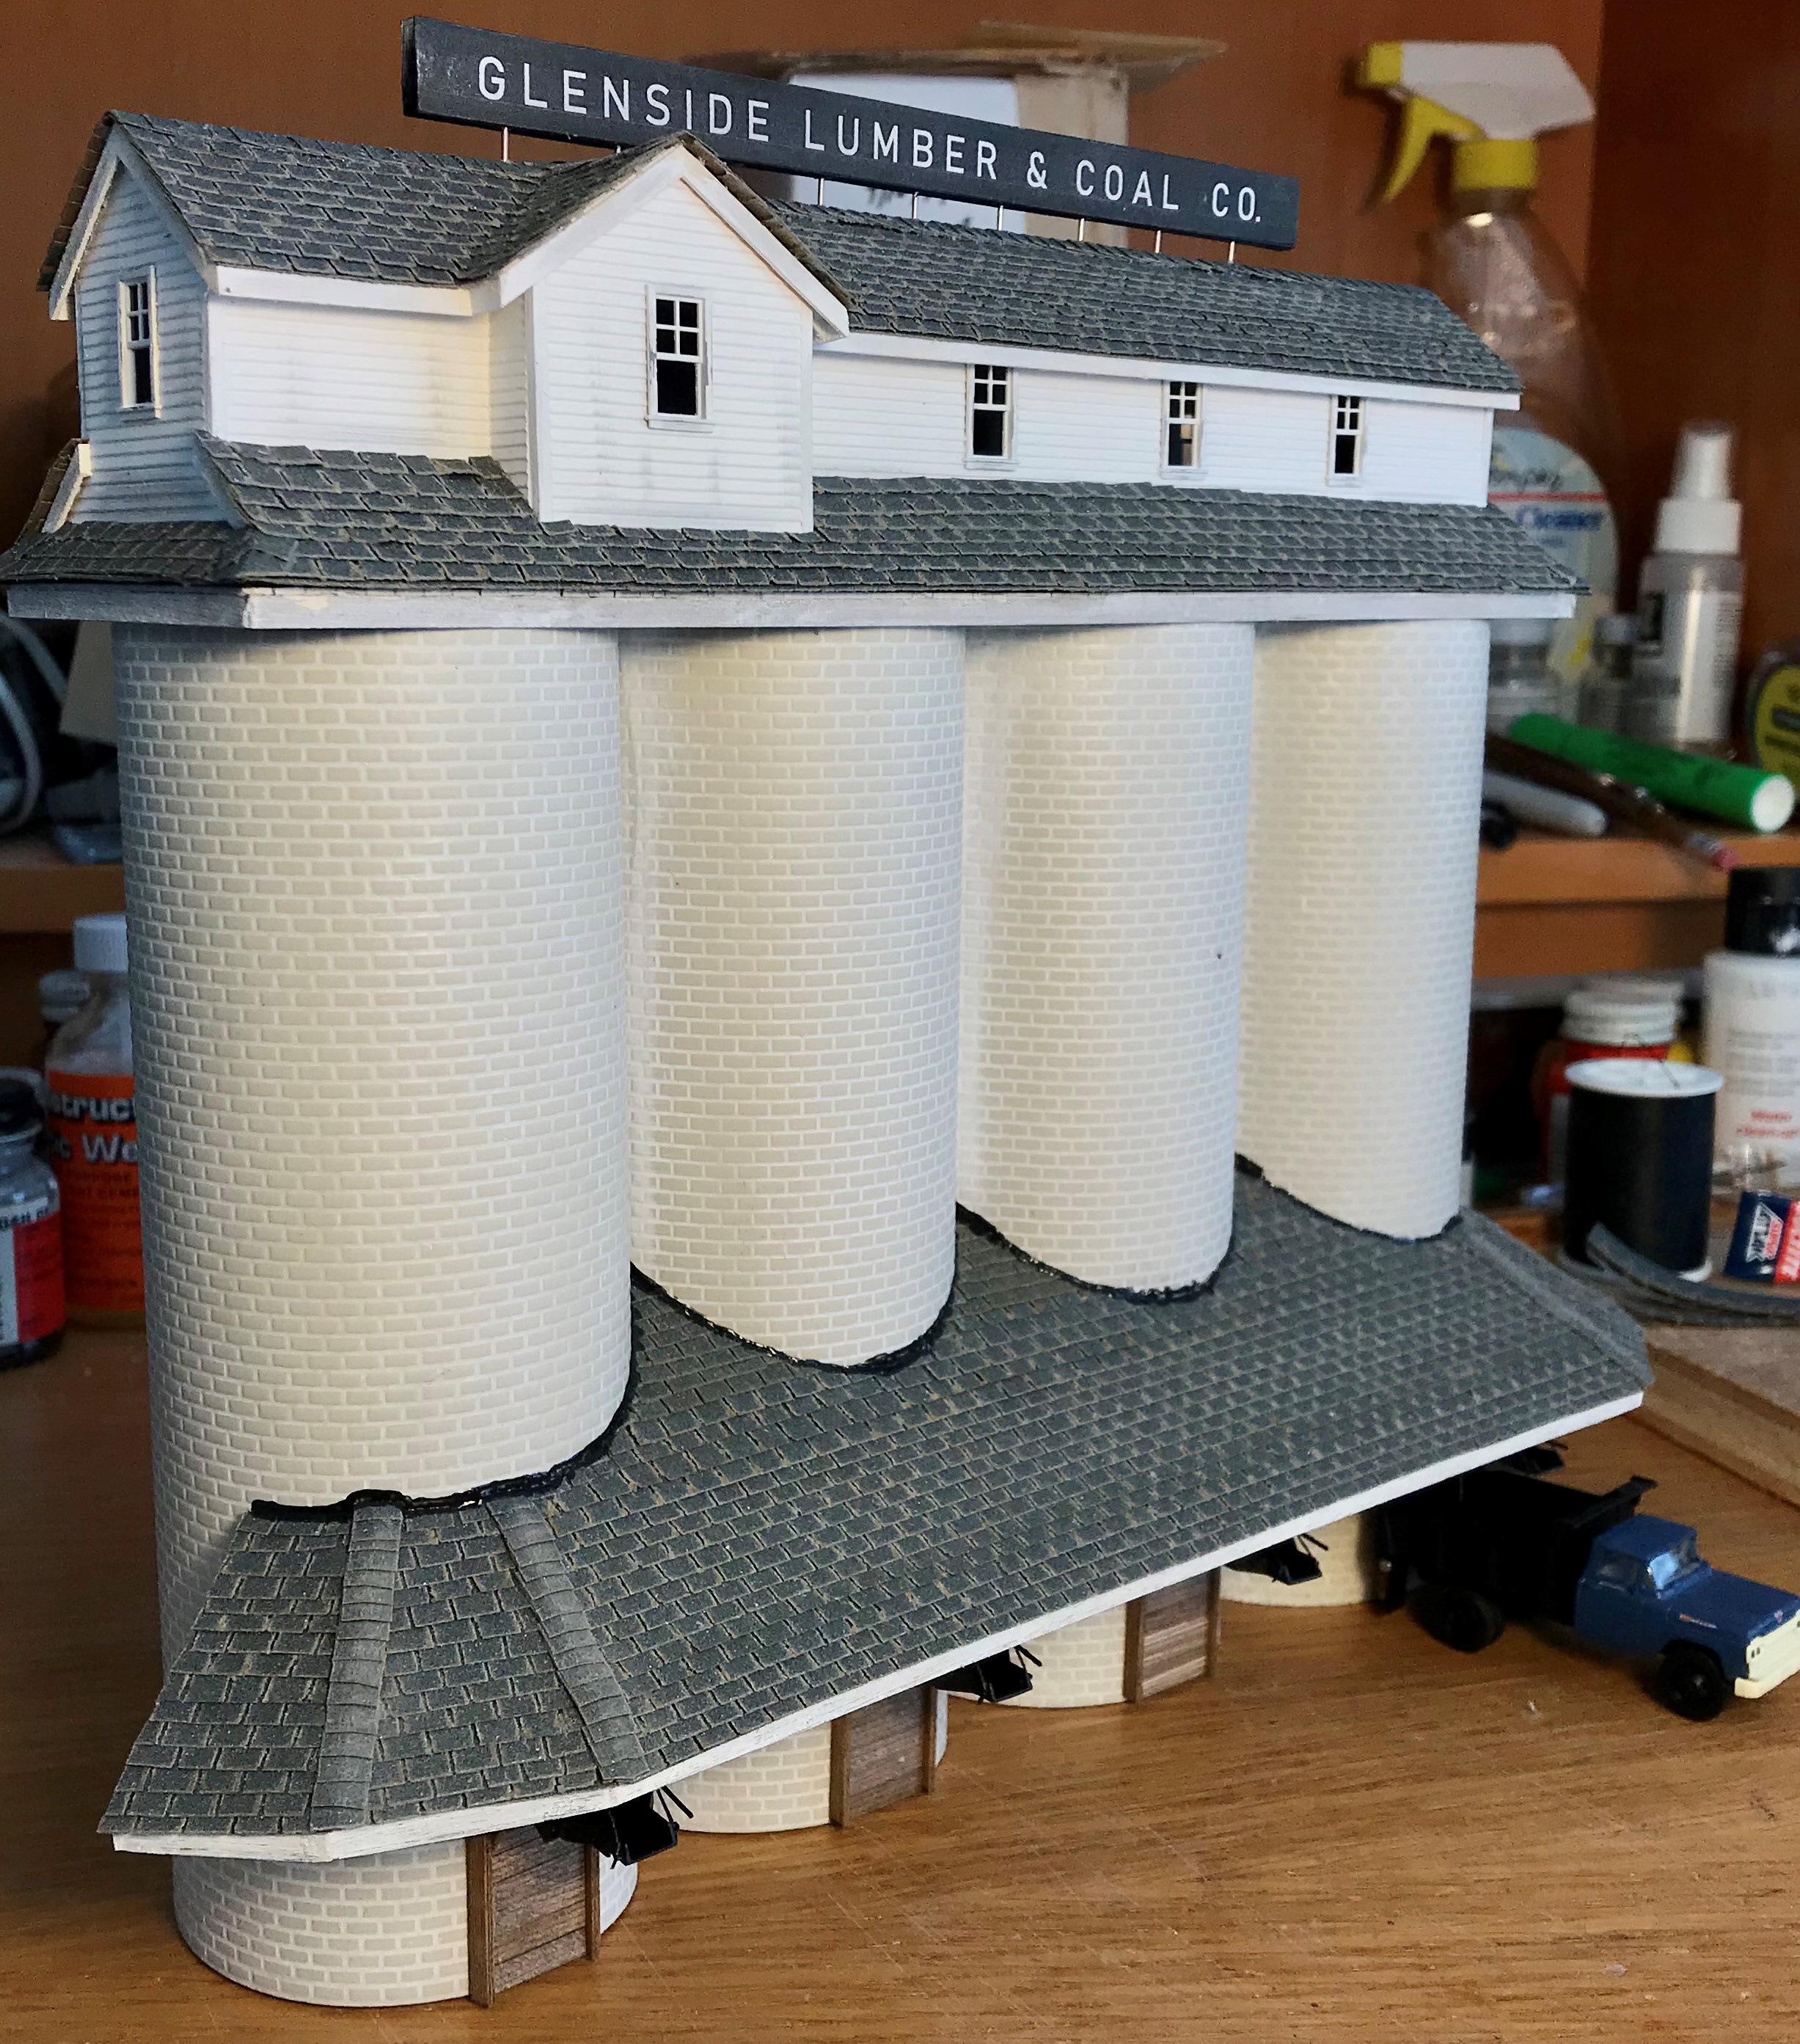
The prototype photograph of the Glenside Lumber & Coal Co. was taken about 1937 just after a major fire destroyed a portion of the wooden structures. The masonry coal storage silos remained in-tact.
The two HO scale construction progress photographs show the East and the West face of the silos. The silos are plastic drain pipes which are covered with Plastruct Cement Block patterned sheets. The transfer house on top is scratch built. The coal delivery chutes are from Tichy.
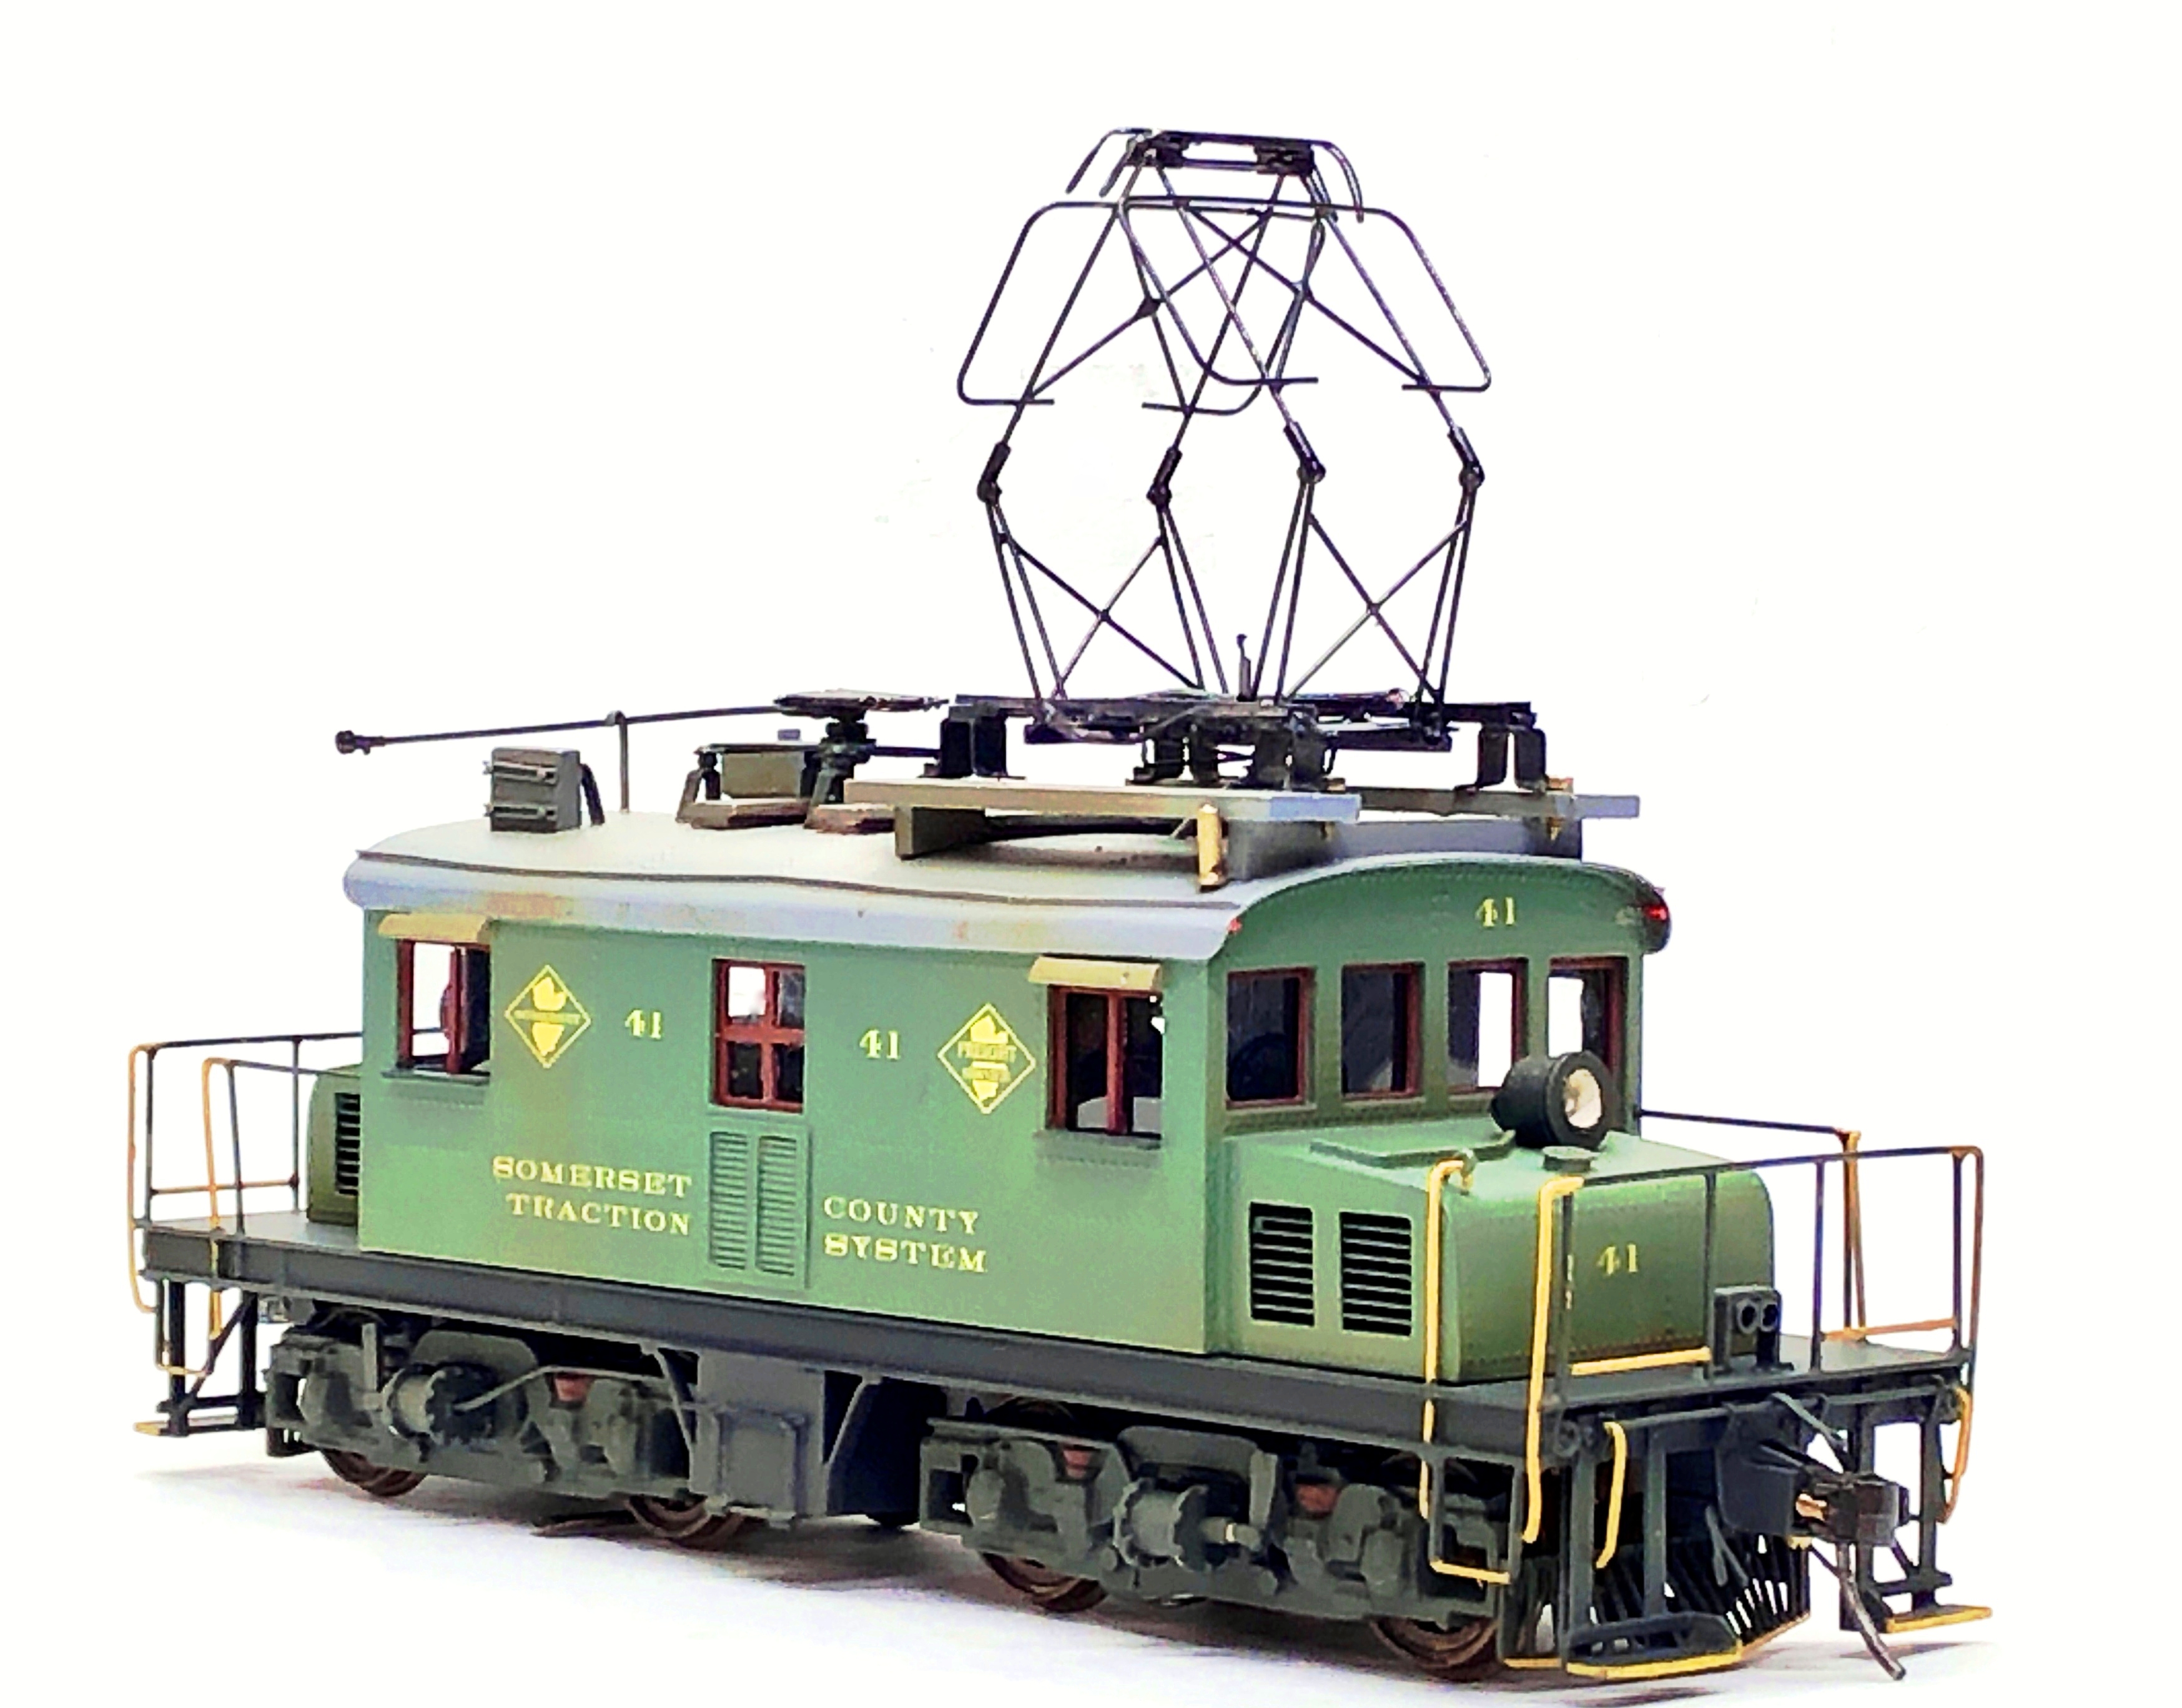
Tom Piccirillo, MMR
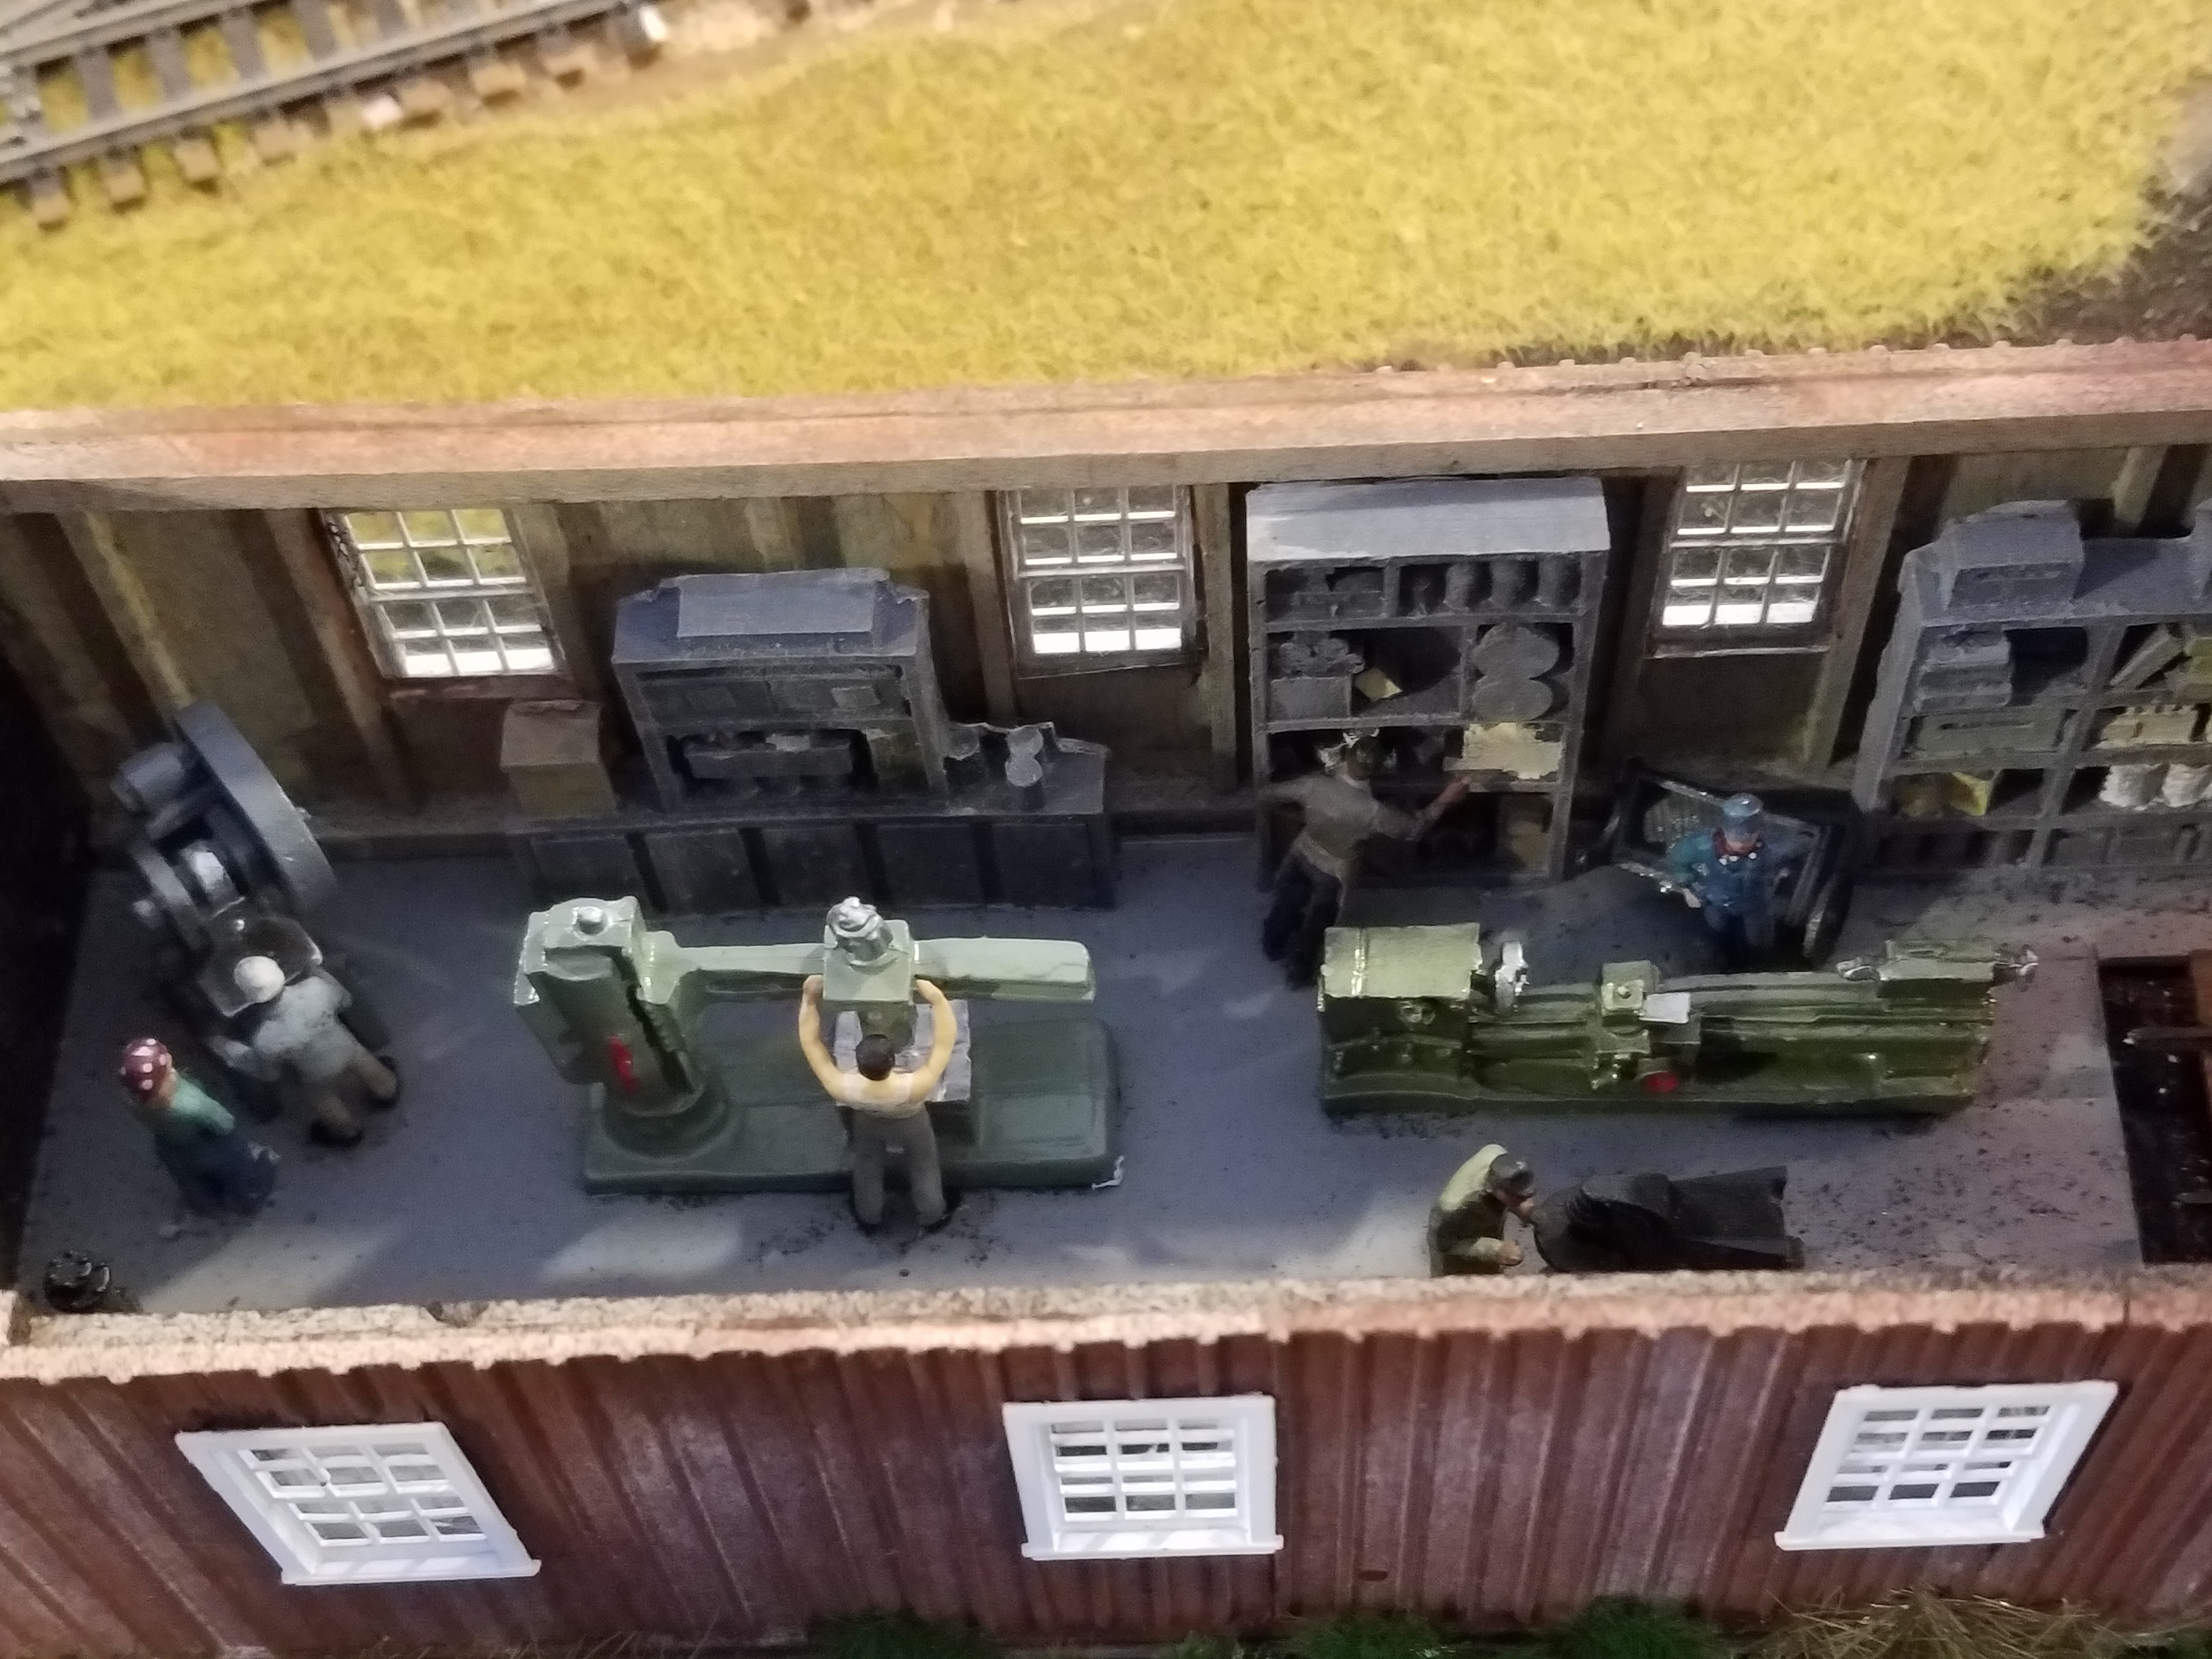
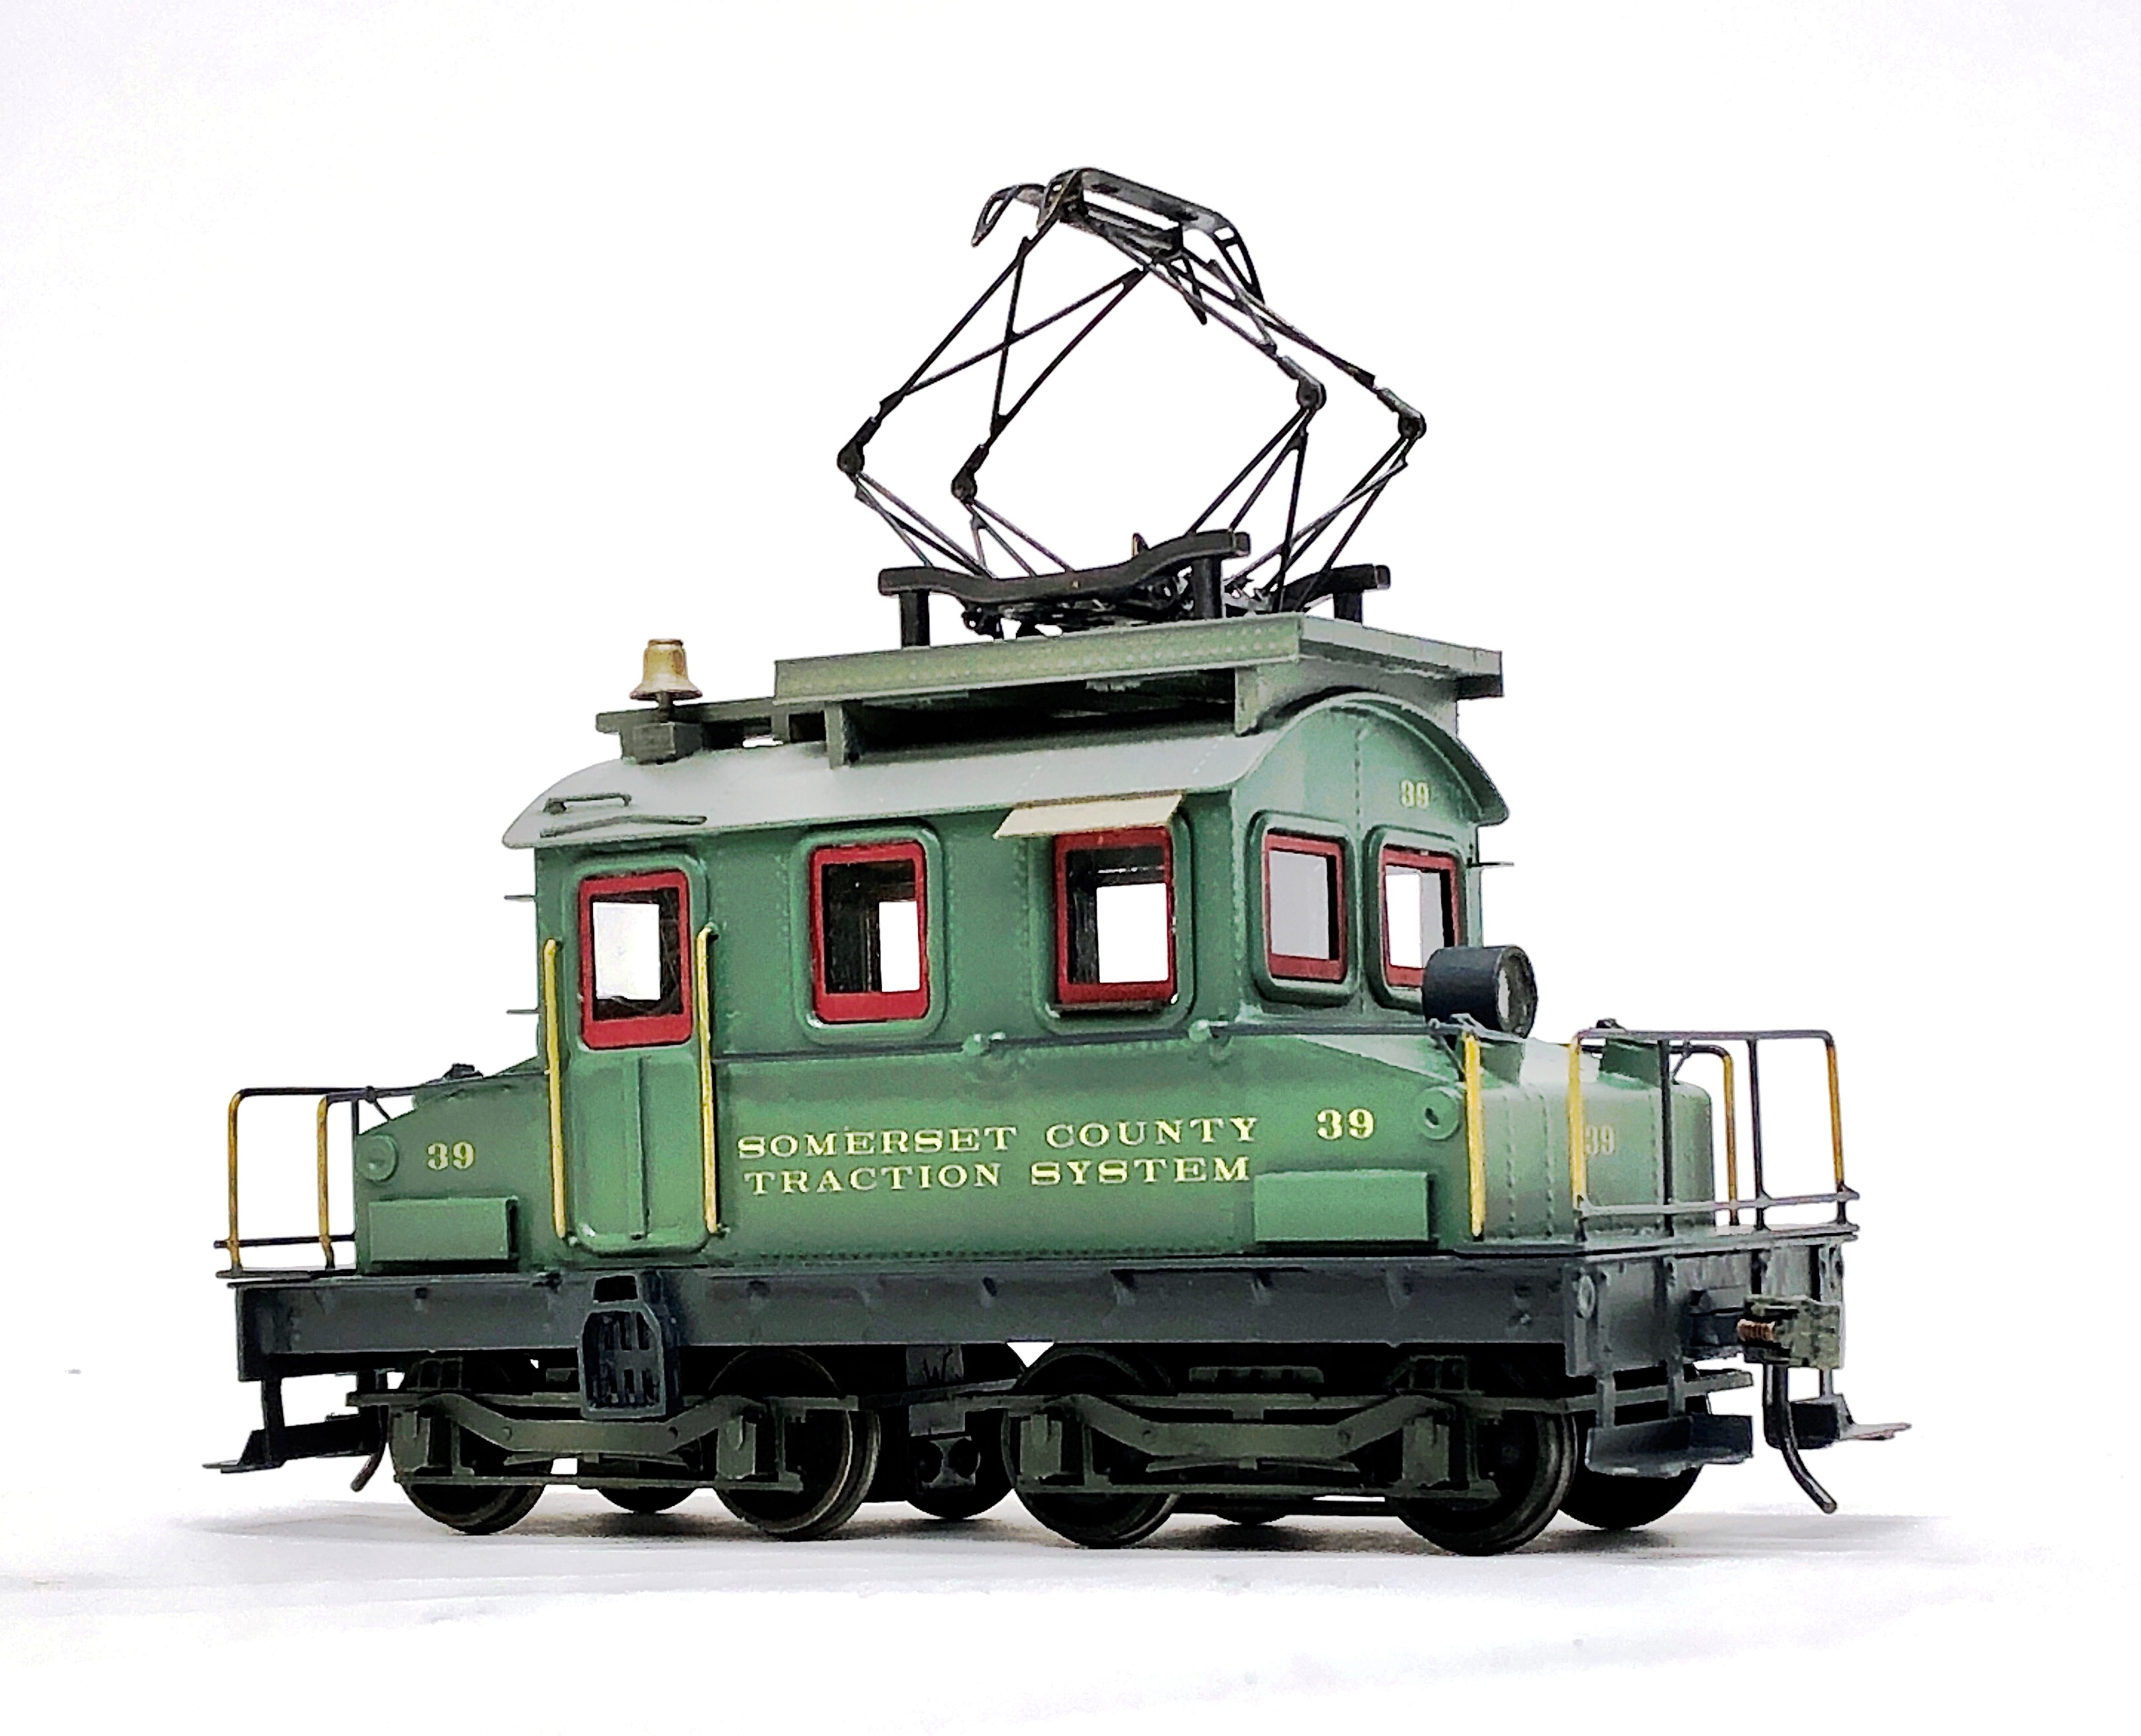
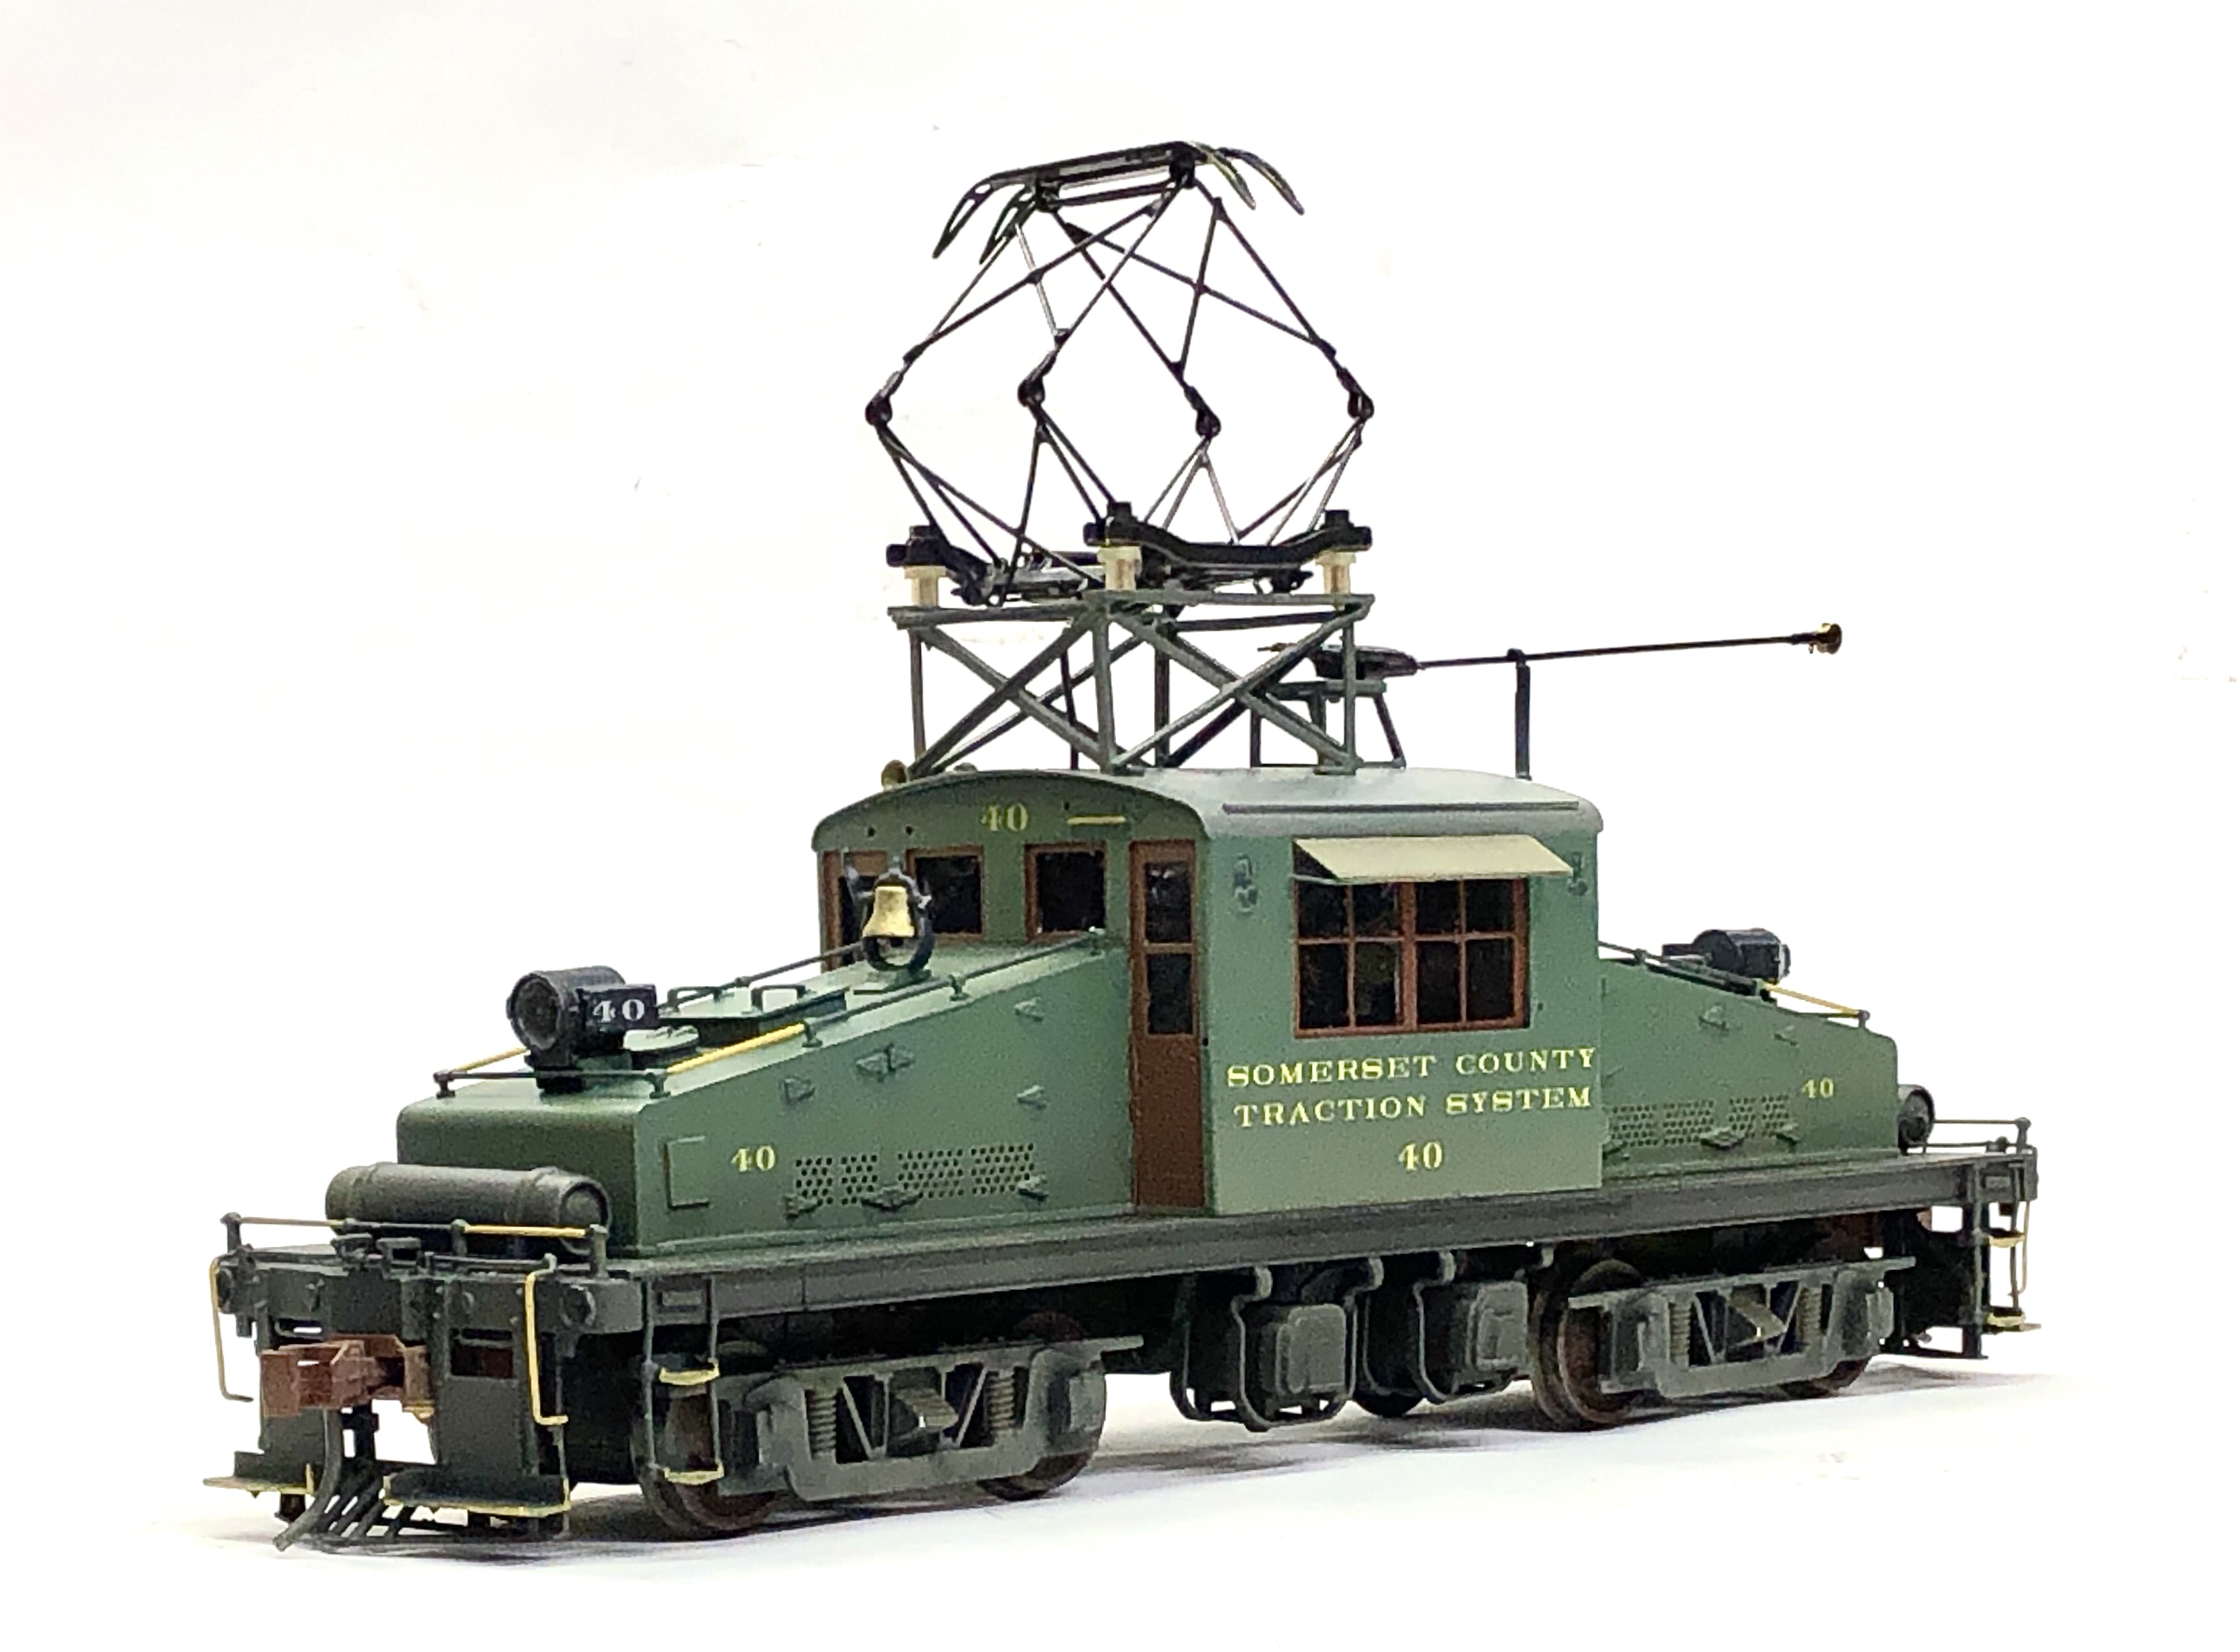
Tom Piccirillo MMR 418 of Warren, NJ, constructed these O scale steeplecab motors. He started with
stripped-down body shells acquired at model railroad flea markets. With the addition of details,
power drive components, DCC electronics, and paint and weathering, they are now ready to go to work
hauling freight on his 32 x 40 foot Somerset County Traction System.
John Becker
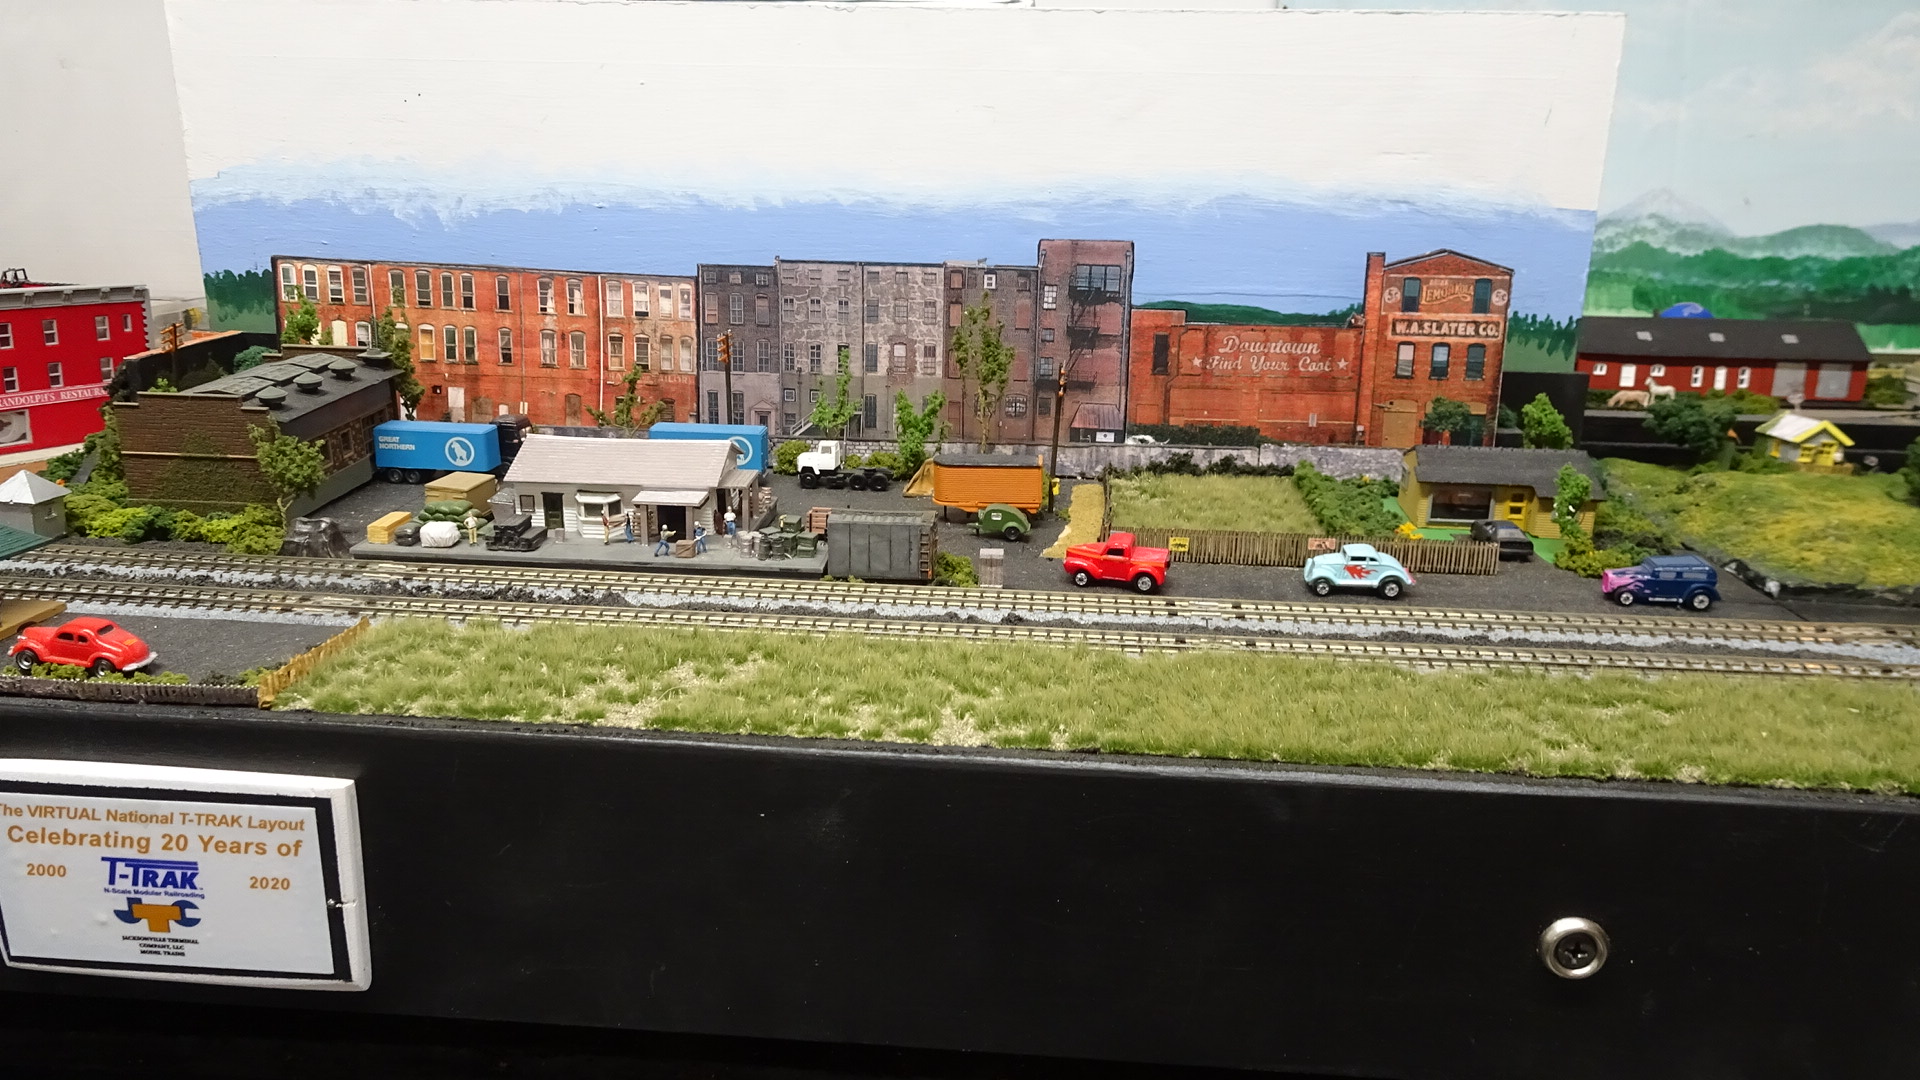
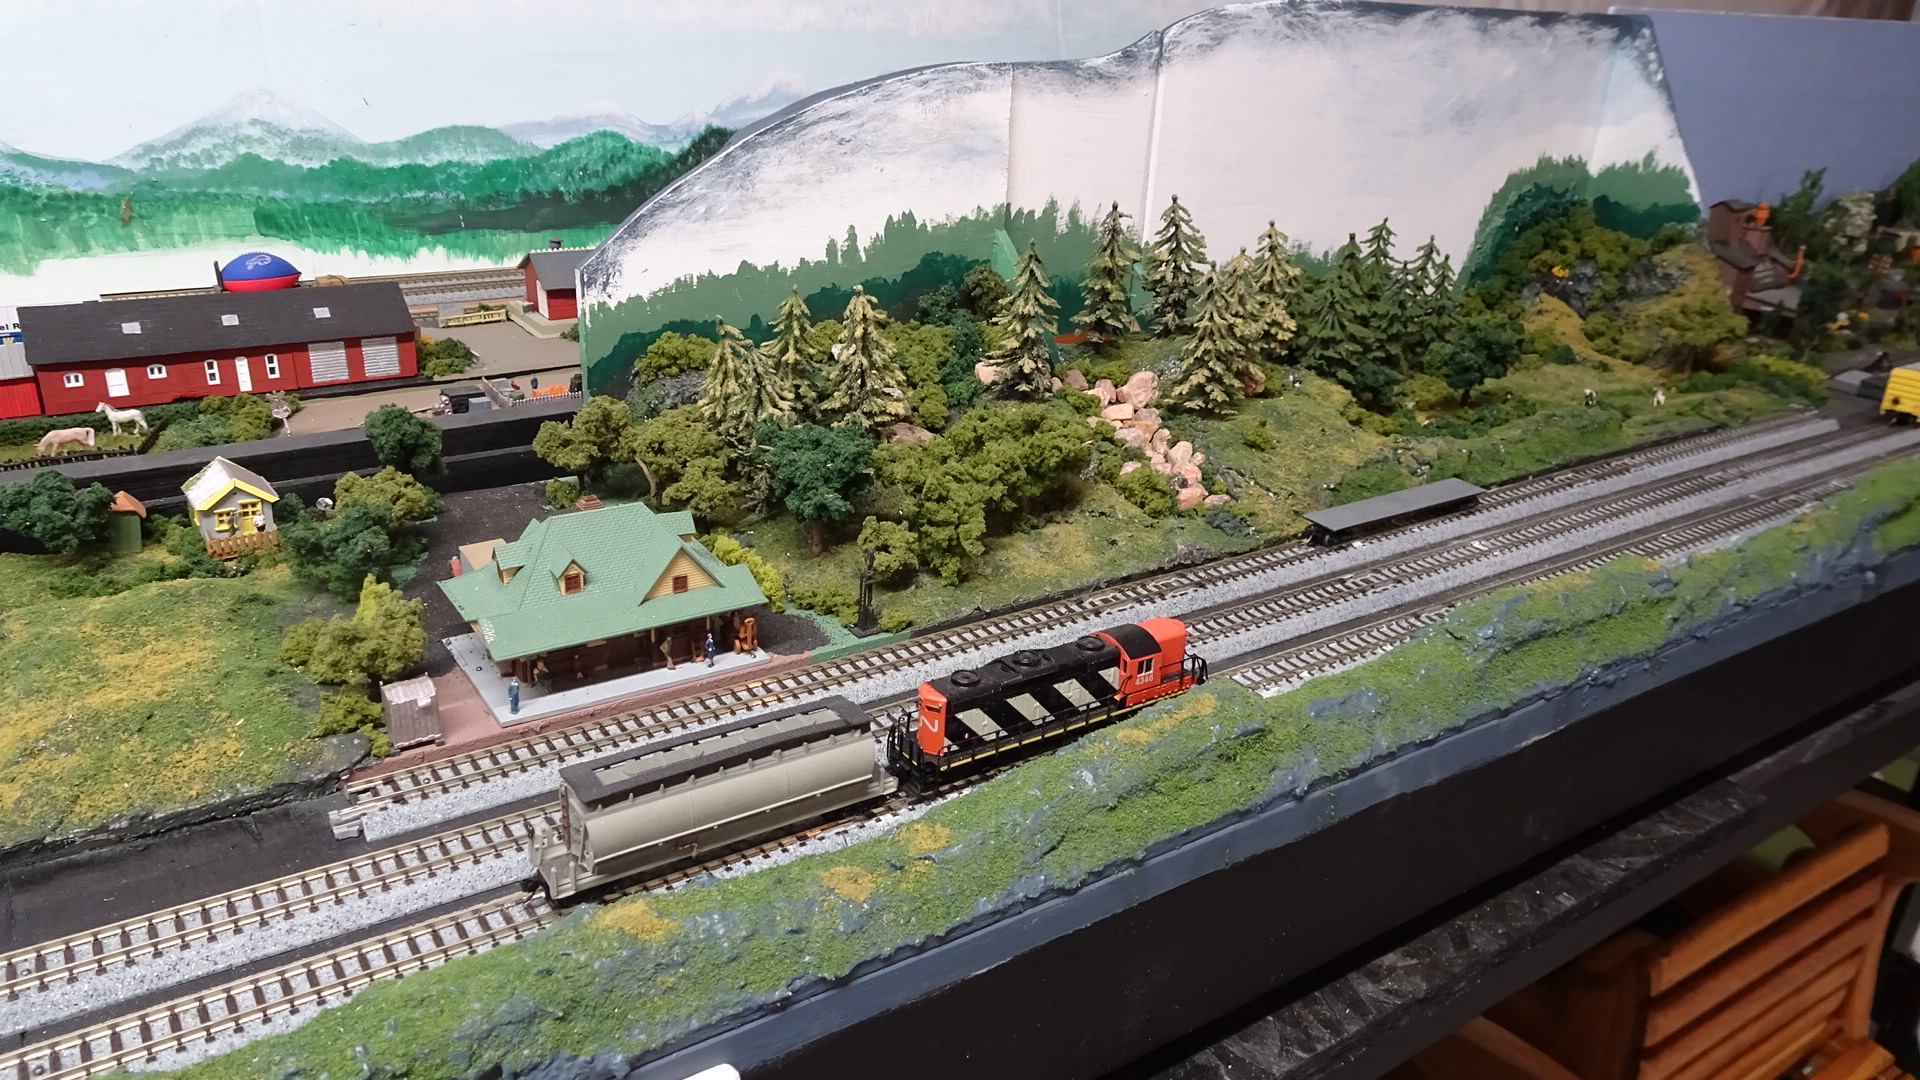
NRail - TTRAK module. N-Scale.
Dimensions: 36-1/2 inches by 13 inches.
Diorama includes two track mainline and one passing siding.
The structures are upgraded stock items with minor enhancements.
Various ground foam, assorted trees and rock pebbles have been used.
Assorted livestock can be seen on the right hand side of the diorama with a farm implement working 'the field'.
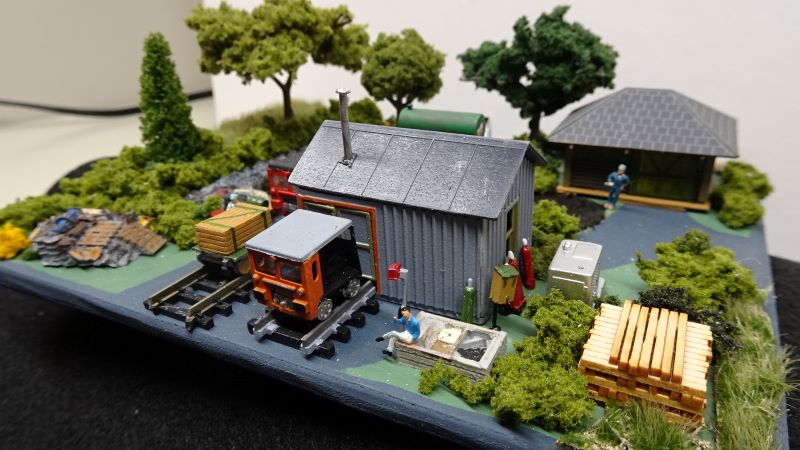
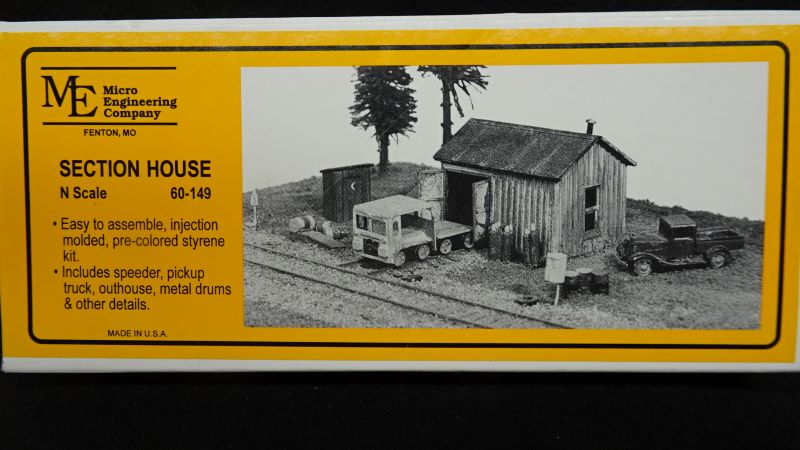
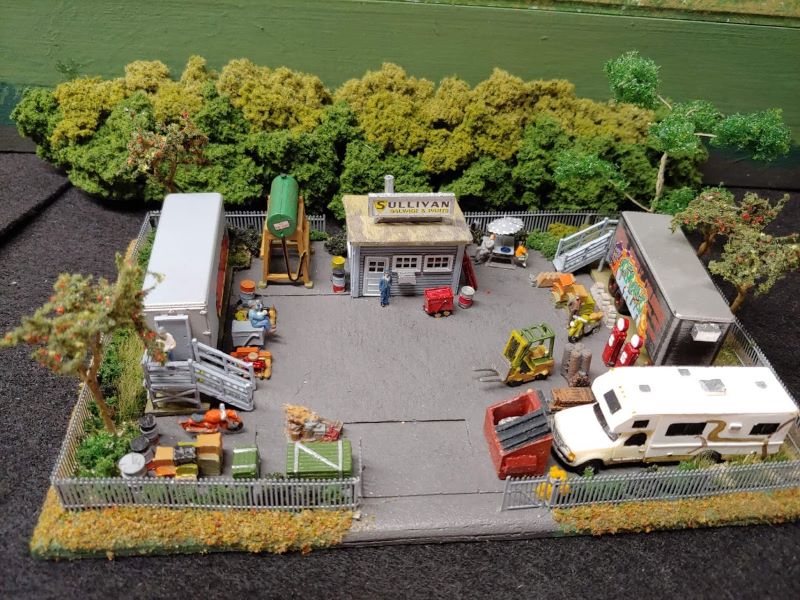
N-Scale display. Base kit, Section House (#60449), by Micro Engineering Company.
Added enhancements include ground foam, trees, speeders and assorted junk piles and figuresines of 3 or 4
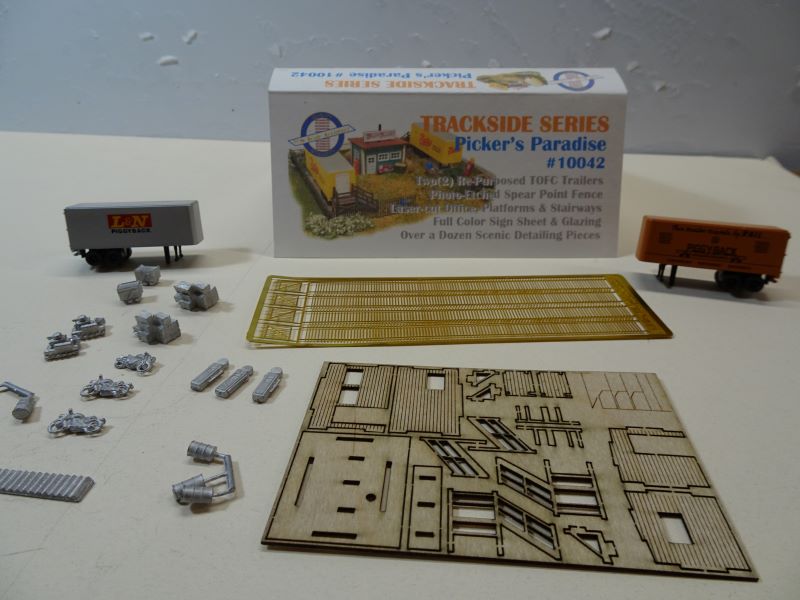
N-Scale Architect's Trackside Series 'Picker's Paradise', kit #10042.
This N-Scale kit includes yard shed, two trailers, platforms, assorted junk yard items.
Enhancements added include: scratch built camper, yard fork lift, picnic table with umbrella, crates, trash bins, barrels, fuel tank,
ground foam, assorted trees and figures.
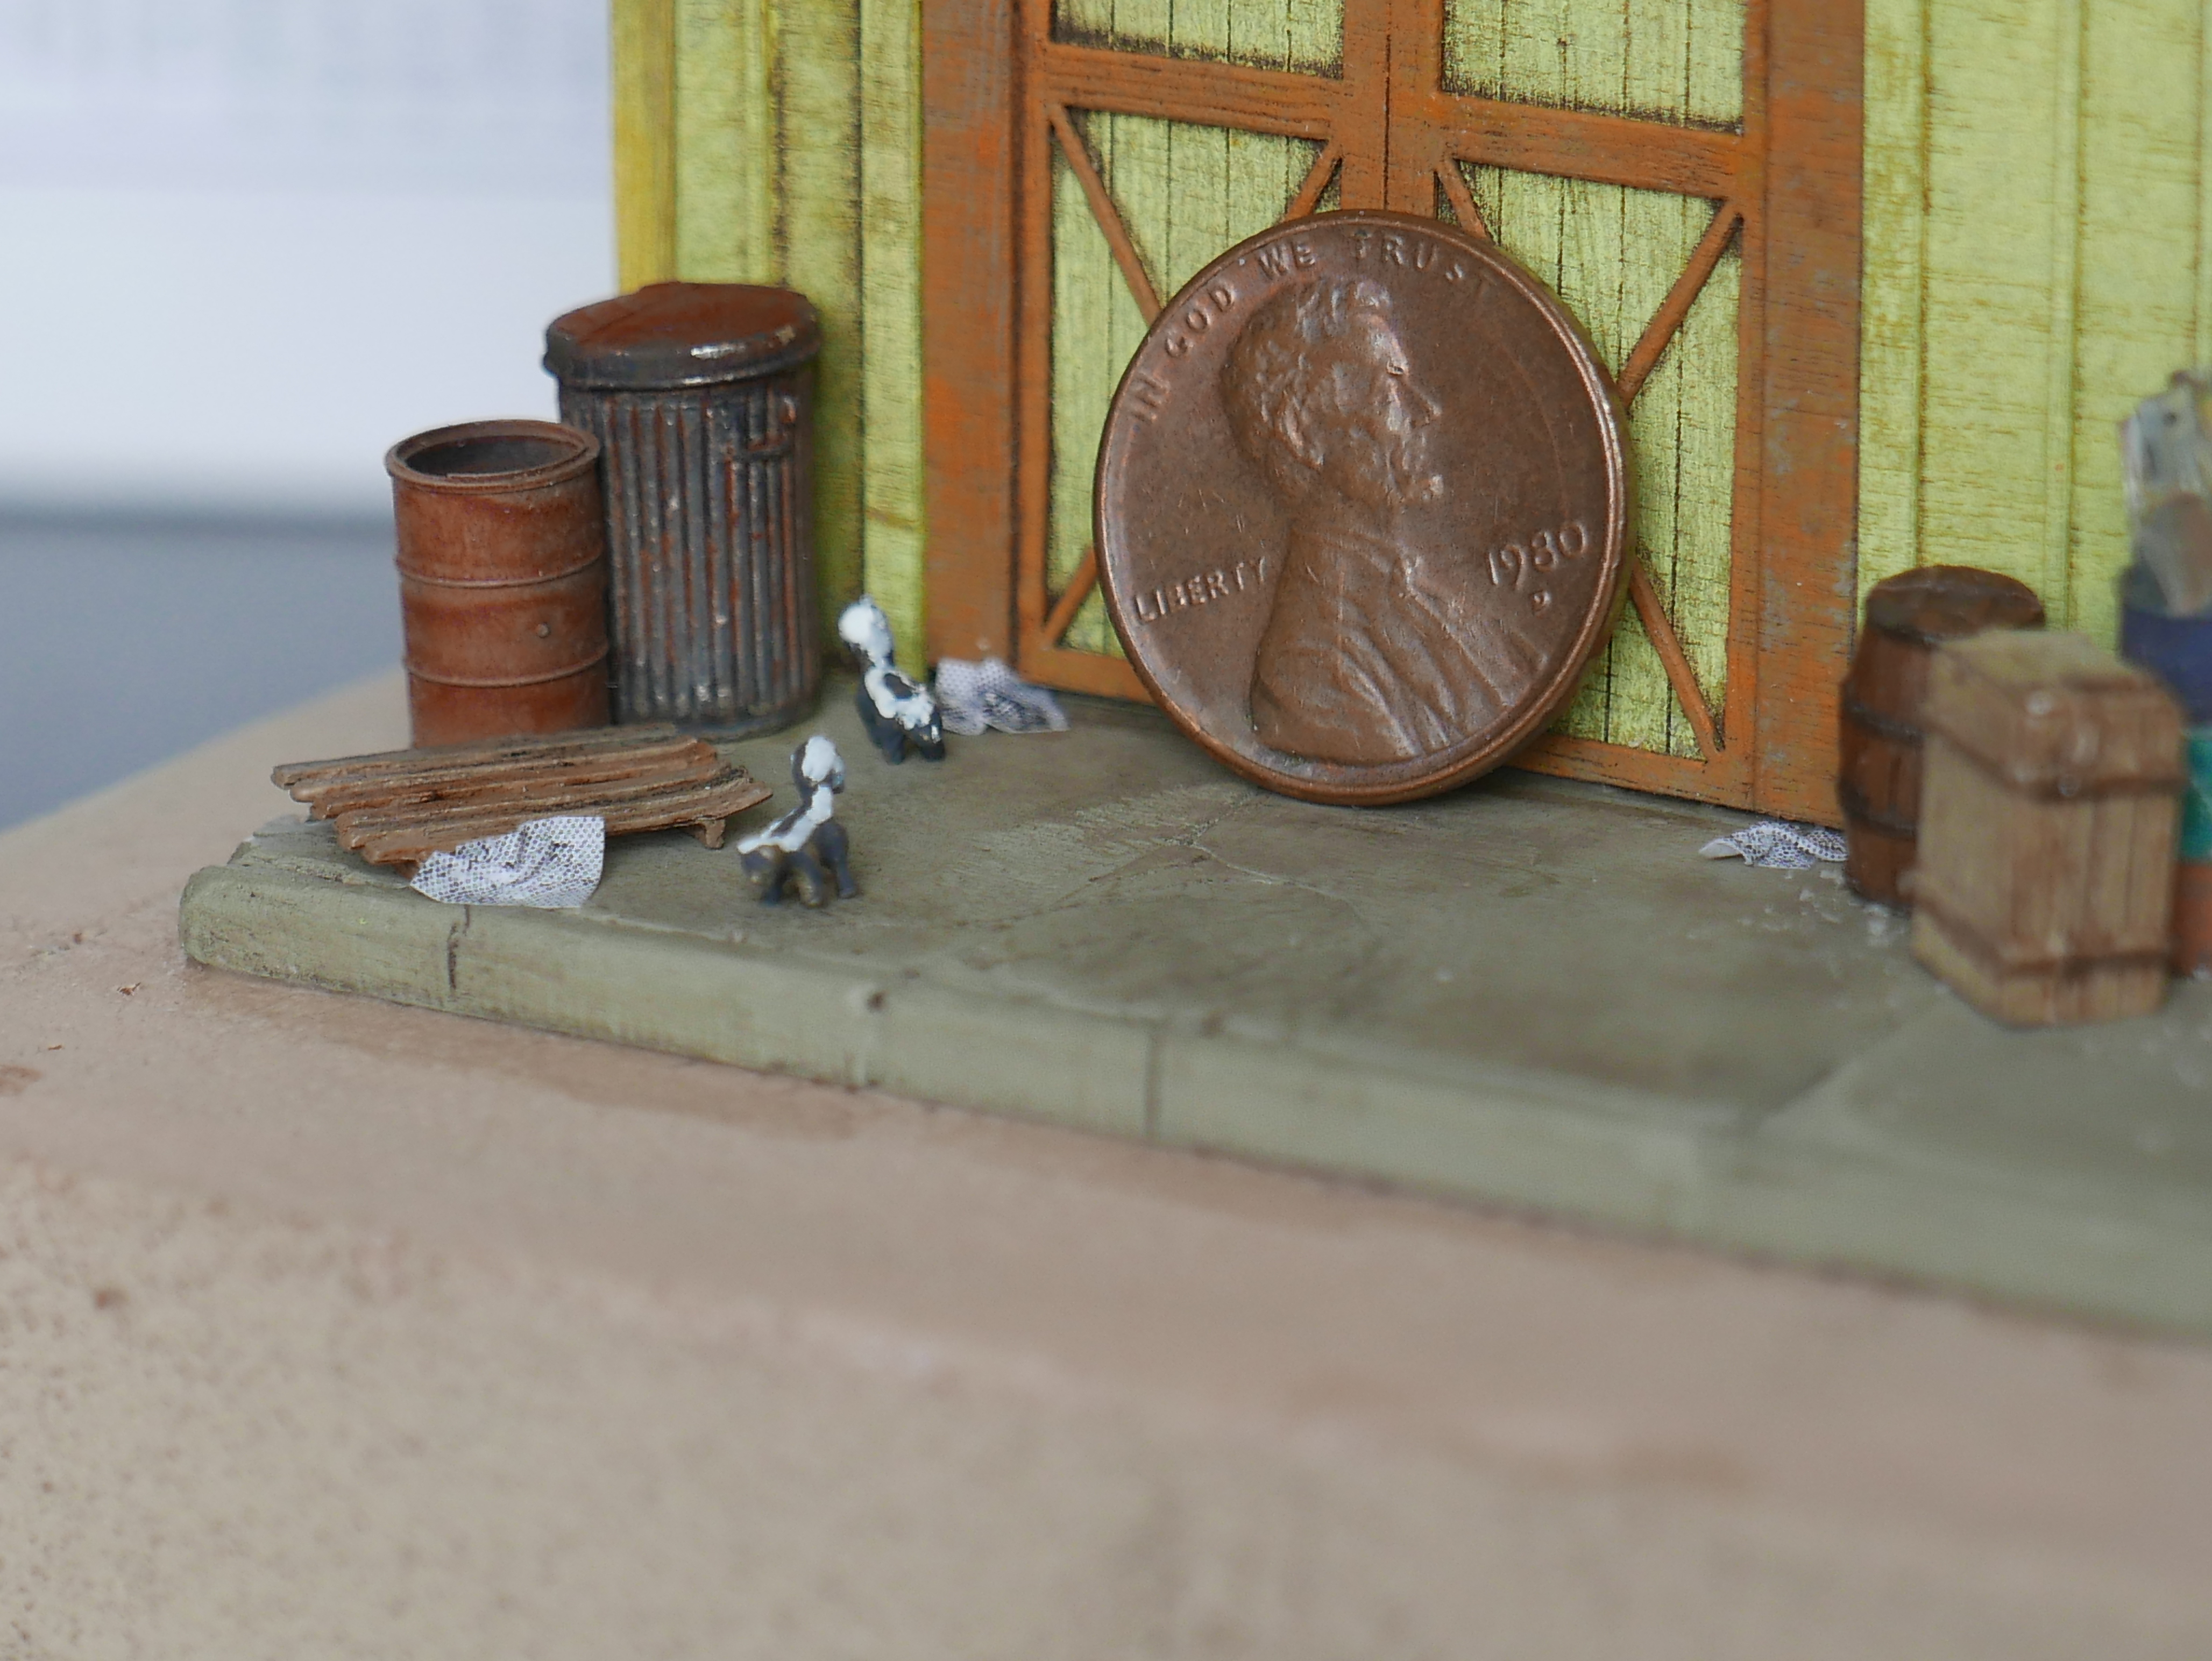
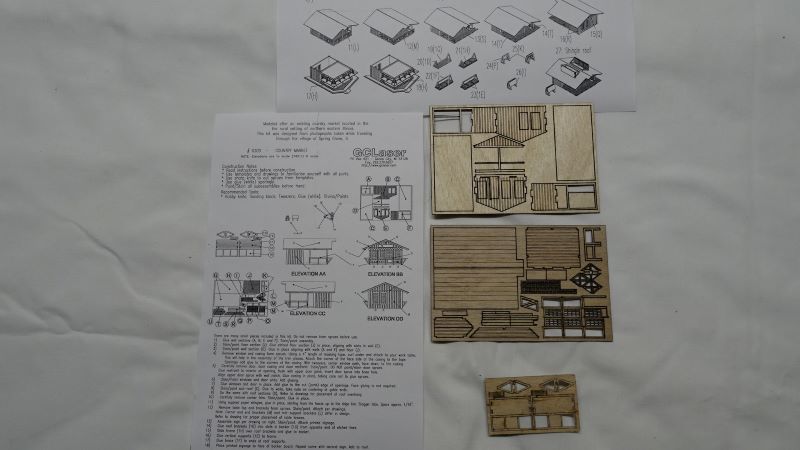
Base kit from GCLaser. N-Scale. Kit #0309 - Country Market. Laser cut micro plywood.
Diorama enhancements include: Woodland Scenic Paul's Farm Produce pickup and two figures.
Other 'add-ons' include ground foam, assorted trees, clump foliage bushes and simulated veggie garden crops, Bar Mills Insta-Fencing, hand crafted pottery plant pots, Woodland Scenic figures and assorted livestock (horse, dog and sheep).
Diorama base measures 6 inches by 6 inches
Dave Durr
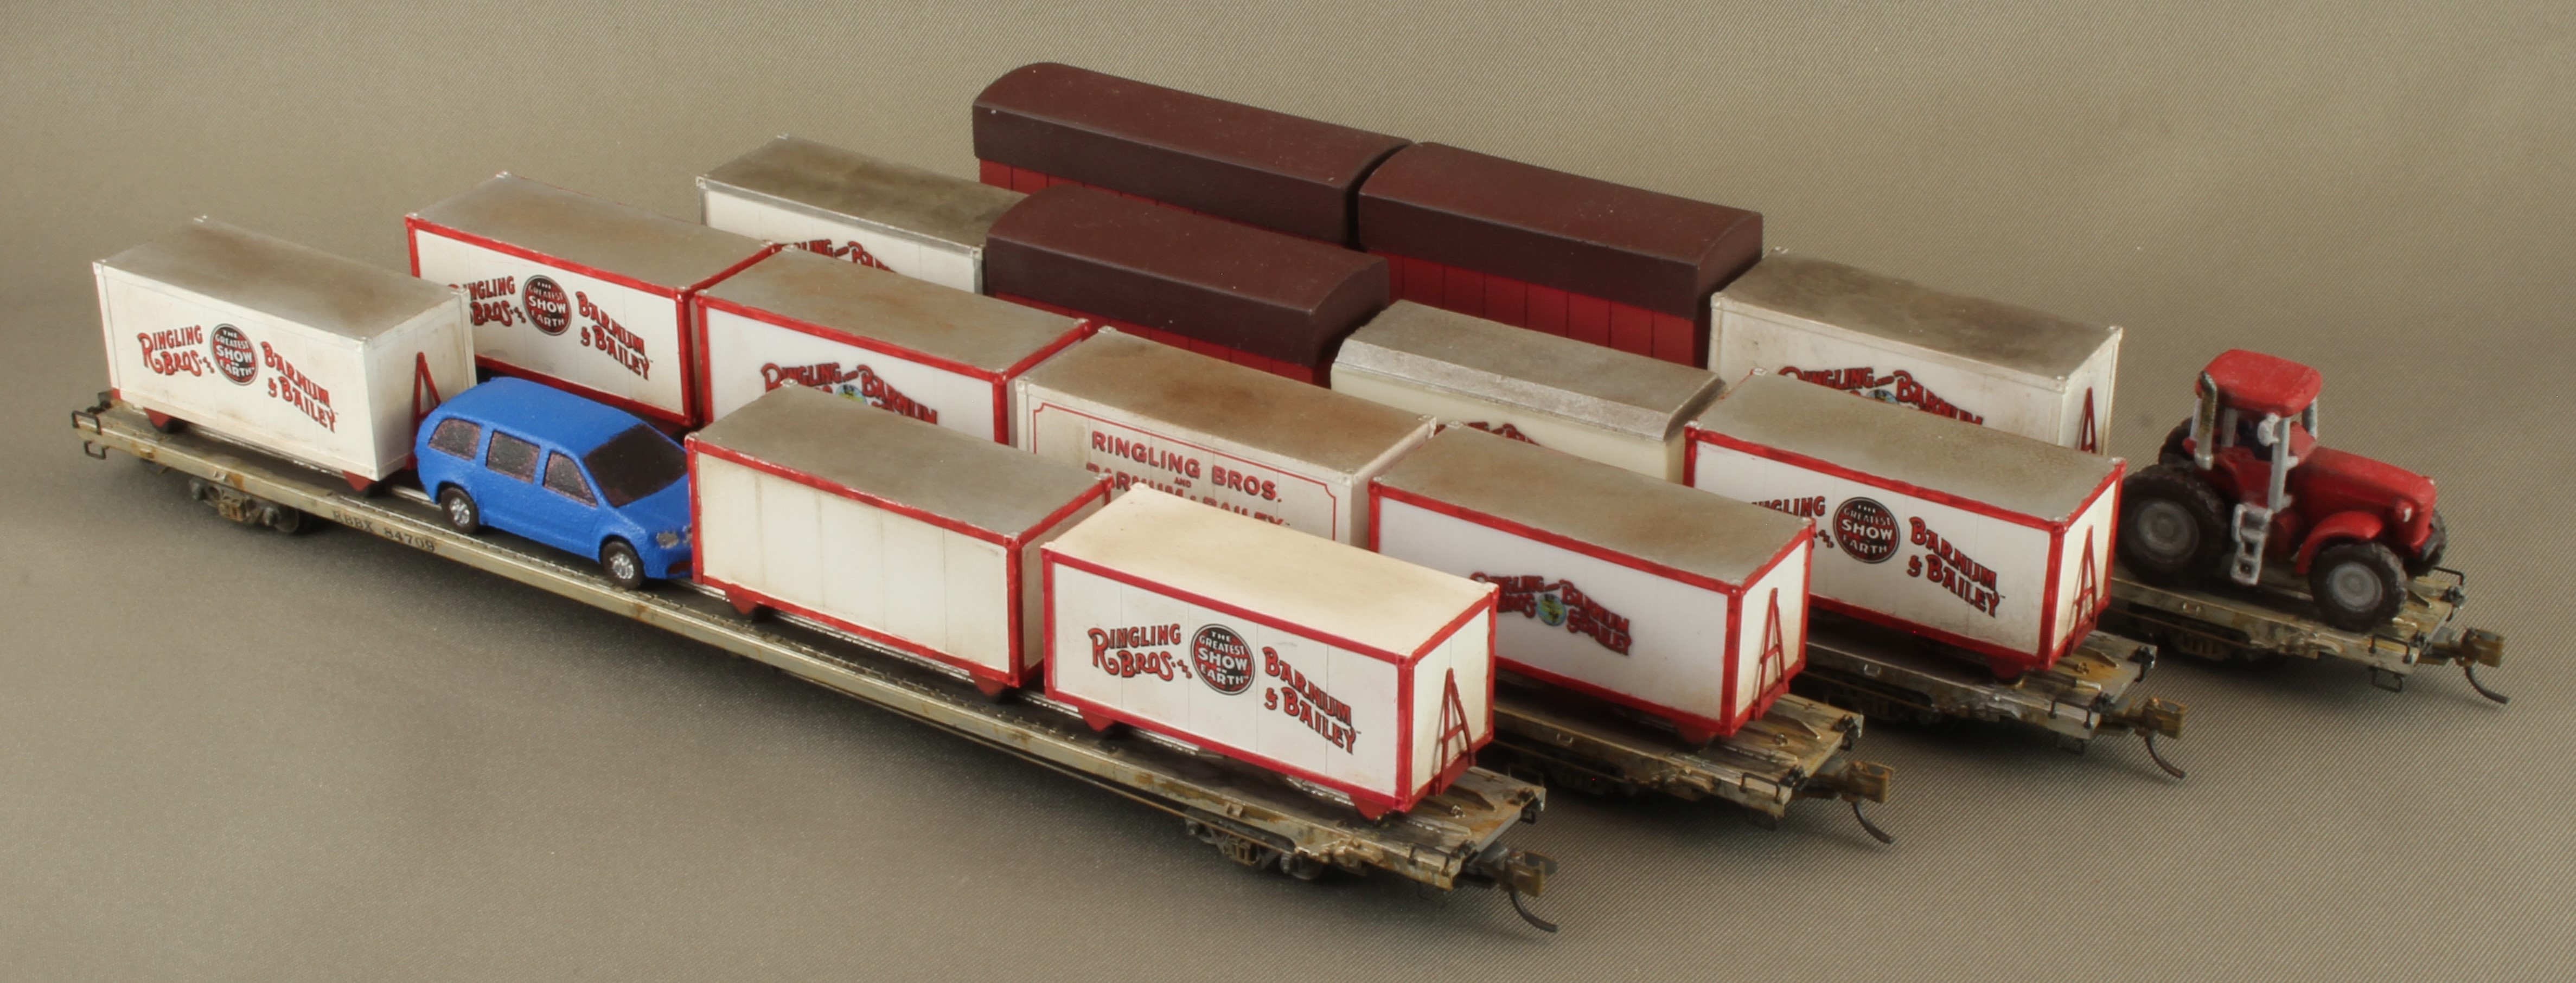
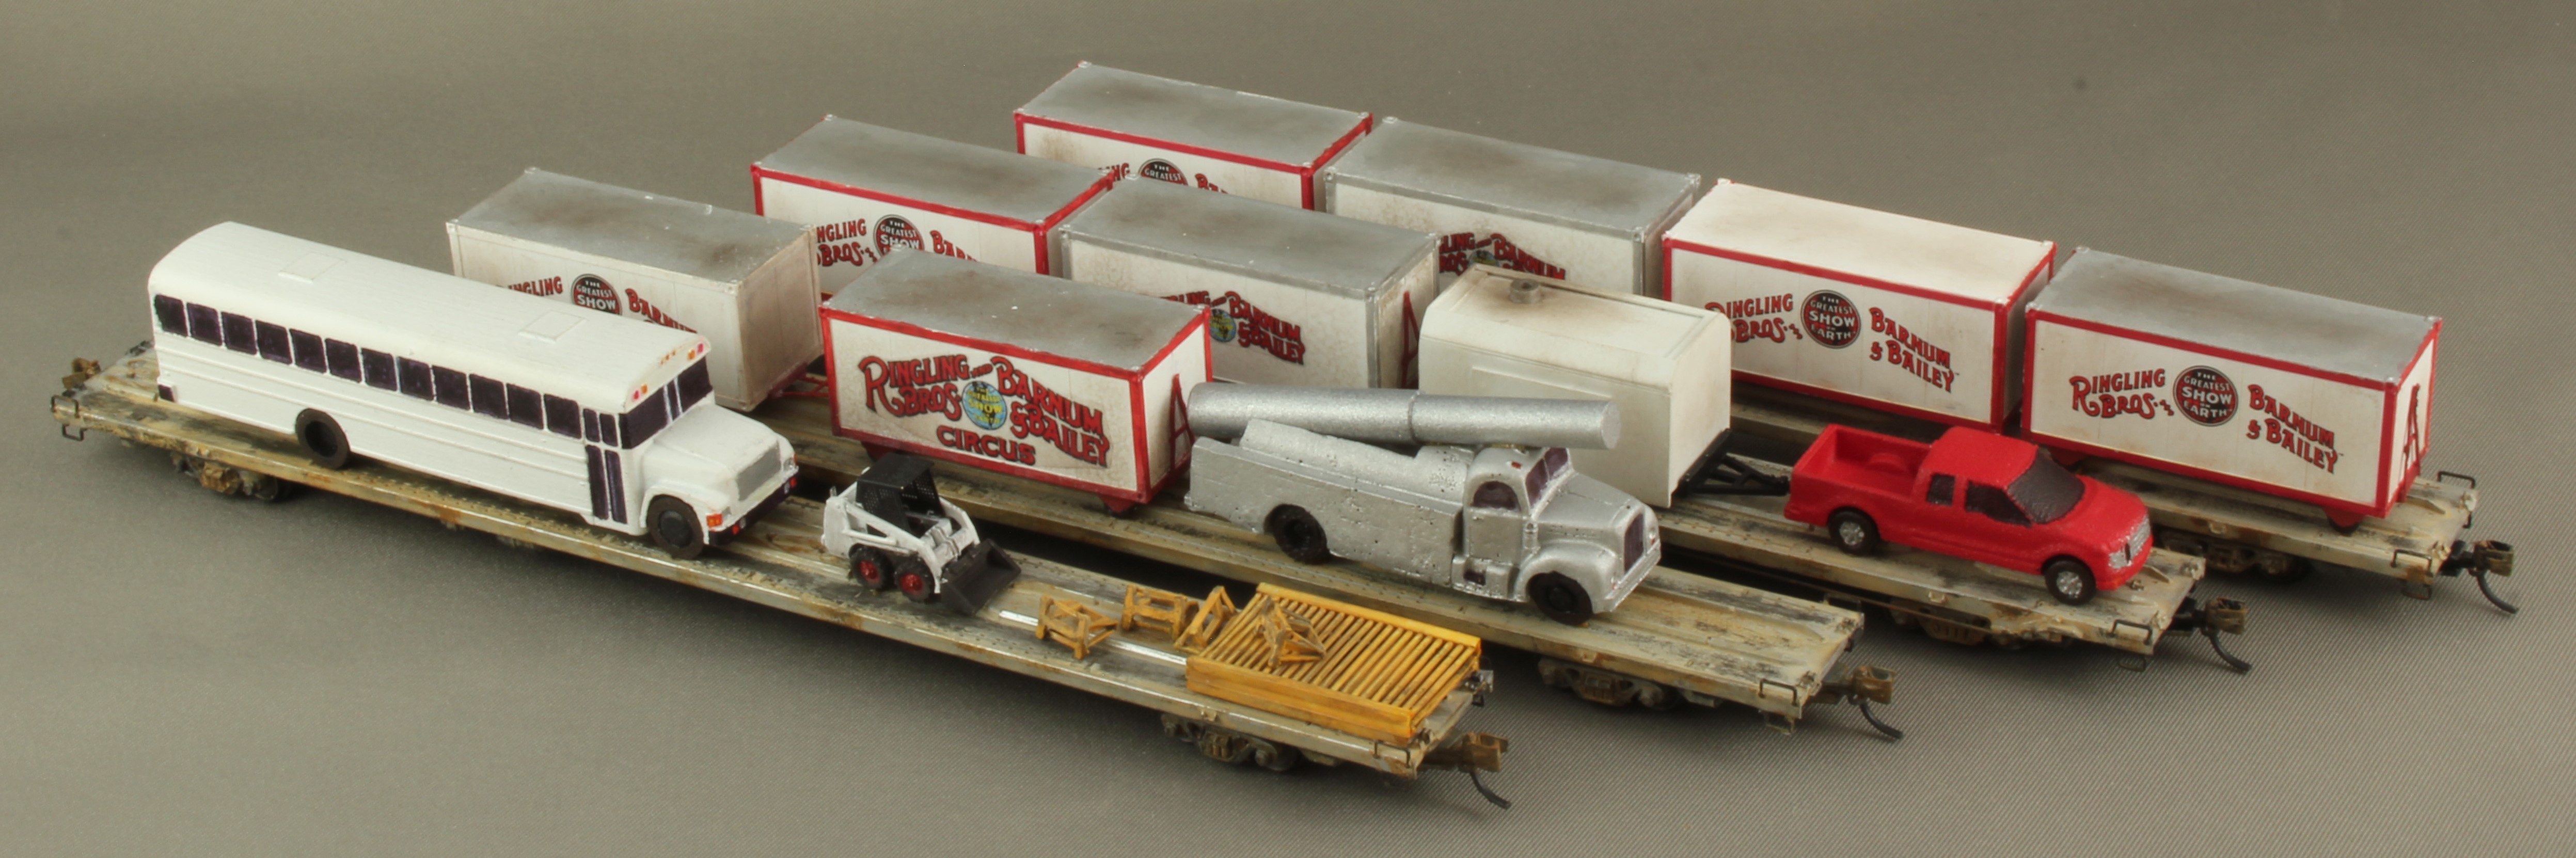
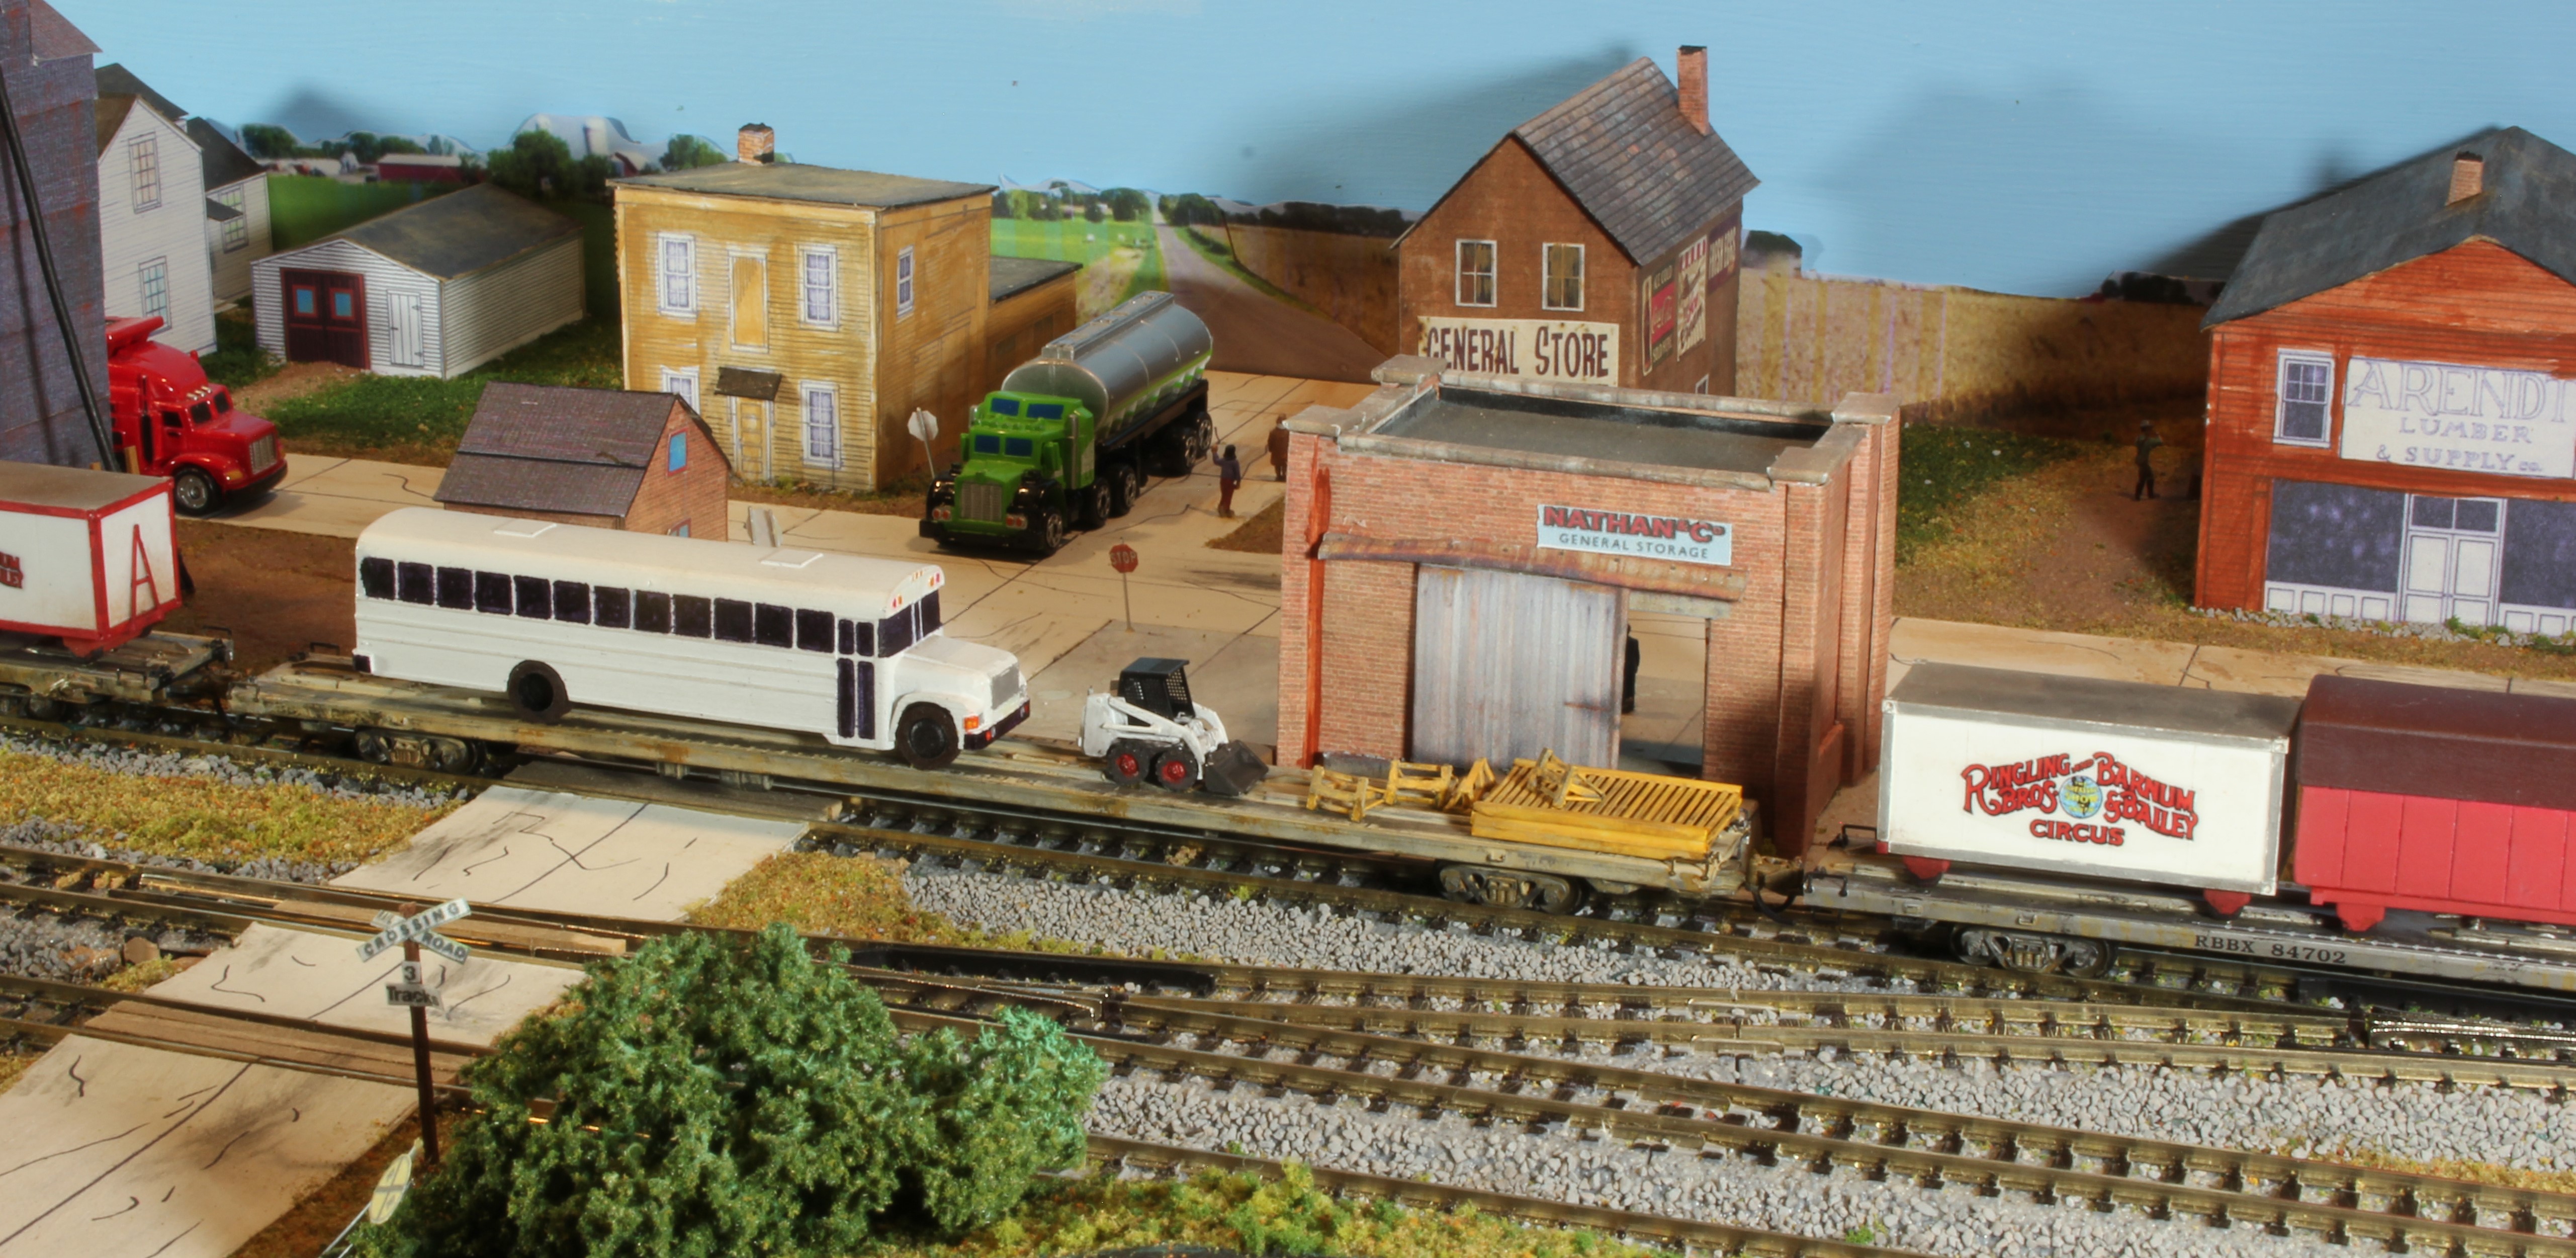
RBBX FLATCARS, 2007-2017
Like the northeastern railroads of my younger days, the Ringling
Brothers and Barnum and Bailey Circus train is also a “fallen flag.”
One of my recent interests is recreating an N-scale version
representing the train in its last 10 years. The project was started in
February 2020 after seeing John Rezuke’s HO scale replica of the
train at the Amherst Train Show. My flatcar part of the roster was
completed in February 2021. Pictures readily available on the internet
were used as reference.
Both the 89’ flats and the wagons are from MicroTrains. Some remain
with factory paint and lettering; others had factory paint stripped and
were repainted and decaled. All were weathered. The flatcars had
brake rods added. Where visible, scratchbuilt tow bars were added to
the wagons. 3D-printed and GHQ vehicles, along with some
scratchbuilt items, completed the loads.
My next N-scale RBBX projects will be a bilevel car and a concession
car.
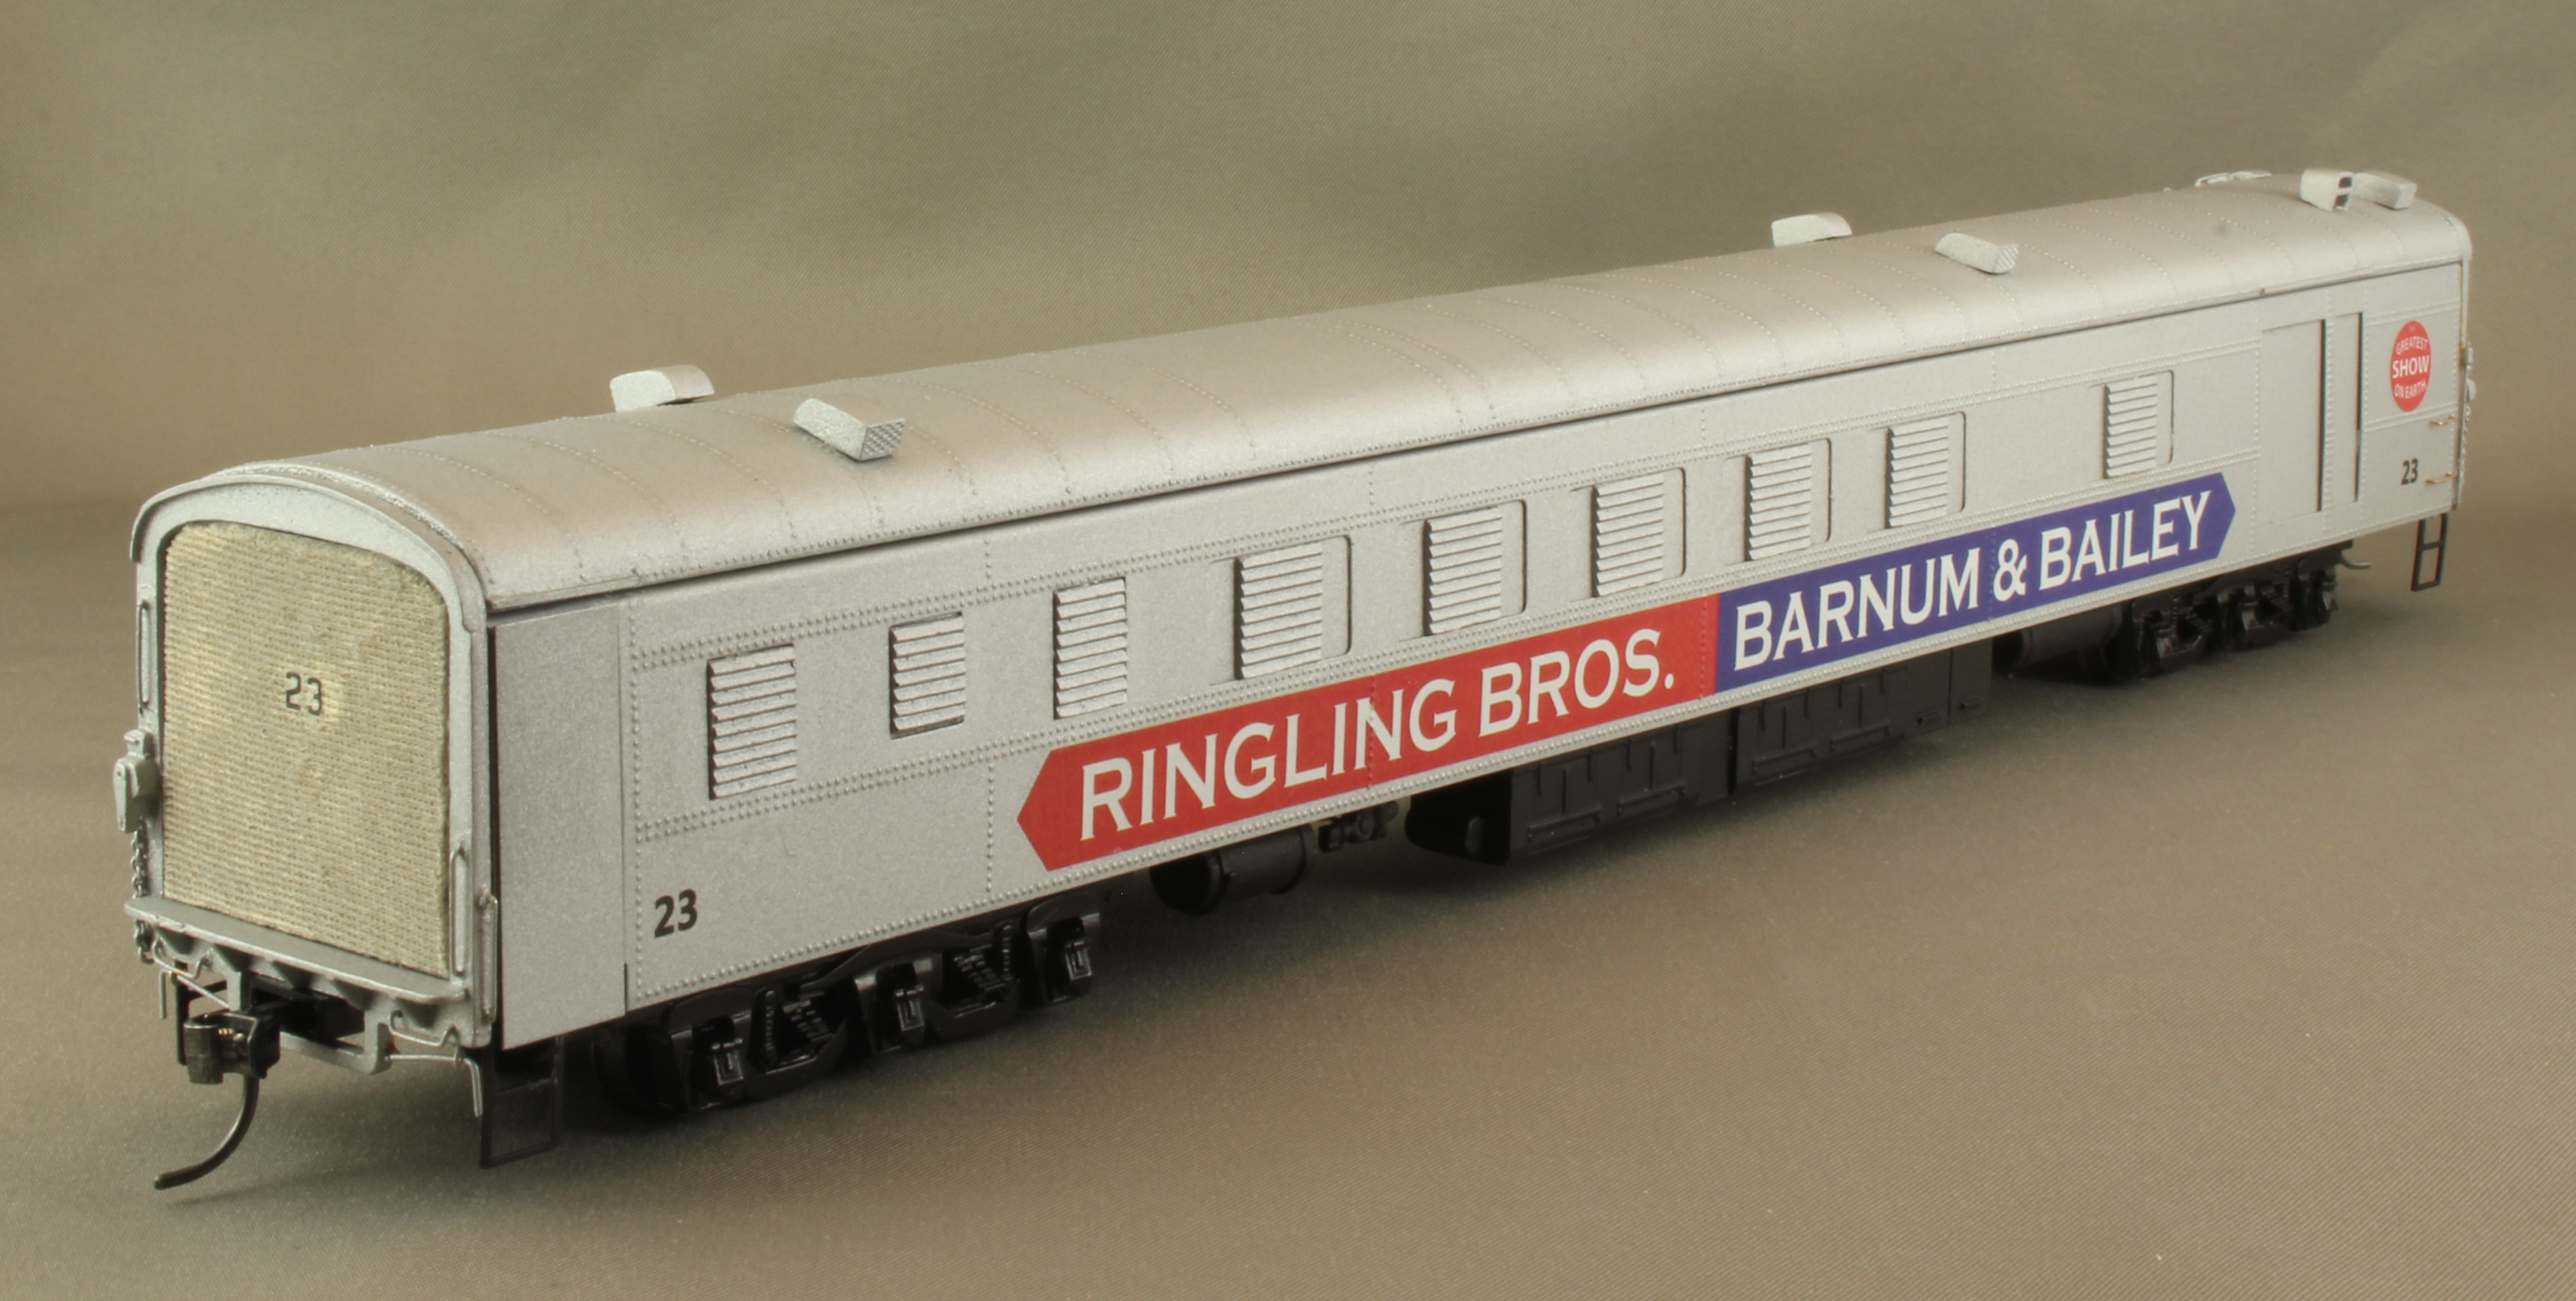
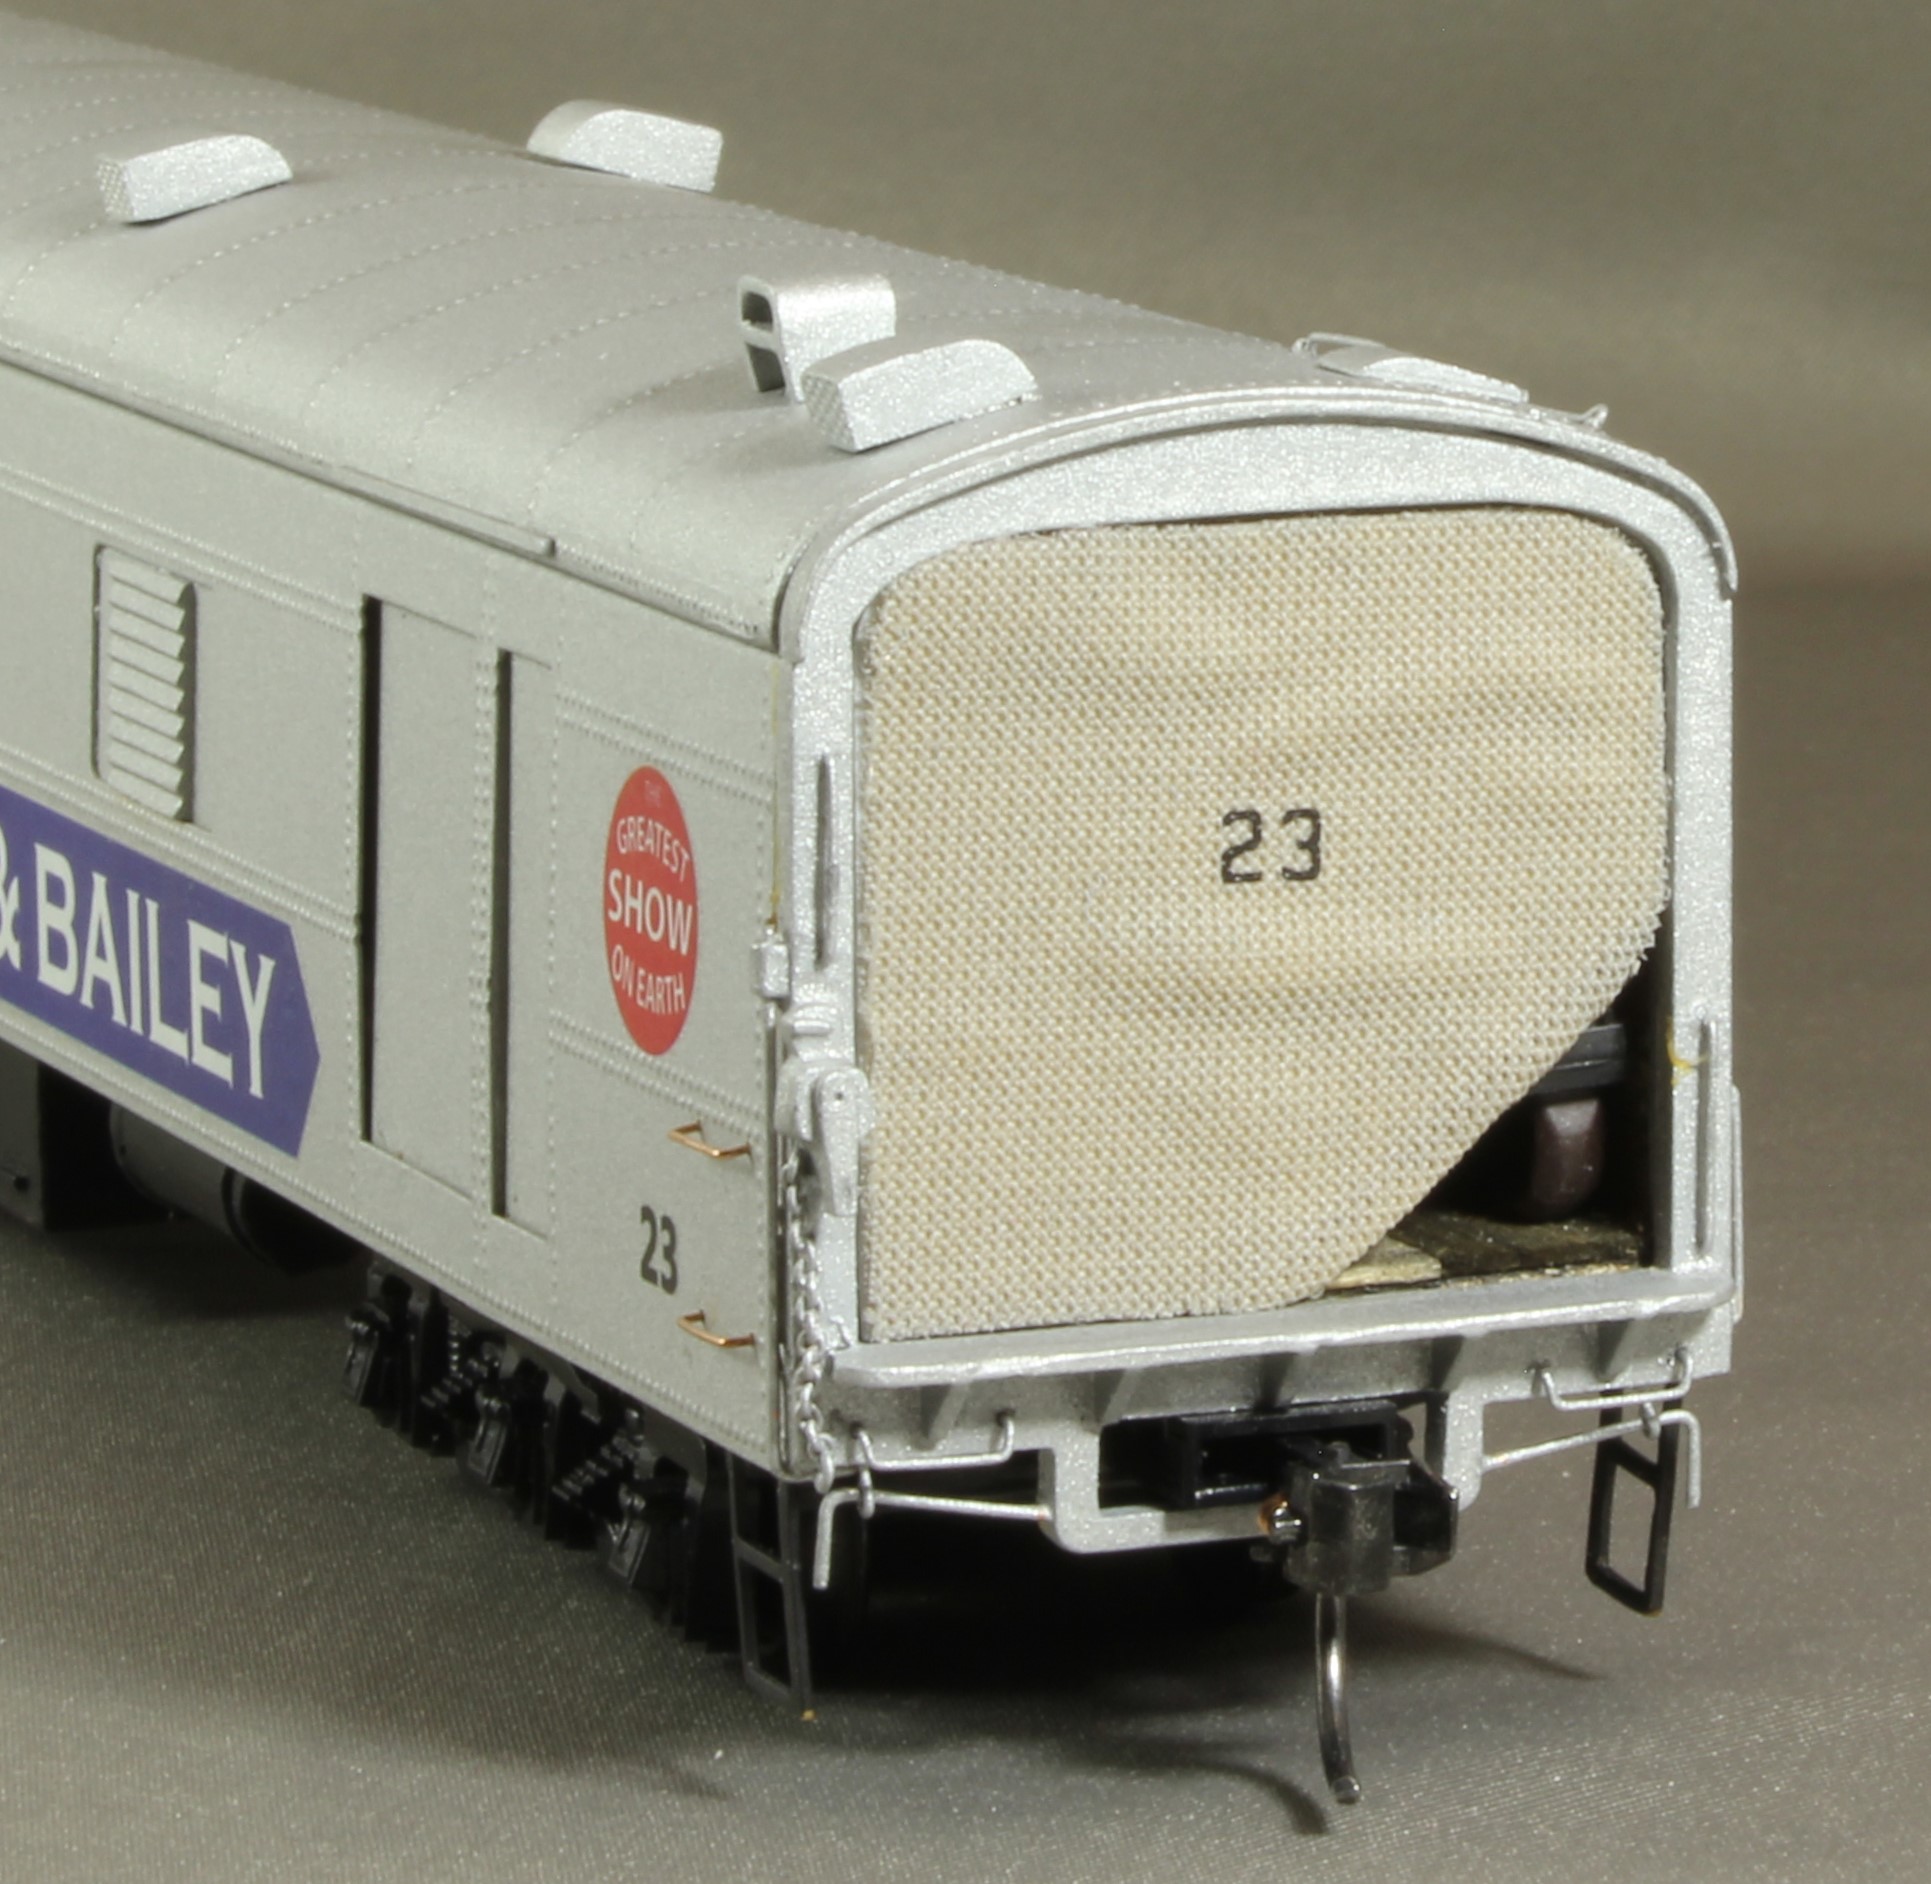
RINGLING BROTHERS TUNNEL CAR #23
When Ringling Brothers left the rails after the 1956 season, all but two
or three of their flatcars were bought by the railroads. However, with
declining rail passenger travel, the show was left with many of its
passenger cars. As a result, when the circus returned to the tracks in
1960, it “tunneled out” several of its passenger-type cars to carry
show wagons. Tunnel car #23 was originally a USArmy WWII hospital
car built by ACF in 1944 and purchased by Ringling in 1949.
My other circus project is to recreate a condensed version of the
Ringling Brothers train as it appeared in the 1960 to 1967 era.
Walthers made HO scale models of the hospital/circus cars from the
1950s to the early 1980s. They are still available on the internet; the
price has become quite inflated over the past two years, fortunately
after my purchases. Unfortunately there are not a great number of
good pictures with which to document this era of the Ringling
Brothers train. There is a certain degree of “winging it” when
modeling the early-mid 60s circus train (and finding out later that my
best guess wasn’t…).
These photos are of a nearly completed Walthers tunnel car model.
The roof and the ends are not yet fastened and are set in place
loosely for the photographs. After gluing those parts, there will be
some touchup painting and light weathering to finish the model.
Some construction highlights are as follows:
● Using kit parts and instructions the Walthers model sits about 5’
off the rails. A new bolster and center sill were scratchbuilt to
lower the body to a prototypical 42” above the rails.
● The model’s wooden roof was made to look like metal using a
sand-paint-repeat cycle about 10 to 15 times. MicroMark rivet
decals were added (Figure 1).
● The canvas ends were made using plastic sheets covered with
cloth, then spray painted and decaled. Tunnel car #23 carried a
line of circus floats down one side and transfer cages for the big
cats down the other. Figure 2 shows a glimpse of a transfer
cage where some kids running away to join the circus loosened
up the canvas and pushed away the corner to hitch a ride.
Eddie DeGan
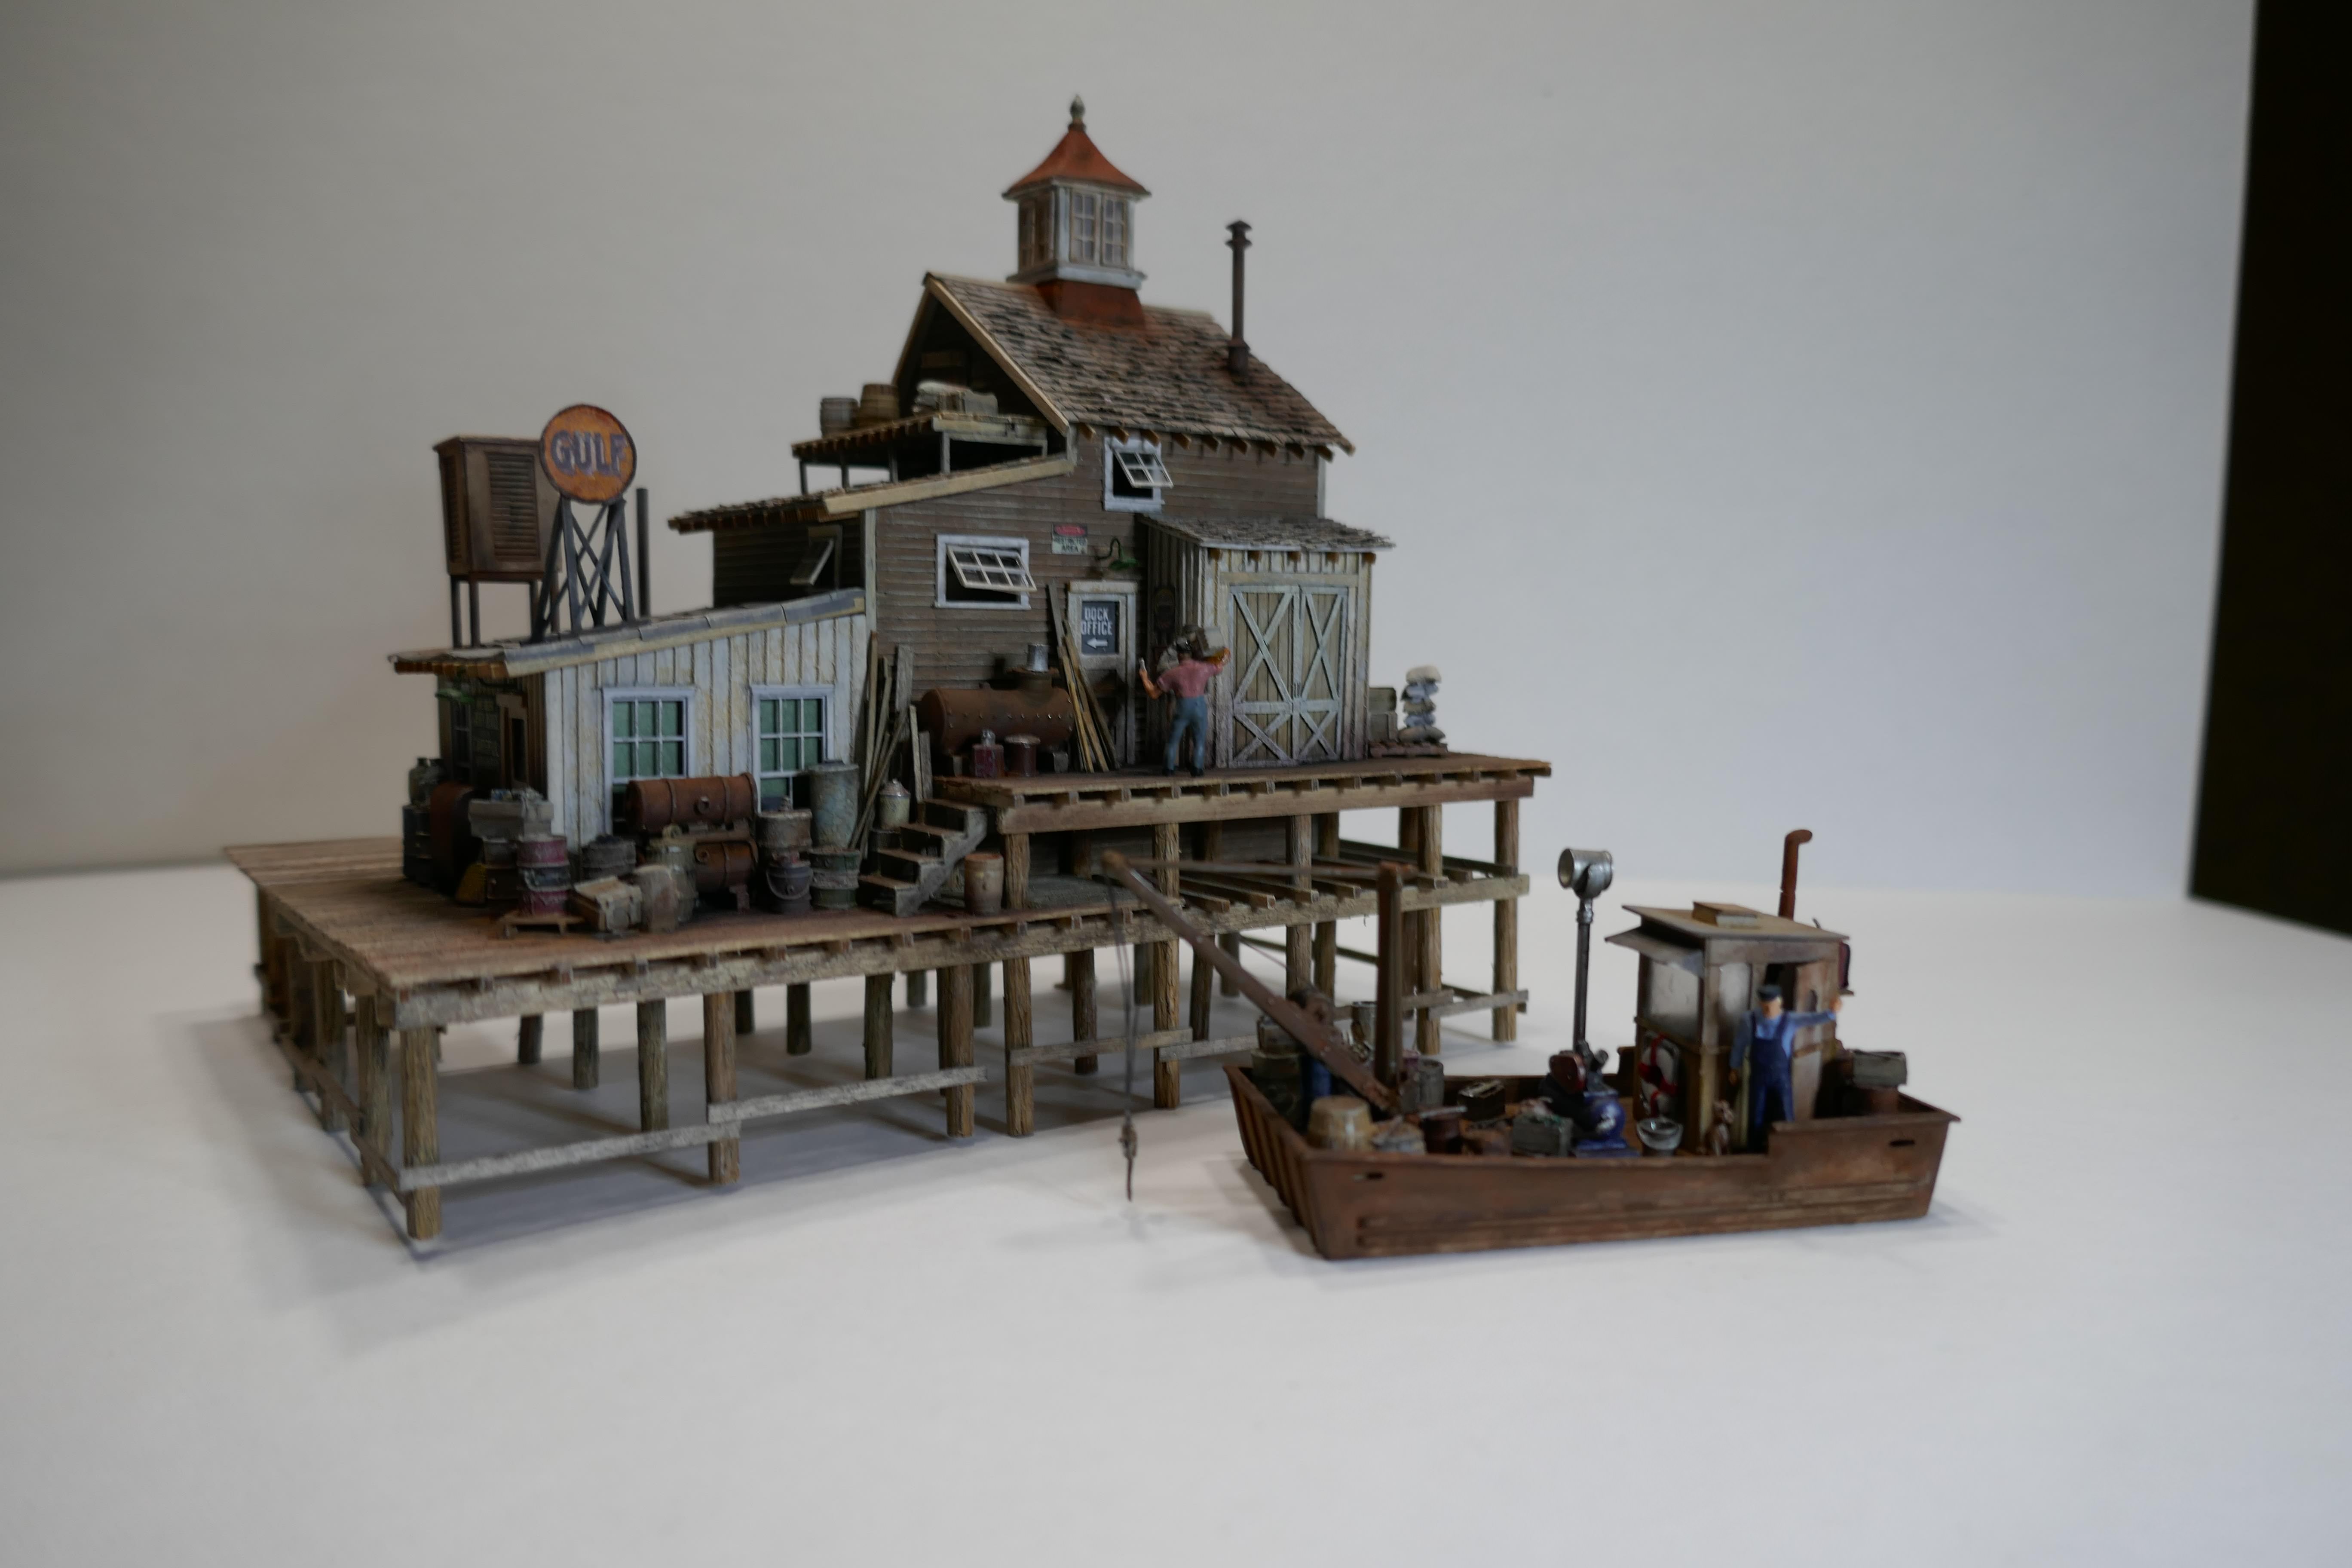
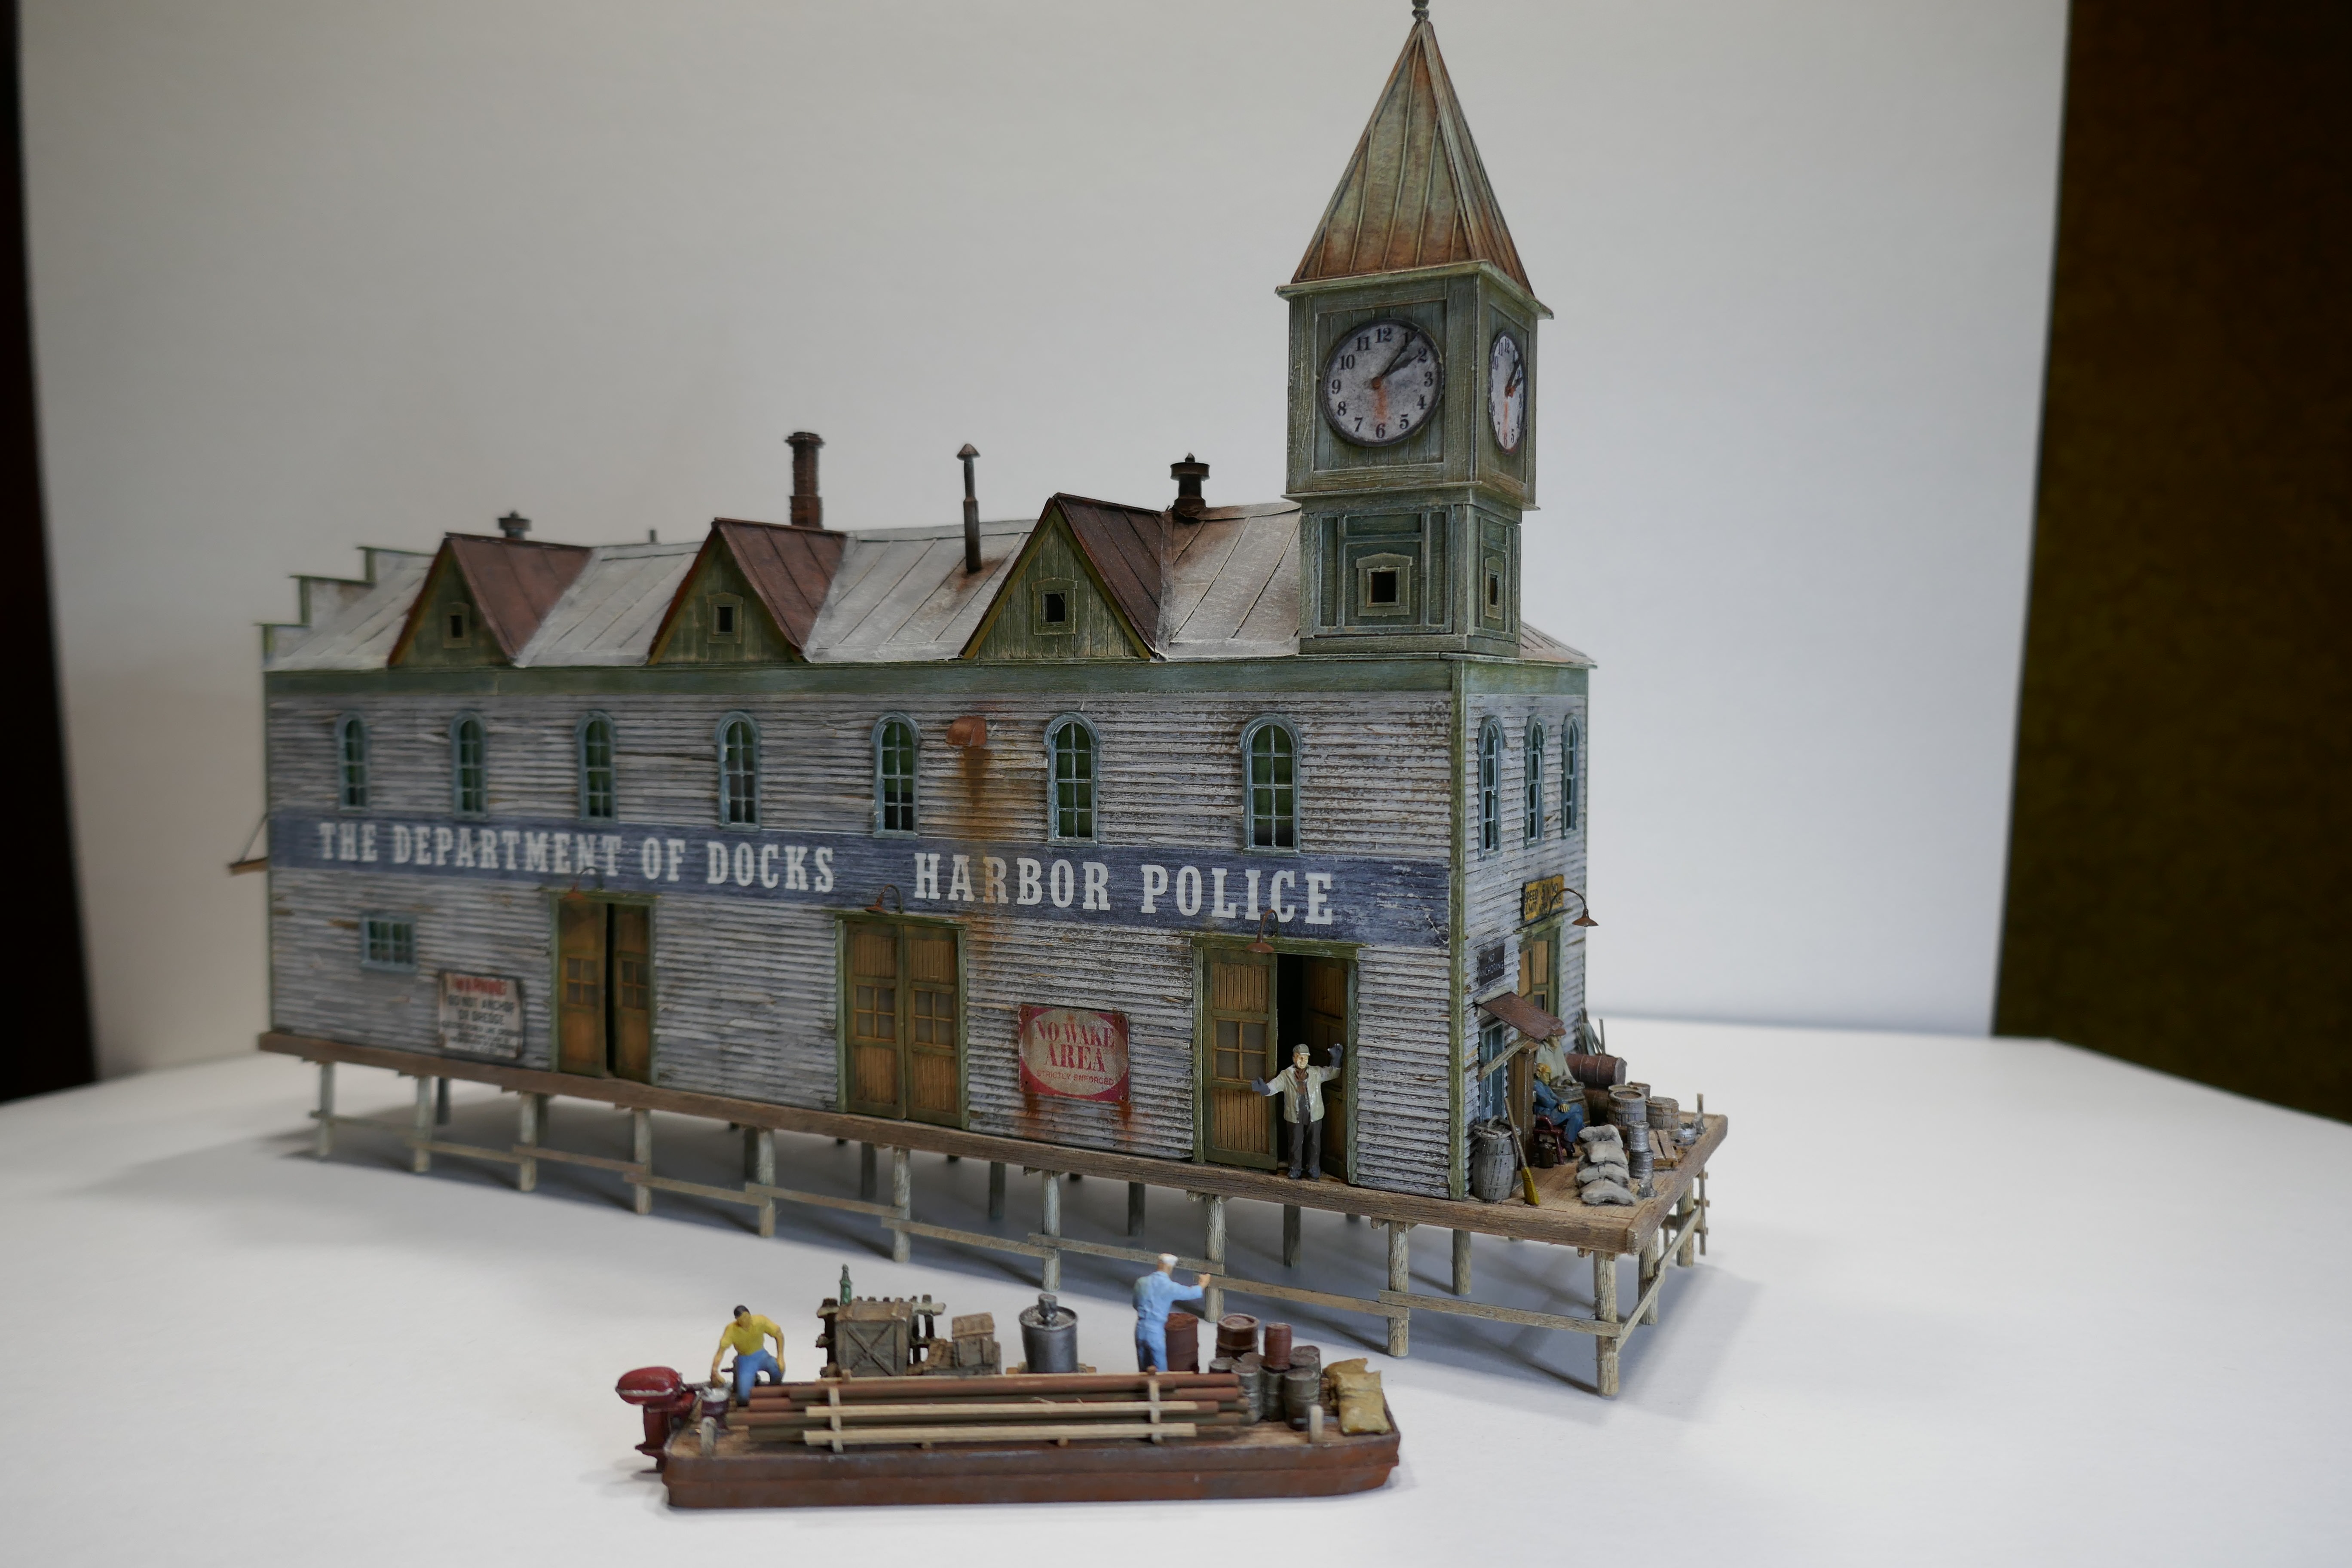
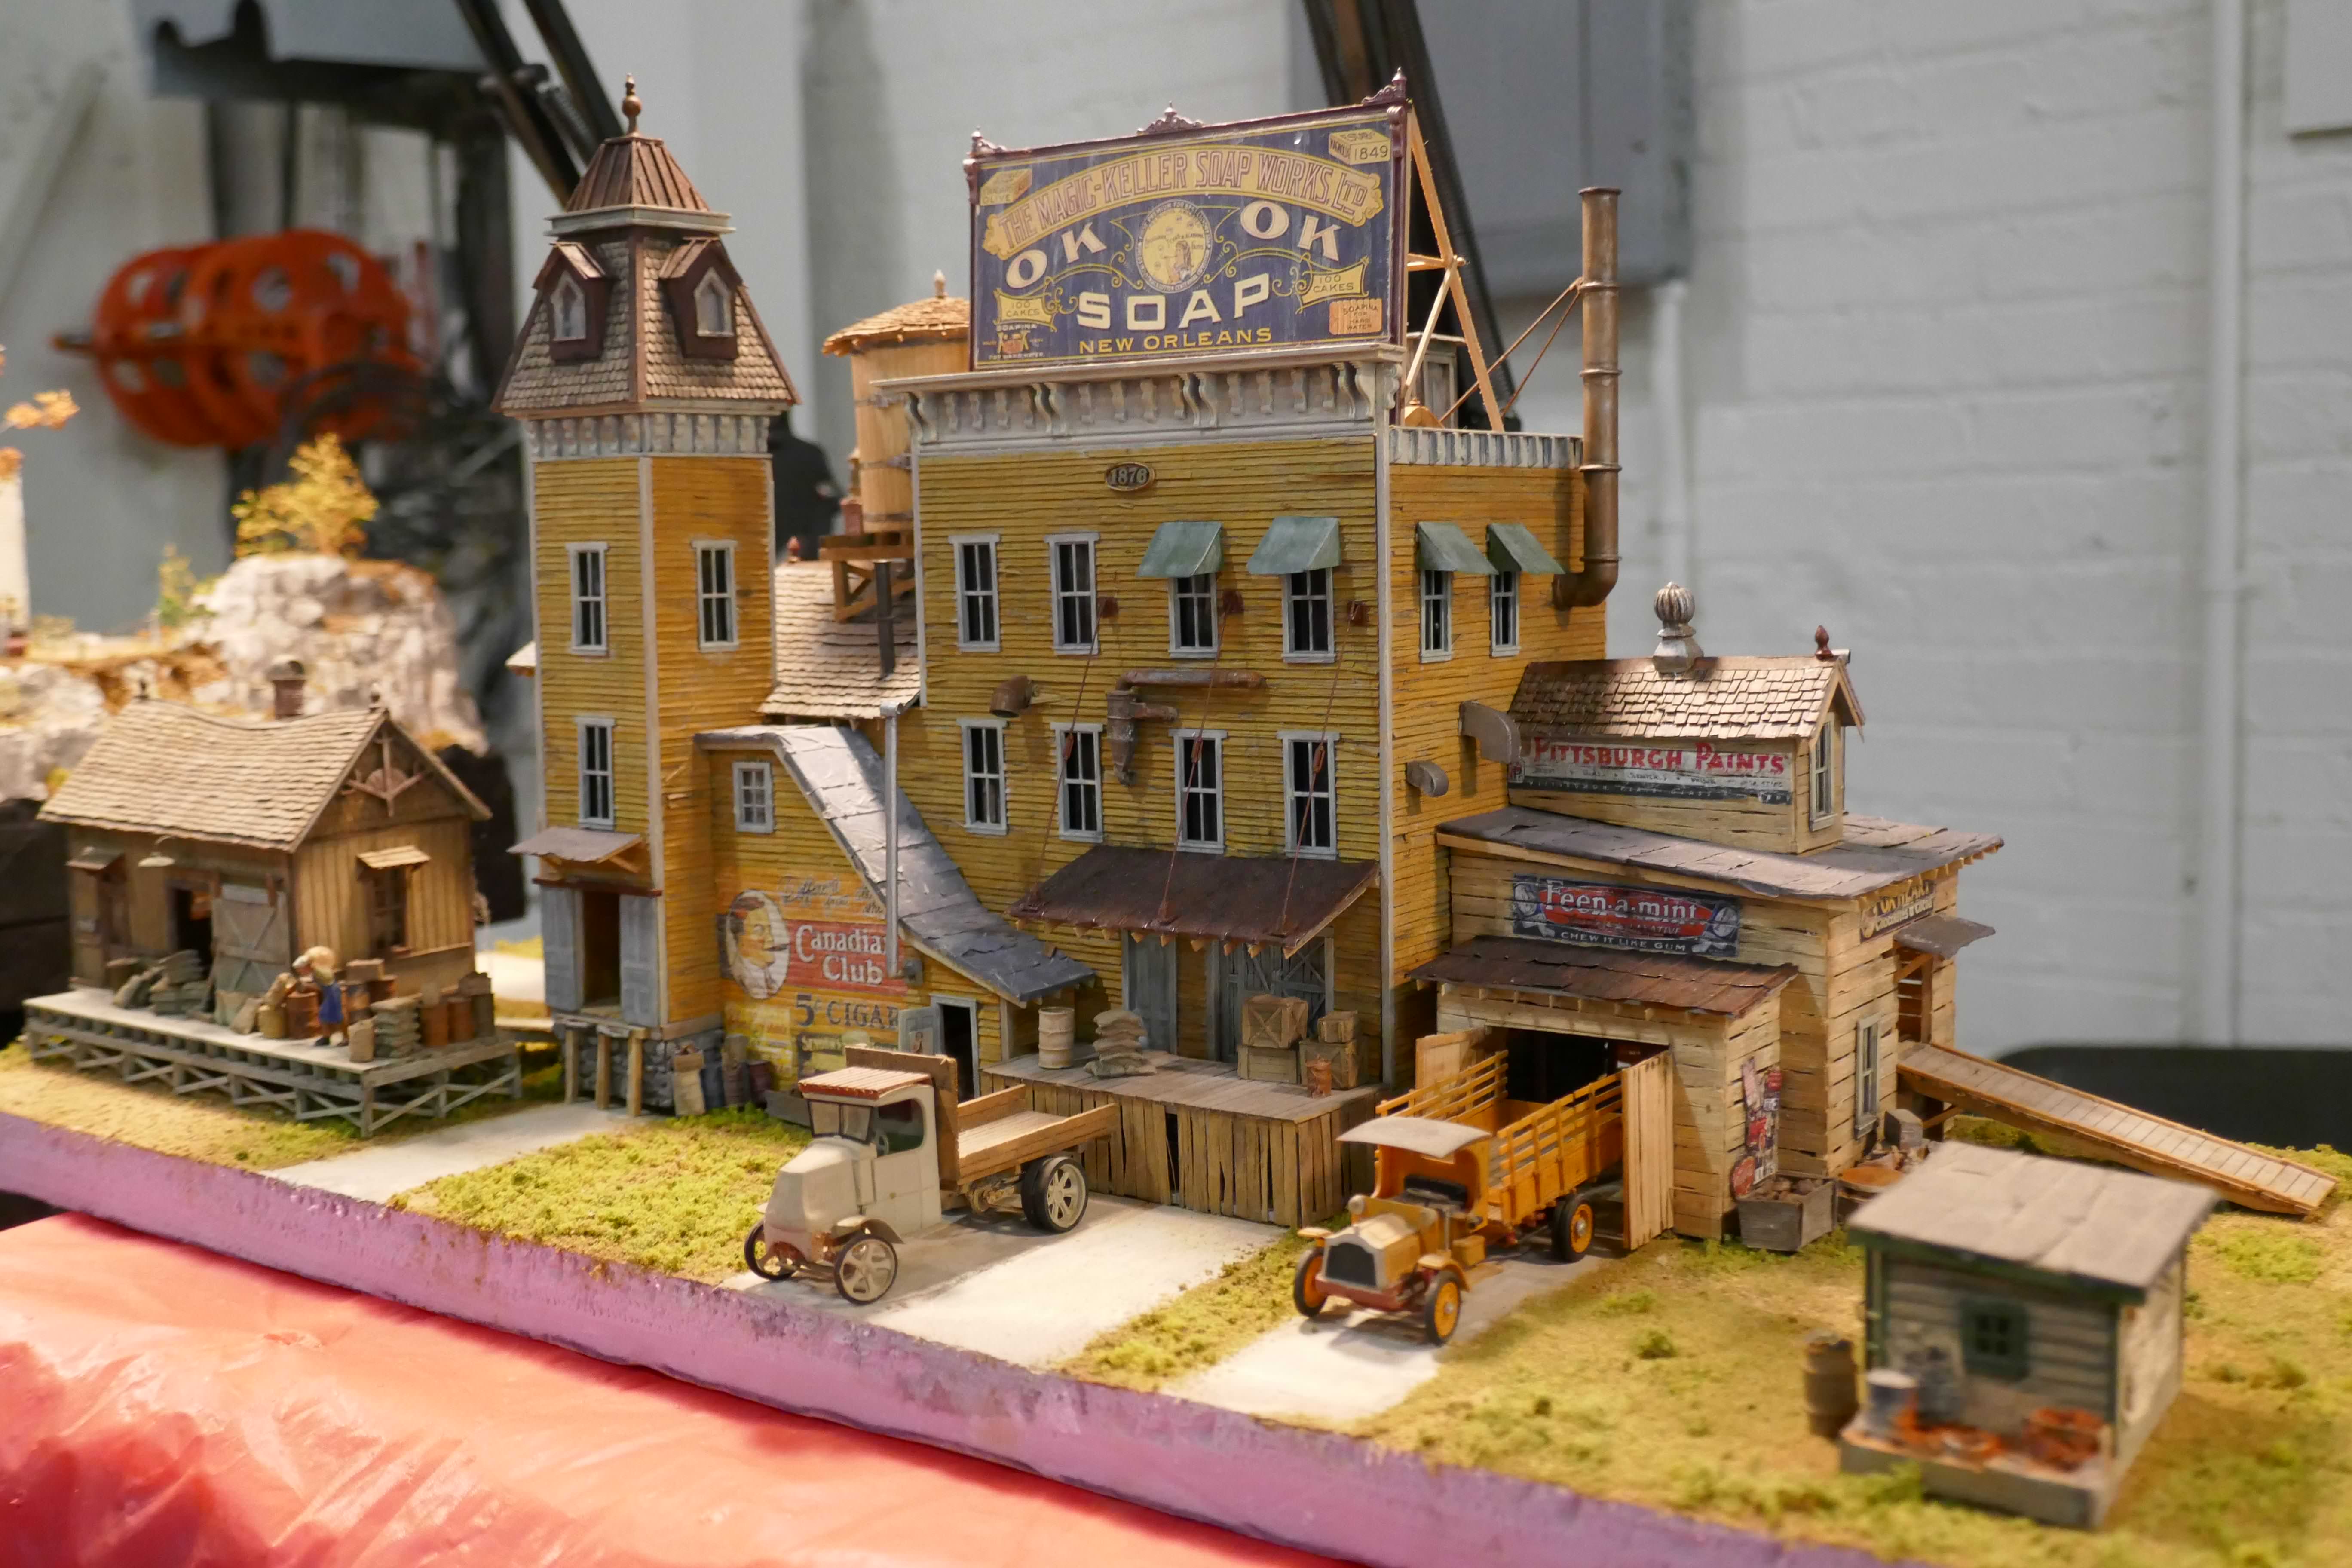
I'm Eddie DeGan. I've been working on harbor models in HO scale.
The first picture is of a modified Bar Mills dock house kit. The barge I added from Fos Scale Models.
Details added include the crane, compressor, dock, and Skipper, the dog.
The second picture is a Fos Scale Models Department of Docks and Harbor Police. I added lots of
details to the barge and some to the dock house.
The third picture is a scratch built, based loosely on Fine Scale Miniature seafood emporium. Board
on board construction with extra buildings and additions.
John Gillespie
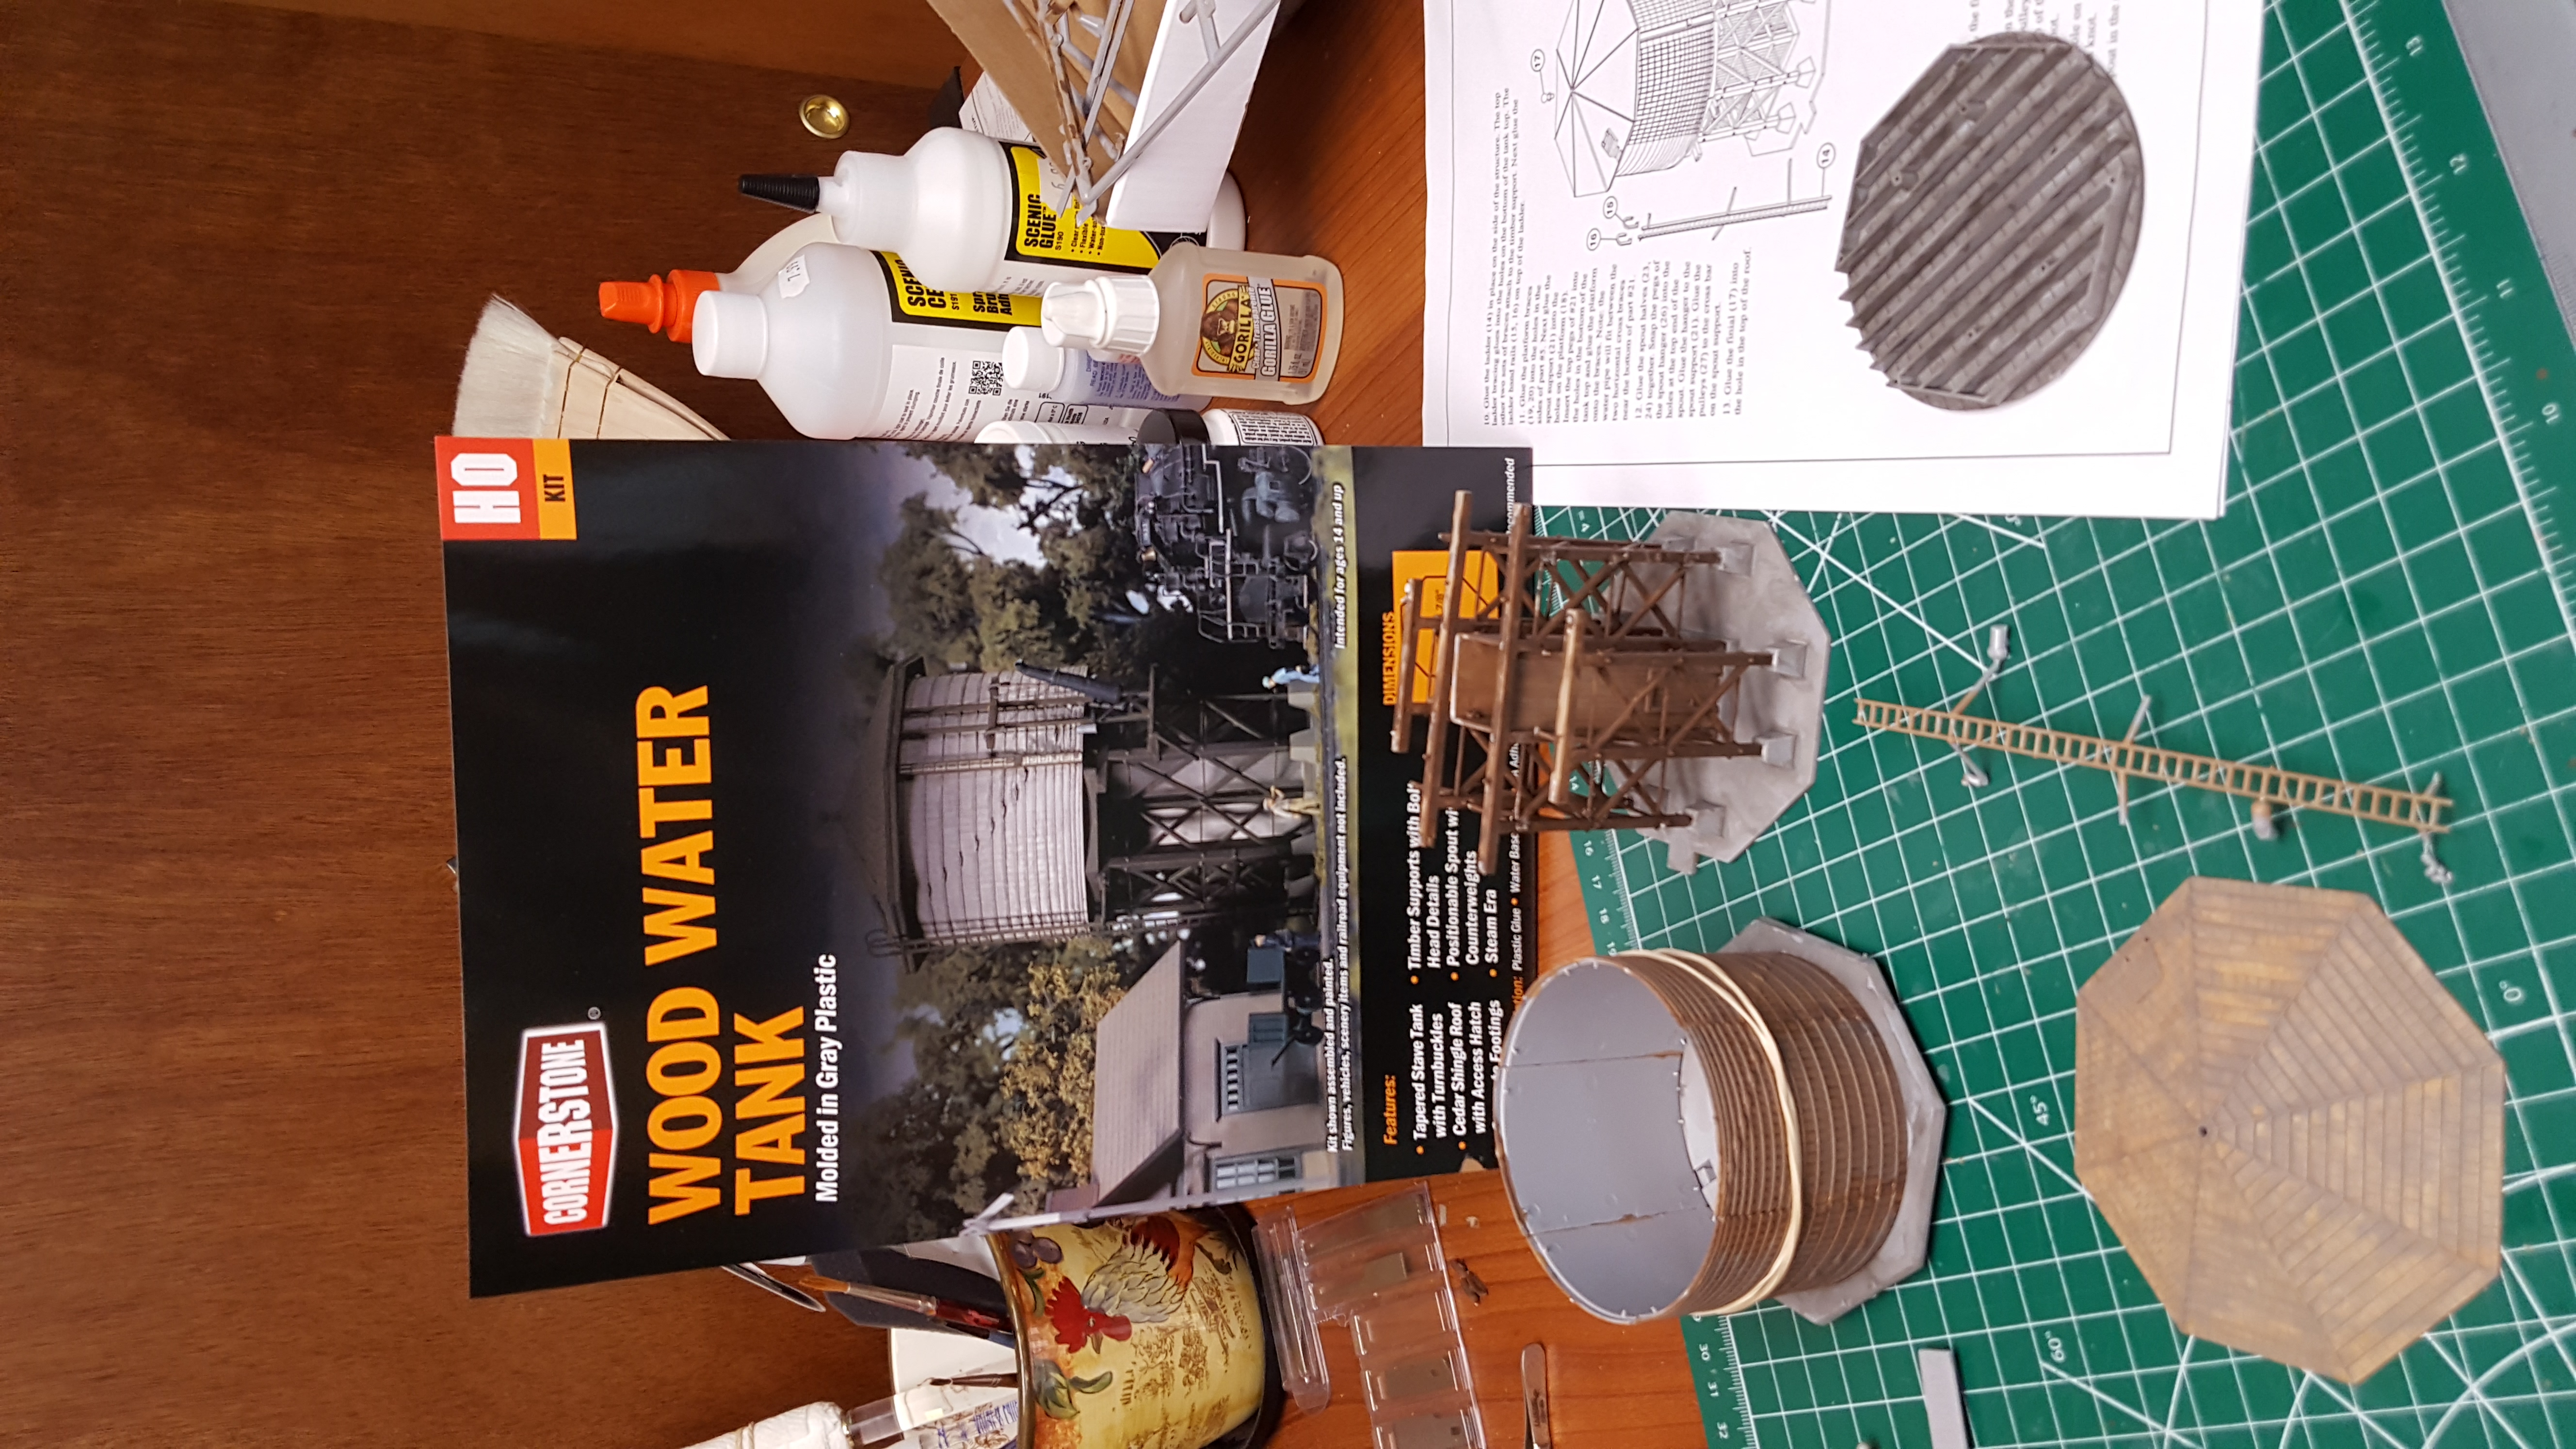
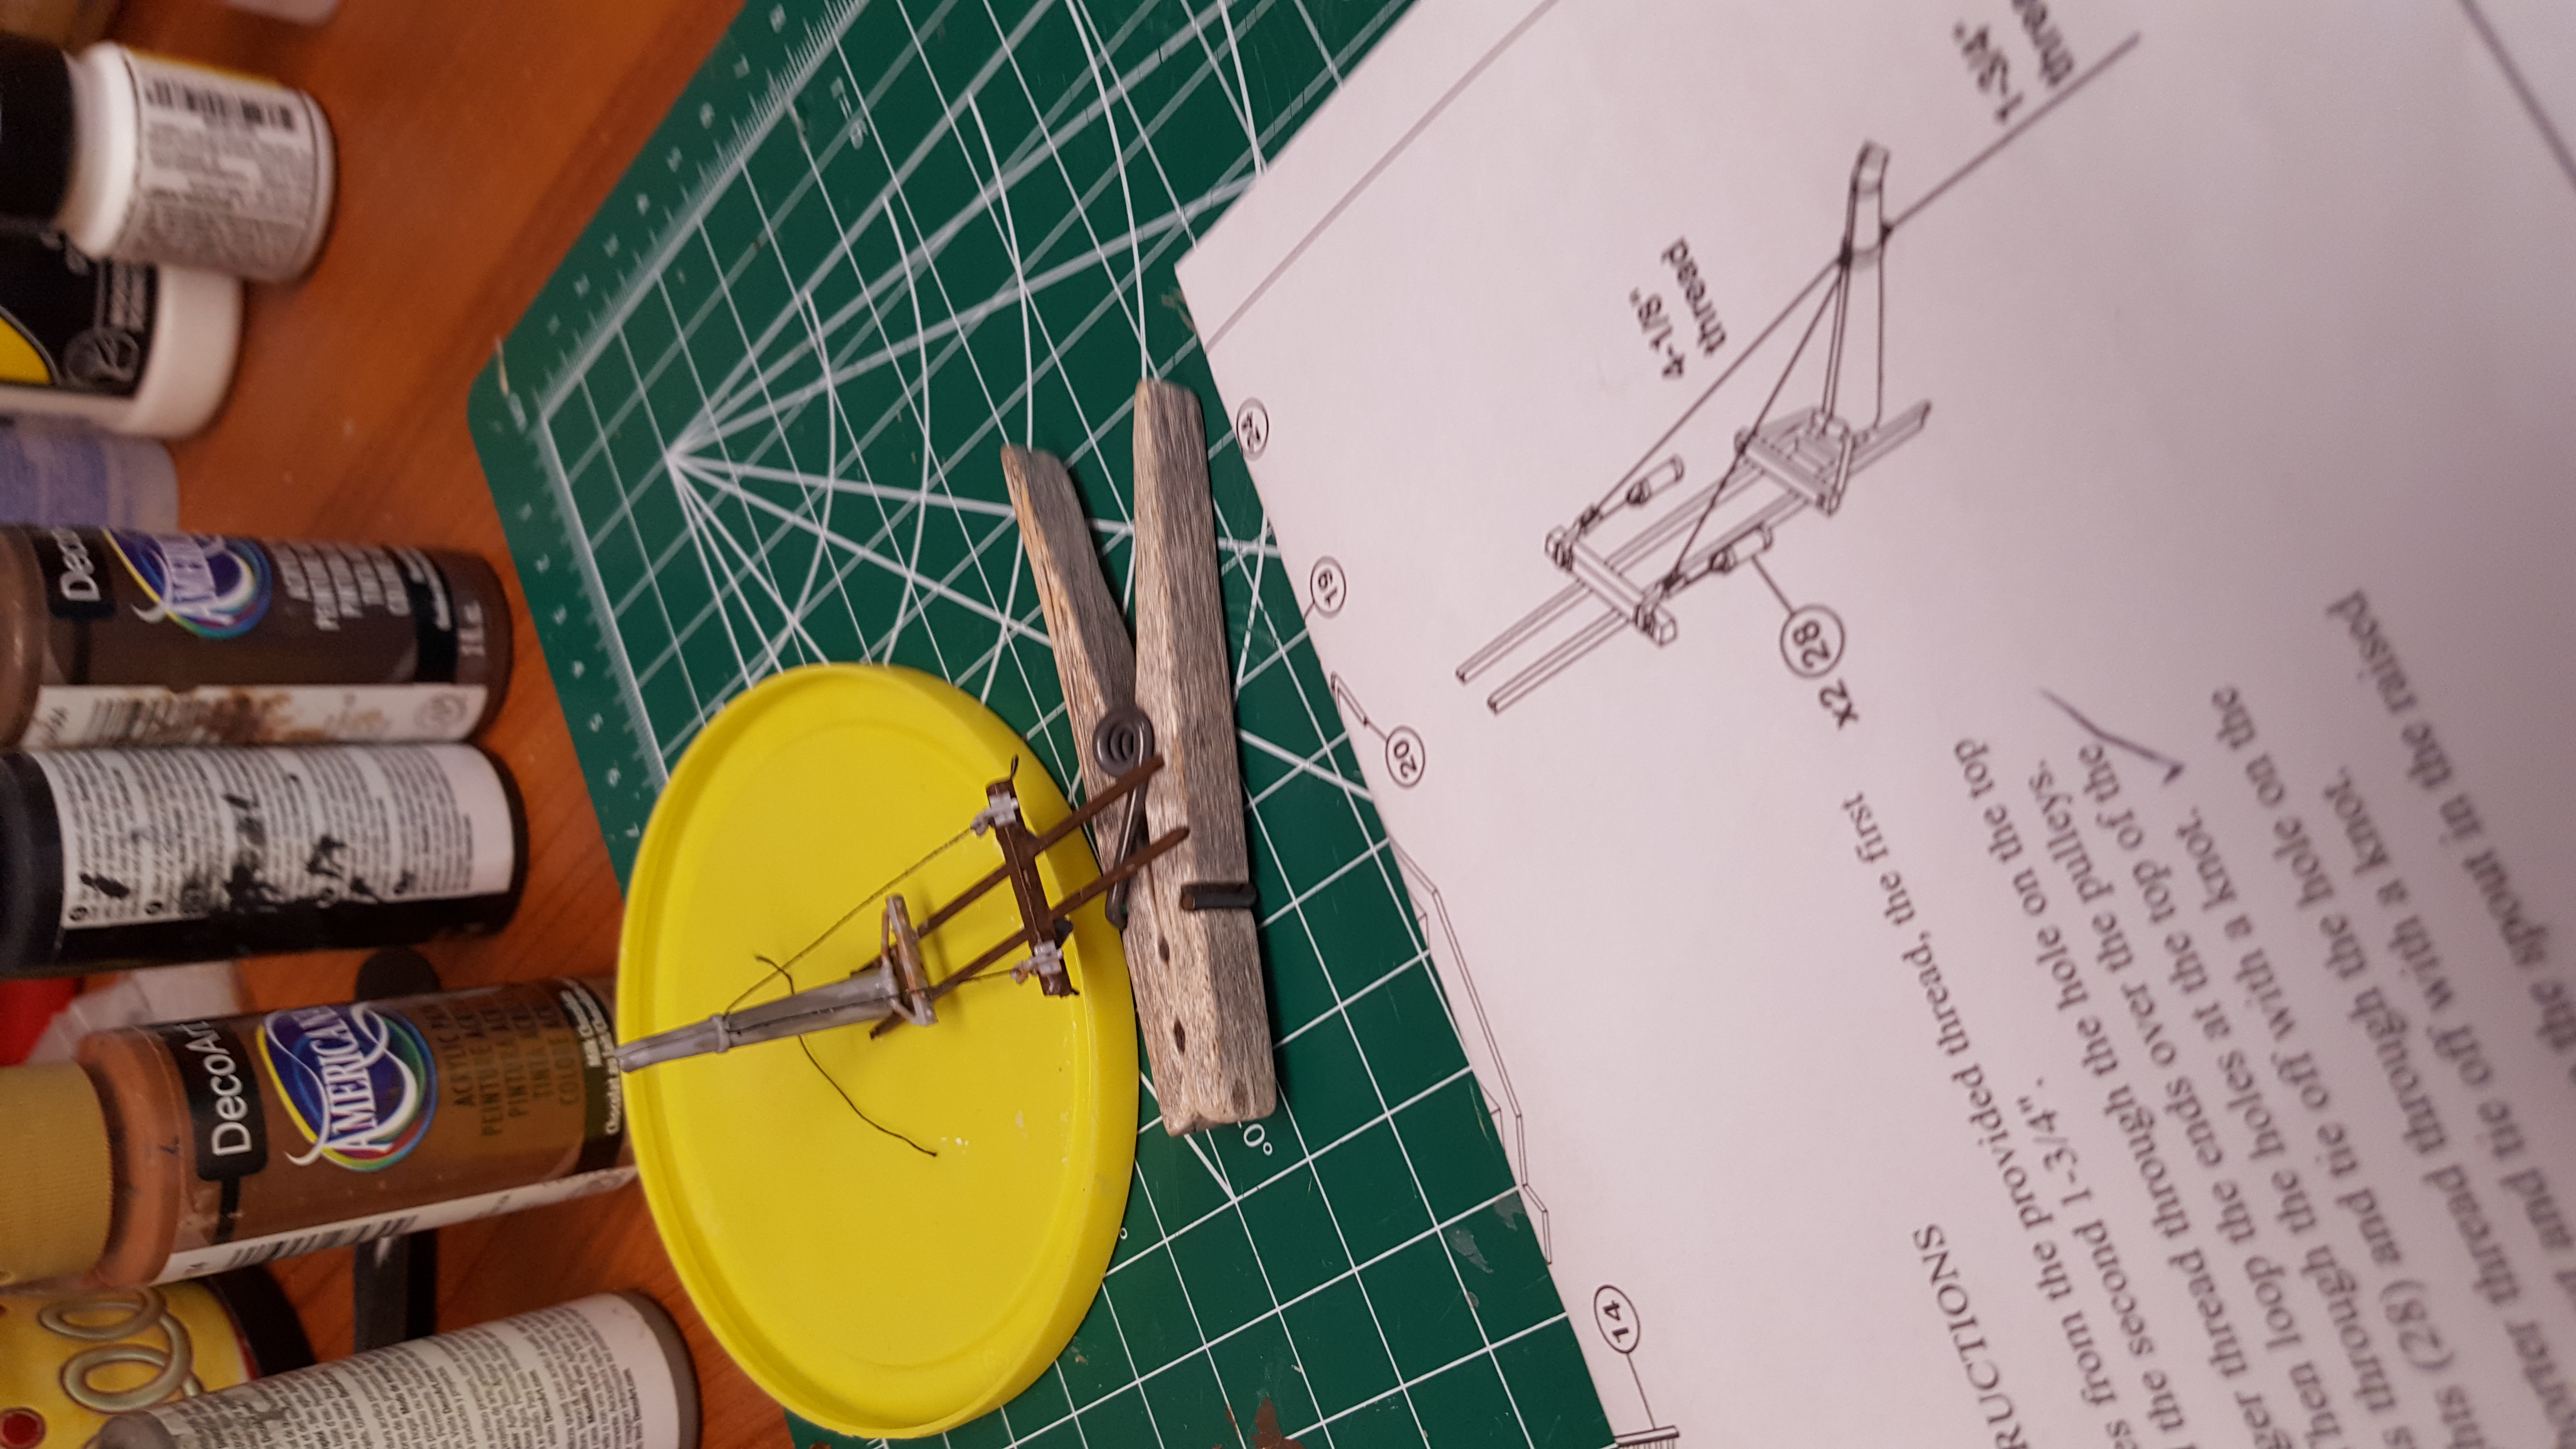
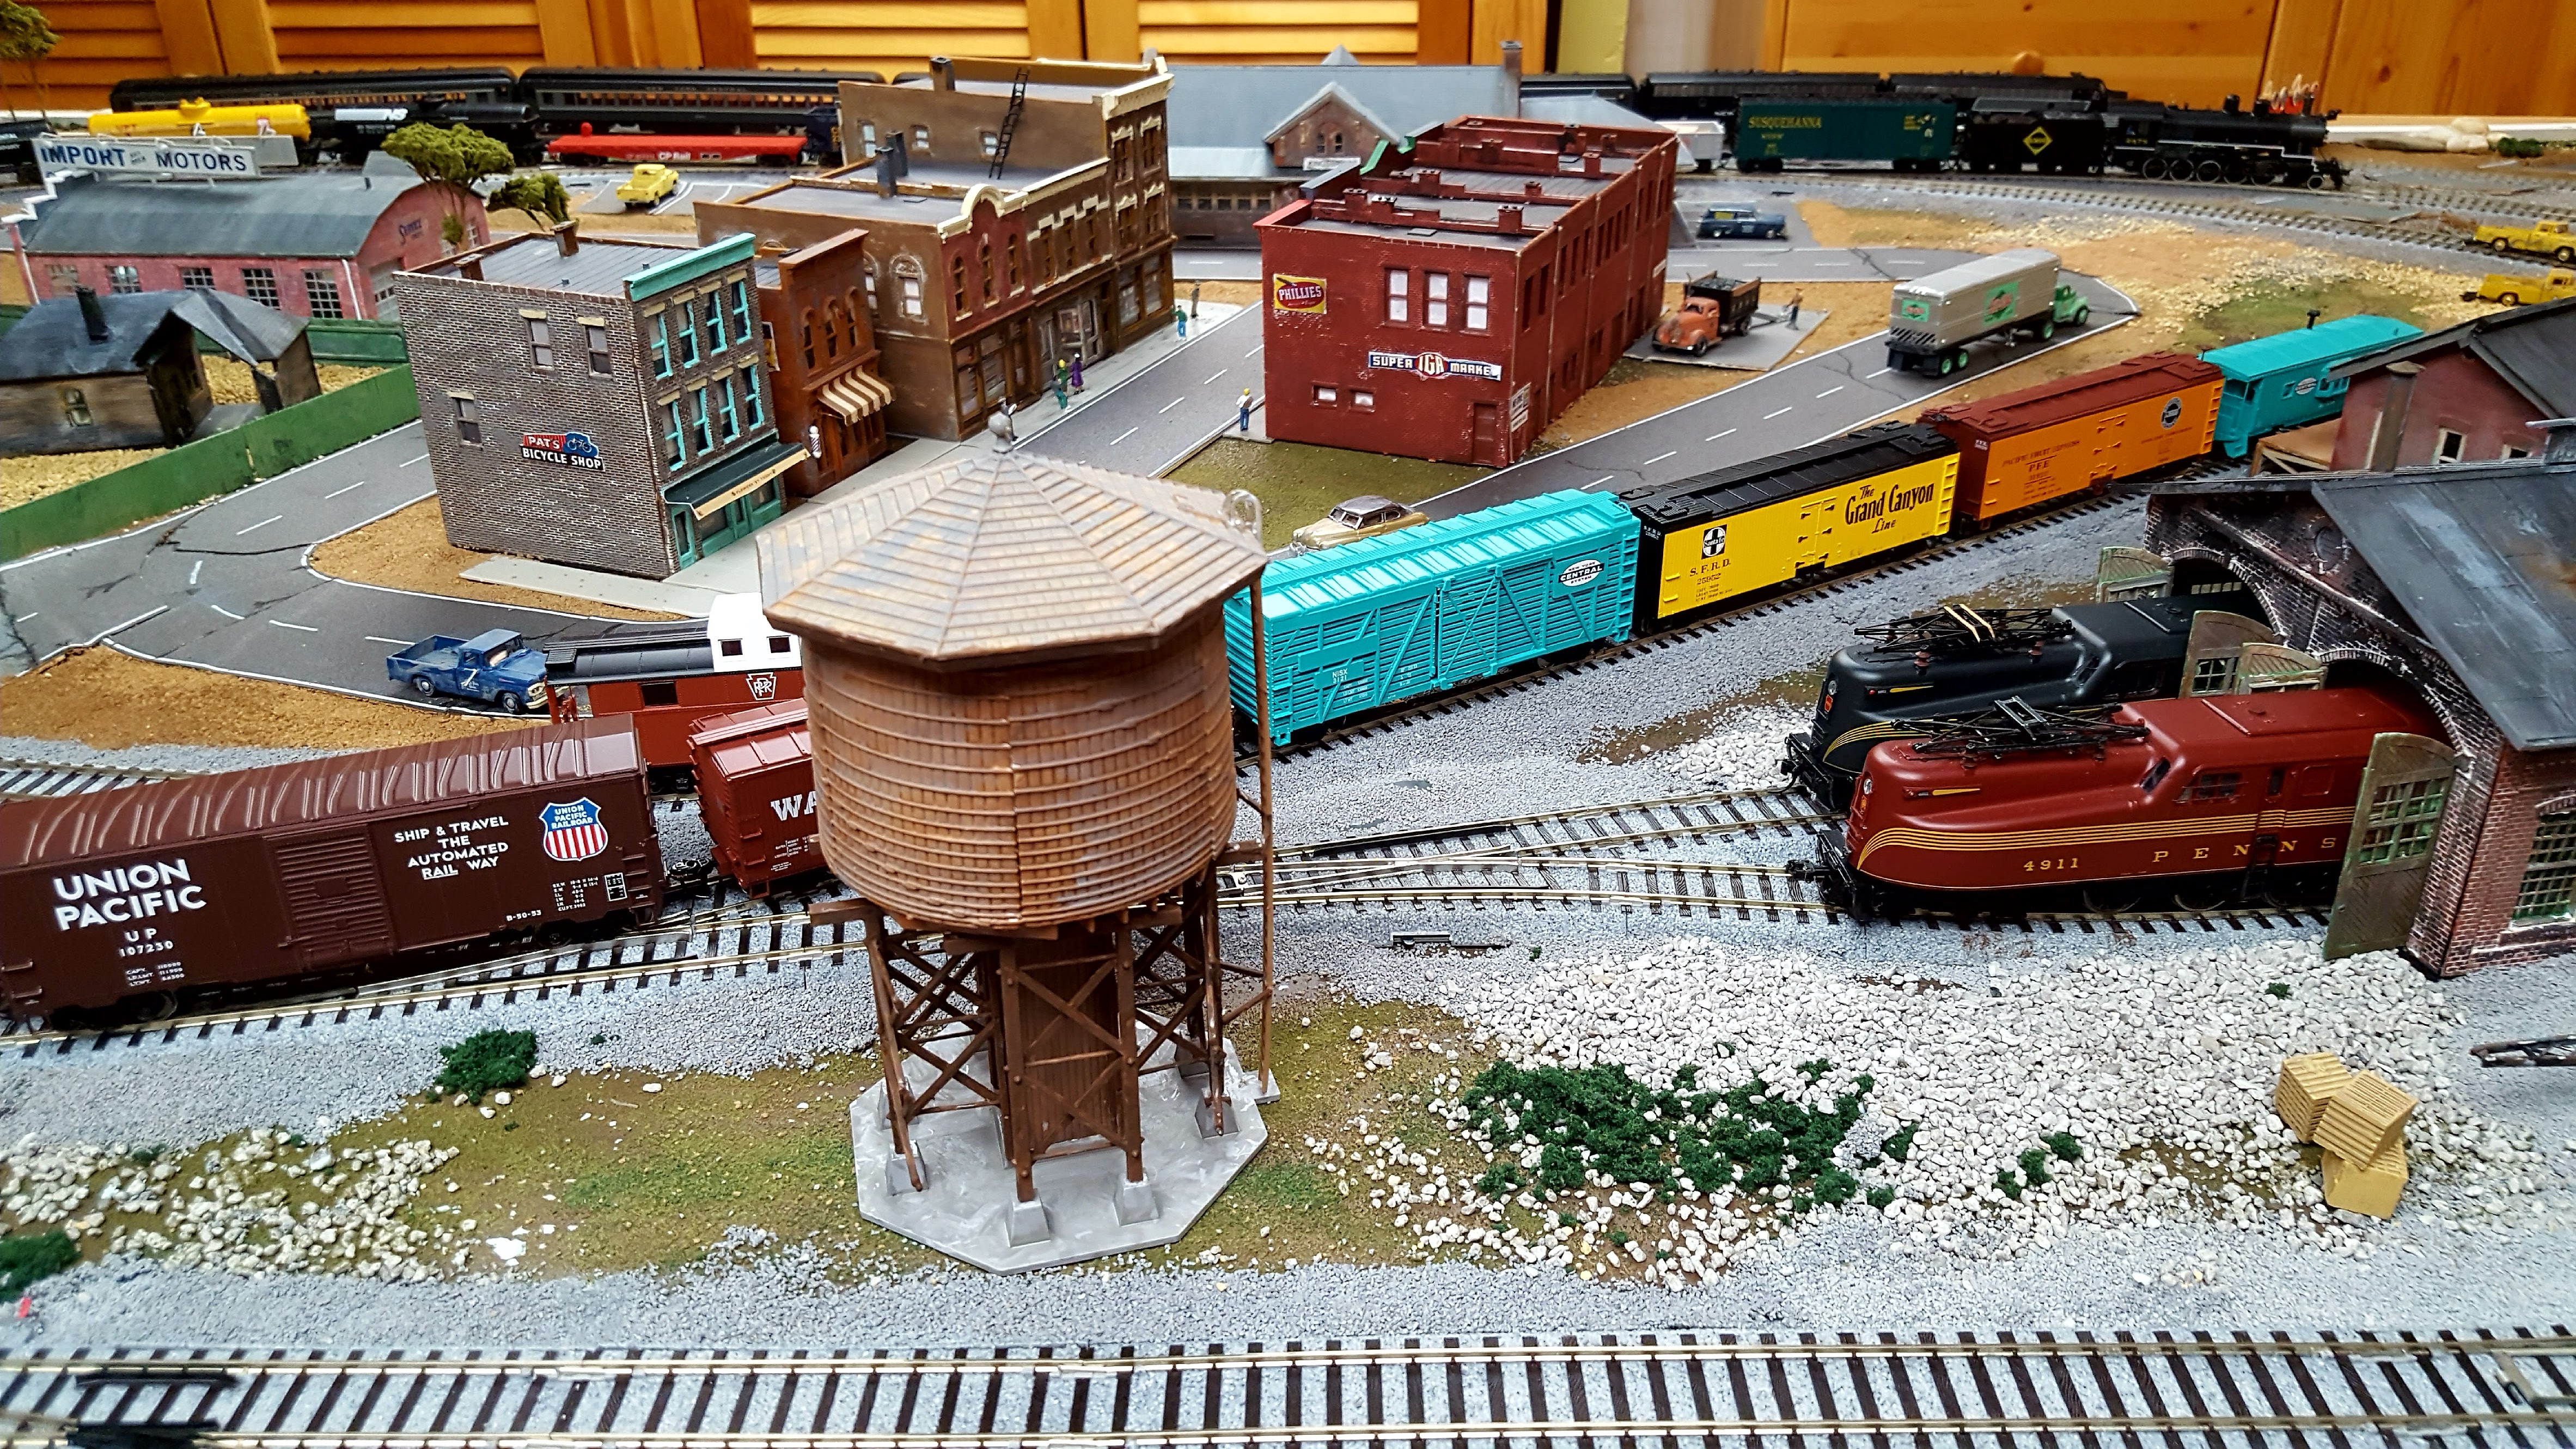
Sunrise Trail Division
Project: Cornerstone # 933 3531
Wood Water Tank
HO project overcame construction issues with frost box and bracing and Spout assembly.
Larry Cannon, MMR
For entertainment during the pandemic I decided to develop the last available piece of real estate
in my basement into a rendition of the Fairbanks Scale Company in St. Johnsbury, VT. Research
involved and fair amount of time and apparently, the management was not fond of photographers and a
chain link fence topped with barbed wire surrounded much of the complex at least 130 years ago.
The factory at its peak employed over 500 people and there were 1.1 miles of railroad tracks on the
property. The complex has been mostly demolished, the original landscape is hard to discern because
parts of the river through the complex have been relocated, and only two original buildings remain.
Sanborn maps are helpful, but they do not show the variation in topography that was present.
As a result of the lack of photos, the first photograph of the coal bunker I wanted to model for a
facsimile of the boiler house was taken from about 200+ yards away. At the the time of the photo
(1890 when the “new” chimney was built – tallest in the state at the time) the bunker was filled by
horse and wagon. The bin to fill the bunker is in the “up” position (most likely so the masons wouldn’t
use it for target practice with brick scraps).
The second picture taken during construction shows the bin is in the “down” position for loading from
either wagon or a truck. The picture gives little clue of how the bin was raised to the “up” position
other than apparently it was attached to an “arm” on each side. Hydraulic systems were not in vogue
that much in 1890. I found nothing to verify a manufacturer of the lift system. Research of
“vintage garbage trucks” yielded an image of two City of New Bedford (MA) rear bin trucks that used
a similar cable and pulley lift system.
The lift system in the third photo was “imagineered” from there using Tichy Group sheaves and pillow
blocks and in theory relies on a steam winch in the boiler house. The bunker cover is lifted by
the bin when it is raised and the dual stokers and the coal in the bunker are kept from freezing
with a steam heated coil on the bottom of the bunker. The boiler house contained at least two
boilers, and in colder months coal was consumed at a steady rate.
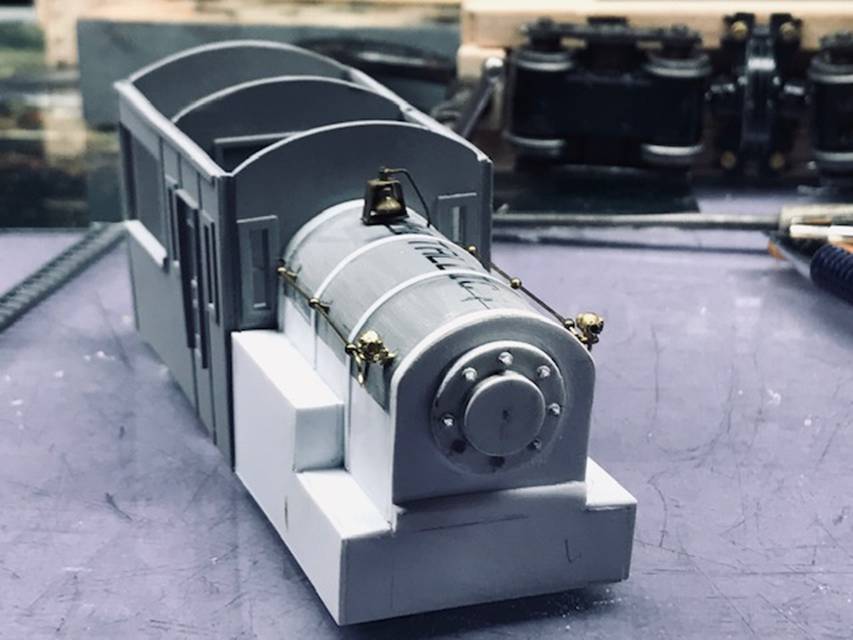
James DeMarco
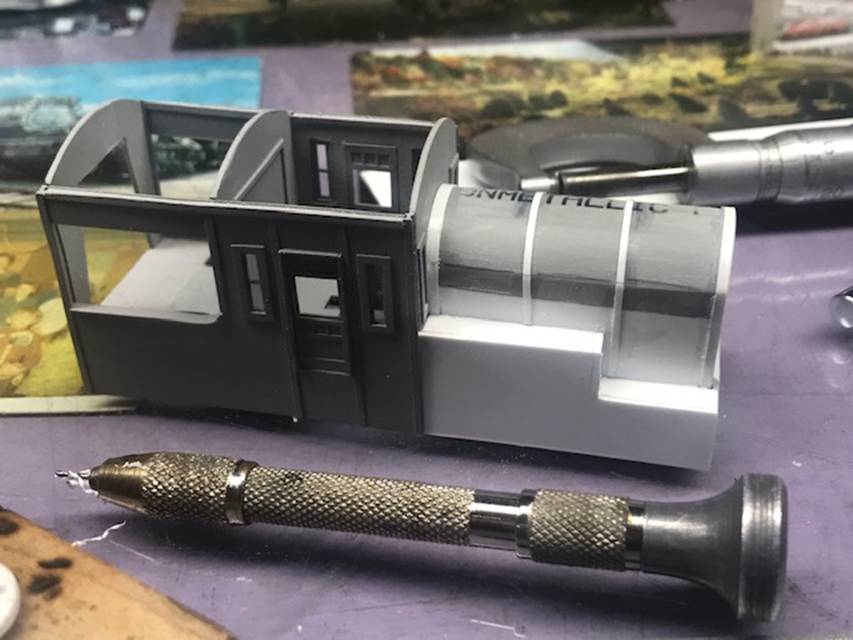
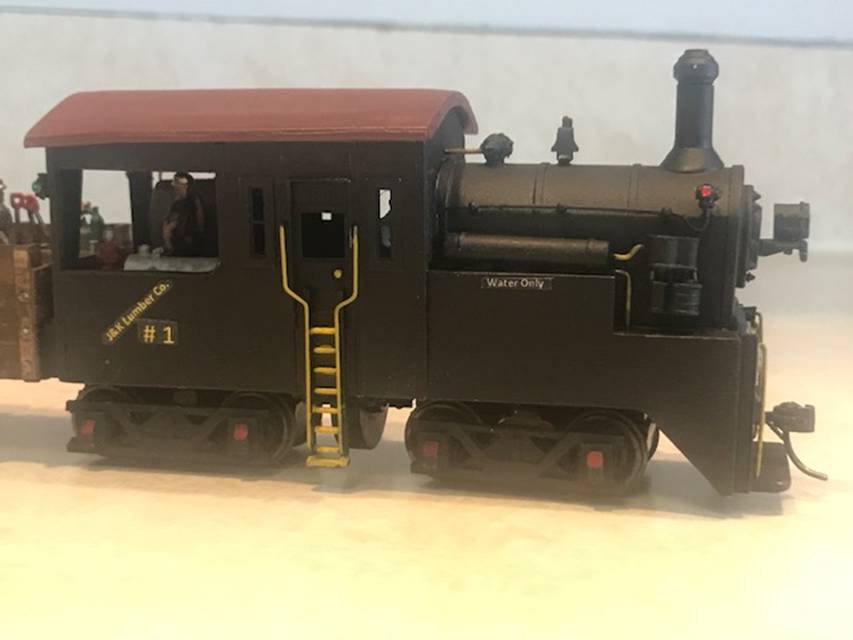
I was given the challenge to scratchbuild an engine that could run on my existing track.
After comparing traits of various types of engines, I decided to design and create a worker engine.
The style of this is similar to the Climax A. In my train layout world, the J&K Lumber Co. needed an
engine to move trees and lumber. In designing this I relied on ; The History of the Climax Locomotive,
information found in the Catskill Archive, and the internet-along with photos found in these areas.
My finished piece has a vertical engine, geared trucks to power all 8 wheels, and runs by diesel
fuel. It has 2 water tanks on the side of the boiler, and a power winch on the front of the engine.
Her measurements are 11' 6" W x 47" 6" L x 19' 6" T . She is used on the Buffalo & Rochester N.Y.C.R.
and was converted from wood to diesel in the late 1950's Along the line,she is affectionately
referred to as "The Noisy One"